Line Art to SVG: Get a Clean Trace Without Double Lines
Clean line art is the best image you can hand a vectorizer. Here's how to turn drawings and coloring pages into crisp SVGs, and dodge the double-line trap.
On this page
- Why line art traces so well
- The one trap: you get outlines, not pen strokes
- Prep your drawing before you convert
- How to convert line art to SVG, step by step
- AI coloring pages: line art you can sell
- What this looks like with PerfectVector
- What doesn't trace well
- Quick checklist before you convert
- FAQ
- Sources
If you're going to vectorize anything, line art is the image most likely to come out beautifully. Black strokes on a white background are exactly what a tracer wants: high contrast, flat color, clear edges. Upload a clean drawing to a converter and you'll usually get a crisp, scalable SVG on the first try. There's one catch worth knowing before you hit convert, though. A tracer redraws the outline of each stroke, both edges, rather than the stroke itself. For printing, coloring pages, and most Cricut projects that's completely fine. For pen plotters, engravers, and anything that follows a line with a physical tool, it means every stroke gets drawn twice. This guide covers the workflow, that trap, and what to do about both.
The quick version
- Line art is the best-case input for any vectorizer: flat, high-contrast, and clean. Expect a much better result than a photo or a shaded painting.
- Prep beats settings. A dark, even scan with solid ink converts better than any slider can fix afterward.
- Know the trap: tracing gives you filled outlines of your strokes, not single centerlines. It matters for plotting and engraving, and it's why some cut files cut every line twice.
- AI coloring pages are line art too, and vectorizing them is how they become sellable, scalable files.
Why line art traces so well
A vectorizer's whole job is deciding where one shape ends and the next begins. Photos make that hard: soft edges, gradients, thousands of colors. Line art removes every hard part at once. The image is essentially two colors, the edges are real edges, and the shapes are exactly what the artist drew. That's why a drawing that took an hour to ink can convert in seconds while a photo never really converts at all.
This is worth knowing because so much of the standard vectorization advice is written for logos and full-color art. With line art you can skip most of the hand-wringing. Get the source clean, and the trace takes care of itself.
The one trap: you get outlines, not pen strokes
Here's the part almost nobody explains. When a tracer meets a black stroke, it doesn't produce a single line down the middle. It produces a thin filled shape: one path along the left edge of the stroke, one along the right, joined at the ends. Zoom into any traced drawing and you'll see it, every line is really a long, skinny outline.
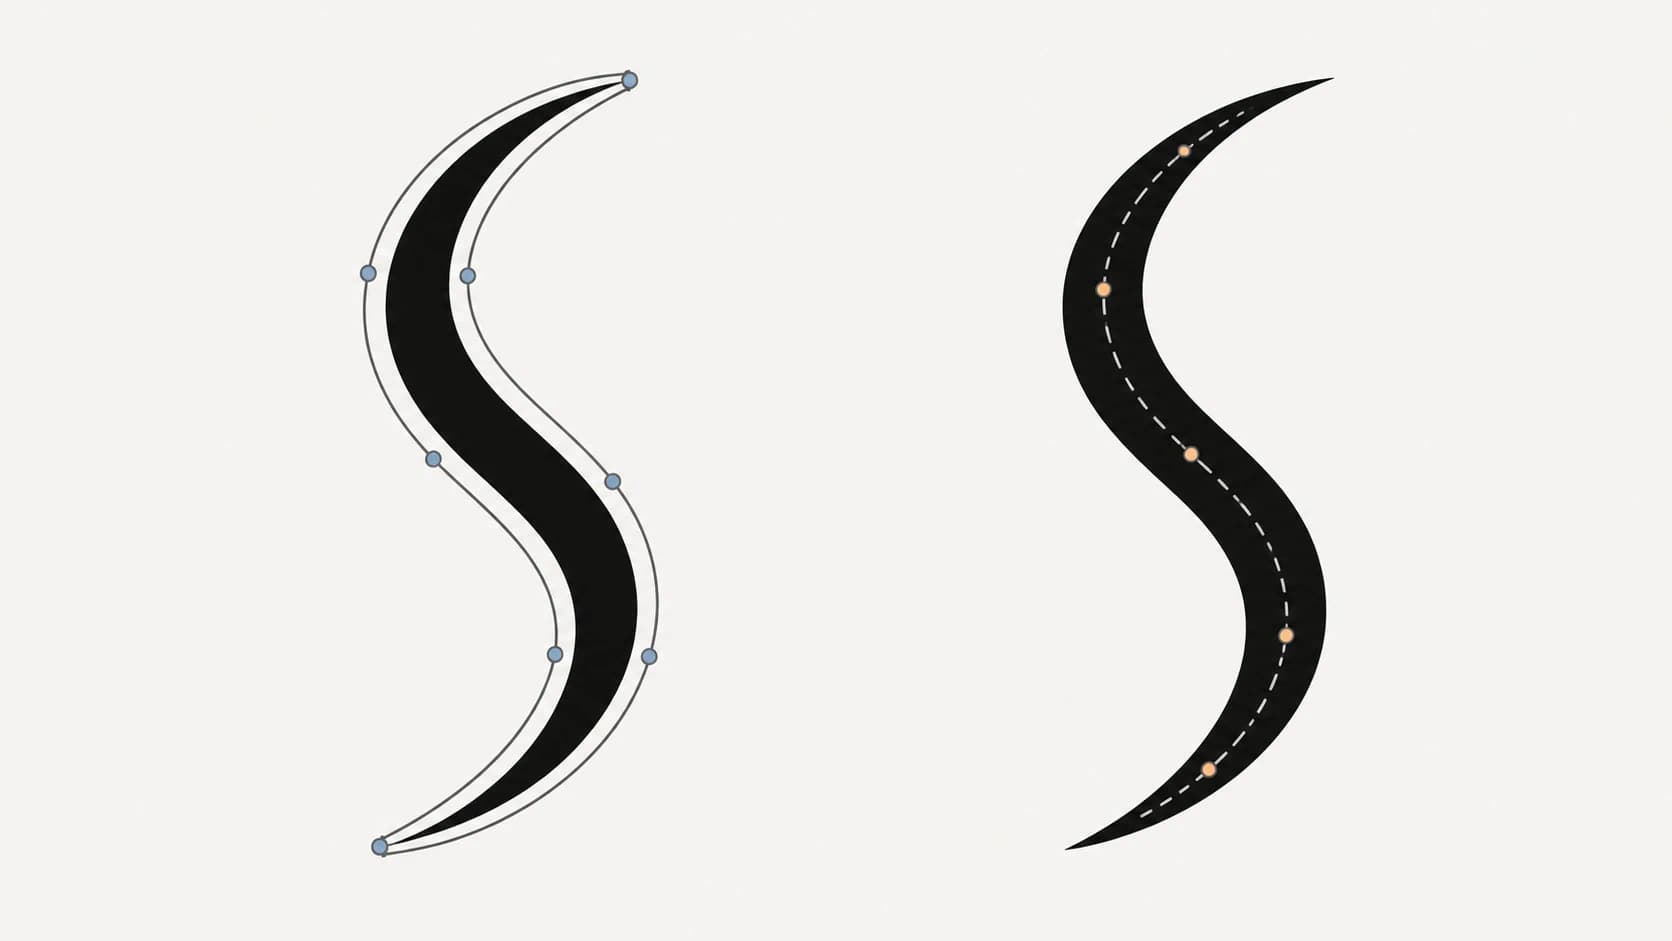
Whether that matters depends entirely on what the file is for:
- Printing, coloring pages, stickers, web graphics: it doesn't matter. Filled outlines look identical to strokes on screen and on paper. This is the majority case, and you can stop worrying here.
- Cricut and vinyl cutting: it usually doesn't matter, because you're cutting around shapes anyway. The exception is very thin lines, which become slivers of vinyl that are miserable to weed.
- Pen plotters, engraving, foiling, single-line fonts: it matters a lot. The machine follows every path, so an outlined stroke gets drawn twice, once per edge. What you want there is centerline tracing, which fits one path down the middle of each stroke. Inkscape's Trace Bitmap includes centerline tracing, making it a practical free option for that specific job.
For the full cleanup, endpoint, pen-lift, and test-plot process, follow the single-line SVG workflow for pen plotters.
For a Blender drawing workflow, use the Trace Image to Grease Pencil guide to choose native black-and-white tracing or prepared SVG import, then check the source object and generated drawing.
If you've ever converted a drawing and watched your machine draw or cut each line twice, this is why. It was never a broken file, just an outline trace doing exactly what outline traces do.
Prep your drawing before you convert
Every minute spent on the source saves ten on the output. Line art prep is quick:
- Capture it flat and bright. Scan if you can. If you photograph the page, use daylight, avoid shadows across the paper, and shoot straight down.
- Push the contrast. The goal is genuinely black lines on genuinely white paper. Any photo app's brightness and contrast controls get you there. Gray, soft pencil marks are the main reason line art traces come back speckled.
- Ink over pencil. Solid ink lines convert cleanly. Pencil texture reads as noise. If the drawing only exists in pencil, either ink it or expect to clean up stray specks afterward.
- Close your loops if the file will be cut. A cutter needs closed shapes. Gaps in outlines that look fine in print become open paths a blade can't follow.
- Export big if it's digital. Drawing in Procreate or a similar app? Export a high-resolution PNG with clean solid brushwork and the trace will reward you. If the drawing starts in ibisPaint, the ibisPaint vector-layer workflow explains why scalable native strokes and a portable SVG are separate deliverables.
If your scanner saves a TIFF master, use the TIFF scan-to-vector workflow to protect thin strokes while separating them from dust, paper texture, and bleed-through.
Three special cases of line art have their own guides: a child's drawing, where crayon texture and wobble-preservation change the rules; a handwritten signature, where the outline-vs-centerline decision matters most; and the hand-drawn map fidelity workflow, where geography, labels, symbols, and selective texture need different treatments.
How to convert line art to SVG, step by step
- Prep the image as above: high contrast, solid lines, as much resolution as you have.
- Run it through a vectorizer. For book artwork, upload the PNG or JPG to the coloring page to SVG converter. For other drawings, use the general image to vector converter.
- Remove the paper background. A white page can trace as a white shape. Use Remove Background in the editor, then switch the canvas to a color that makes any leftover white areas easy to spot.
- Inspect the result before you use it. Zoom in on curves and corners: are they smooth? Select a line: is it one clean shape, or a cloud of fragments? A clean line-art trace should be a small file with a modest node count, not thousands of anchor points doing the work of dozens.
- Fix what the source got wrong. Stray dust specks become tiny stray shapes; delete them. If lines look lumpy, go back and raise the source contrast rather than fighting the trace.
- Export and test in context. Open the SVG in your design tool, or upload it to Design Space if it's a cut file, and confirm it behaves before you build on it.
AI coloring pages: line art you can sell
The internet is suddenly full of AI-generated coloring pages, and the sellers doing well with them all hit the same realization: the raster image the AI hands you is not the product. It's a preview. Vectorizing it is what turns it into something worth listing, an SVG that prints razor-sharp at any page size, opens as editable paths, and doubles as a cut file.
The workflow is the same one above, with two additions. First, generate with the trace in mind: prompt for bold, closed, even-weight outlines and a plain white background, and skip shading entirely. Second, hold the quality bar of a file that's actually good enough to sell: buyers review the file, not the listing thumbnail, and Etsy requires disclosure when an item is created with AI. Vectorize your strongest pages, check them at full print size, and cull the ones with broken loops or wobbly weight. If cut files for makers are part of the plan, the SVG-for-Etsy-sellers workflow is built around exactly this.
For lesson artwork you have permission to adapt, reuse Sunday school illustrations across slides and activity sheets, while keeping lesson text editable.
What this looks like with PerfectVector
PerfectVector traces line art into smooth, editable shapes with a low node count. If the source includes white paper, remove that background shape in the editor and check the result on a colored canvas before downloading. The remaining curves are paths you can restyle instead of a jagged crowd of nodes. PerfectVector uses outline tracing, which suits printing, coloring pages, and shape cutting. For a plotter or engraver that needs a single path down each stroke, use Inkscape's centerline mode instead. You can convert a drawing free and inspect the paths yourself, no credit card required.

What doesn't trace well
Line art is the best case, but not every drawing qualifies:
- Pencil shading and texture. Grayscale doesn't survive a two-tone trace. It becomes speckle or drops out entirely. Ink the drawing, or keep it raster.
- Crosshatching and stippling. Hundreds of tiny marks become hundreds of tiny shapes. The file balloons, and cutting it is out of the question. Fine for print if you accept the file size, wrong for everything else.
- Heavily tapered brush strokes. They trace fine as outlines, but they're the worst case for centerline tracing, which expects roughly even stroke width.
- Very thin, very dense linework. Printable, yes. Weedable or engravable, usually not. Thicken the lines in the source if the file has a physical destination.
When a drawing sits in one of these buckets, the honest fix is upstream: simplify the artwork, thicken the lines, or accept that this particular piece stays raster.
Quick checklist before you convert
- Lines are solid black, background is genuinely white
- No shadows across the photographed page
- Loops are closed if the file will be cut
- Line weight is thick enough for the physical output (weeding, engraving)
- After tracing: smooth curves, sane node count, no stray specks, and the paper background removed
FAQ
Can I convert a hand-drawn sketch to SVG? Yes. Scan or photograph it flat and bright, push the contrast until the lines are solid black on white, then run it through a vectorizer. Remove the white paper background in the editor before downloading. Inked drawings convert cleanly; pencil sketches need the contrast push first and some speck cleanup after.
Why does my machine draw or cut every line twice? Because a standard trace outlines both edges of each stroke, and your machine follows every path it finds. That's an outline trace working as designed, not a corrupted file. For plotting or engraving, use centerline tracing instead, which fits one path down the middle of each stroke.
What is centerline tracing, and when do I need it? It's tracing that produces a single path along the middle of each stroke instead of a filled outline. You need it when a physical tool follows the line itself: pen plotters, engravers, foil quills, single-line fonts. For printing and shape cutting, a normal outline trace is the right result.
Are AI-generated coloring pages good candidates for SVG? They're close to ideal, as long as you generate with bold, even, closed outlines and no shading. Vectorizing turns the raster preview into a sharp, scalable file you can sell for printing or cutting. Check line weight and closed loops at full size before listing it.
Does line art make a good Cricut file? Generally yes, since cutters cut around shapes and line art is nothing but clean shapes. Watch the line weight: very thin strokes become fragile vinyl slivers that are hard to weed. Thicken lines in the source before converting if the design will be cut small.
Why does my pencil sketch trace so badly? Pencil is gray and textured, and a trace has to force every pixel to black or white. The soft texture lands on both sides of that line, so you get speckle, broken strokes, or missing detail. Ink over the sketch or boost contrast hard before converting.
Sources
- Inkscape: Tracing tutorial — Explains standard bitmap tracing and centerline tracing.
- Cricut: Upload images into Design Space — Documents SVG uploads and how layered vector files enter the cutting workflow.
- Cricut: Unsupported image-upload items — Explains how flat vector colors become Design Space layers and why raster effects require a raster workflow.
- Etsy: Creativity Standards — Sets Etsy's rules for seller-designed items made with AI and disclosure.
Got a drawing, a doodle, or a folder of coloring pages waiting to be real files? Vectorize one free and zoom into the paths. Clean line art deserves a trace that keeps it clean.
More from the blog
Vectorize Hand Lettering Without Losing Its Shape
Turn hand lettering into a clean SVG while keeping open counters, expressive terminals, intentional texture, and curves that remain easy to edit.
Convert PNG Icons to SVG for a Consistent UI Kit
Turn a folder of PNG icons into a coherent SVG set. Learn how to standardize artboards, optical size, colors, paths, and delivery checks across a UI kit.