Turn a Drawing Into a Single-Line SVG for Plotters
Convert a scanned drawing into centerline SVG paths a pen plotter follows once, without the doubled edges produced by ordinary outline tracing.
On this page
- Why an ordinary SVG trace draws every line twice
- What a single-line SVG actually contains
- Choose a drawing that can survive centerline tracing
- 1. Capture and prepare the source
- 2. Use centerline tracing in Inkscape
- 3. Inspect endpoints, branches, and accidental loops
- 4. Decide where the pen should lift
- 5. Set stroke appearance and document size
- 6. Preview and test before the final plot
- Where PerfectVector fits—and where it does not
- FAQ
- Sources
To turn a drawing into a single-line SVG for a pen plotter, use centerline tracing, not ordinary outline tracing. A normal vectorizer follows both edges of every ink stroke. A centerline tracer estimates one path through the middle, which is the route the pen should follow.
The result may contain several open paths and require several pen lifts. “Single-line” describes the geometry of each drawn stroke; it does not guarantee that the entire illustration is one unbroken <path>. Joining every segment into one object can add unwanted connecting lines, so optimize the travel only after the drawing itself is correct.
The short workflow
- Start with thin, even, high-contrast linework on a clean background.
- Scan or photograph it flat, then remove shadows and paper texture.
- Run a centerline trace in Inkscape or another centerline-capable tool.
- Set the result to a visible stroke with no fill and inspect every branch and endpoint.
- Delete specks, smooth obvious wobble, and join only lines that should touch.
- Set the SVG page size, preview the plot route, and run a small paper test.
Why an ordinary SVG trace draws every line twice
A marker stroke has visible width. An outline vectorizer treats that dark region as a shape, then draws a boundary around it. The resulting SVG often contains a long closed path: one side of the original mark, a turn around the end, and the other side back.
That file looks correct on screen because its filled shape resembles the ink. A pen plotter does not reproduce the fill as an area of color. It follows vector paths. The two boundaries therefore become two pen passes.
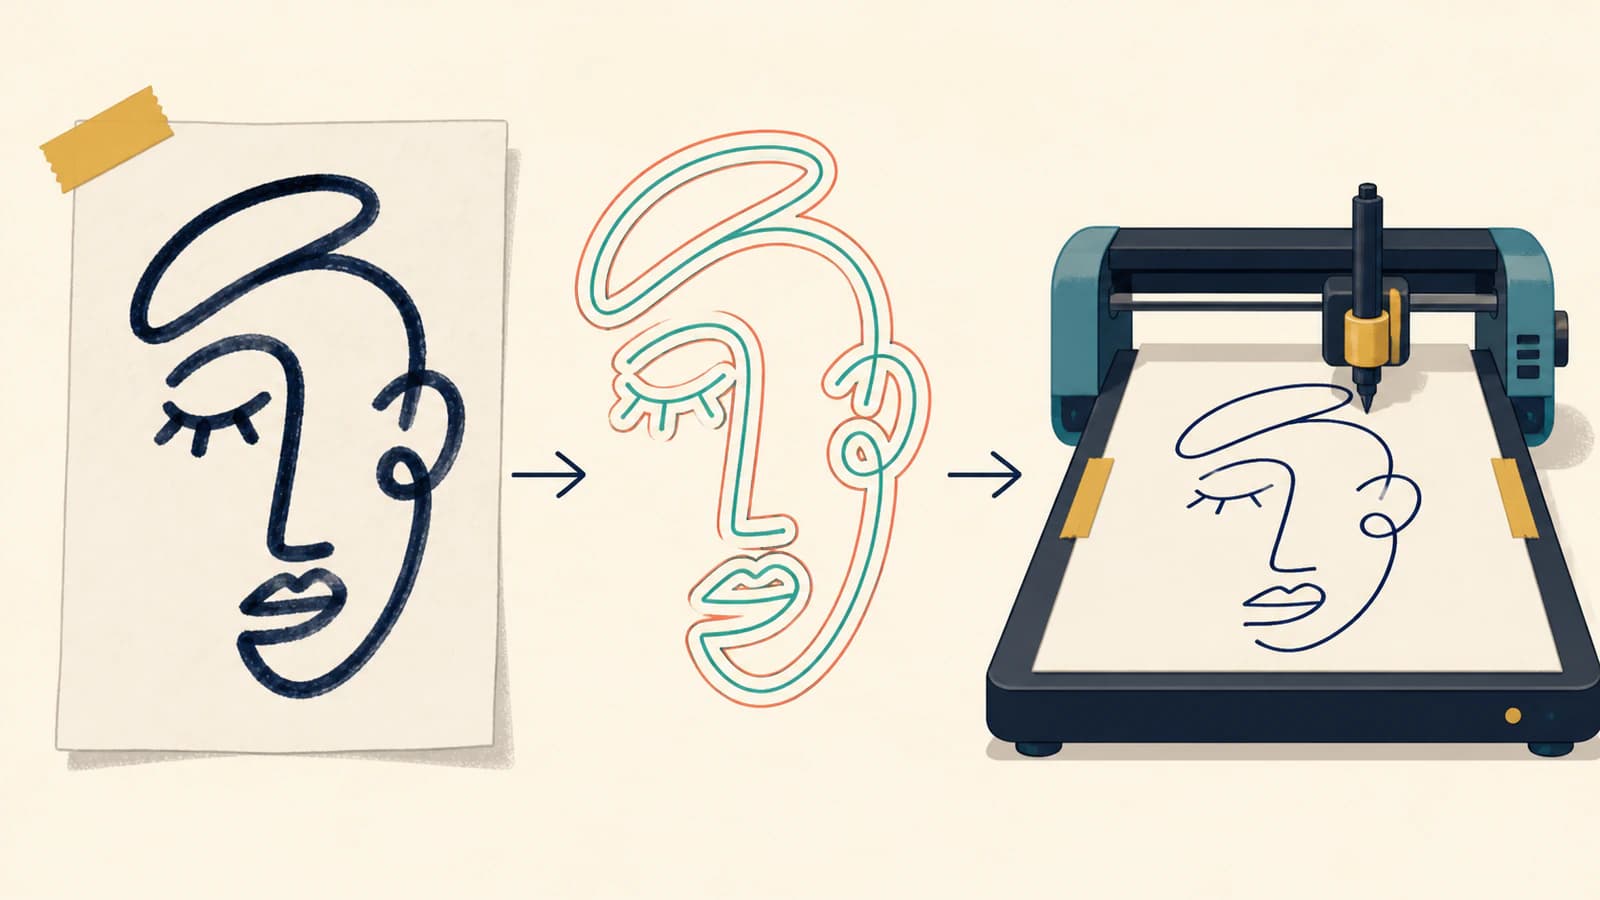
That doubled path is useful when the destination needs a filled shape, a printed silhouette, or a cut boundary. It is the wrong geometry when a pen, engraving tip, or foil tool should travel down the original stroke once. The issue is explained from the standard line-art side in why line art becomes outlines; here we will build the plotter-specific alternative.
What a single-line SVG actually contains
A plotter-ready line drawing usually has these properties:
- paths use a stroke and have no fill;
- each visible mark is represented by one center path, not a thin closed shape;
- intentional intersections meet cleanly without tiny gaps or duplicate segments;
- endpoints exist where the pen should stop or lift;
- page dimensions match the paper or intended plot area;
- paths stay inside the page bounds.
The SVG may contain ten paths or a thousand. Path count alone does not tell you whether it is single-line art. Zoom into one stroke and use the node tool. If you see one row of nodes through the middle, it is a centerline. If nodes run down both sides and connect around the ends, it is an outline. For animation drawings, the OpenToonz conversion mode guide applies this distinction to selected frames, native vector levels and later width edits.
For a browser draw-on effect, the SVG stroke animation guide compares an open route with a filled strip and its perimeter. Prepare the drawing route before adding timing; animation does not recover pen order from an outline.
The AxiDraw documentation makes the machine behavior especially clear: in its normal SVG plotting mode, paths are plotted as paths, while fill and stroke appearance are not used to paint an area. Your preview can look bold and solid yet still encode a route you did not intend.
Choose a drawing that can survive centerline tracing
Centerline tracing works best when the source gives the algorithm an obvious middle:
- dark ink on white or evenly colored paper;
- reasonably consistent stroke width;
- clear gaps between nearby marks;
- no shading, hatching clouds, or paper texture competing with the line;
- curves large enough to distinguish from scan noise.
Thin felt-tip pen, fineliner, or clean digital brushwork is easier than graphite. Pencil pressure produces a gray, textured stroke with an uncertain edge and center. A broad calligraphic brush has a center, but its changing width carries expressive information that one uniform plotter stroke cannot reproduce.
If varied width is essential to the artwork, you have three honest choices: keep an outline version and fill it with hatching, use multiple pen passes or different nibs, or preserve the image as a filled vector graphic rather than pretending one centerline will look the same.
1. Capture and prepare the source
Scan the drawing when possible. For a photograph, keep the camera parallel to the paper and light it from both sides so one edge does not fall into shadow. Crop the page, correct perspective, and rotate it before tracing.
Then prepare a simple black-and-white source:
- lift the paper toward white without erasing faint intentional marks;
- darken the drawing enough that each intended stroke stays continuous;
- remove isolated dust, eraser crumbs, and shadows;
- avoid sharpening until the line grows a bright halo;
- inspect intersections at high zoom.
Do not thicken the line merely to make it “more vector.” A thicker raster stroke creates a wider region whose center can become ambiguous at tight turns. Preserve the smallest clean width that remains continuous.
If the source is a child's drawing and the wobble is part of its character, use the capture advice in turning a child's drawing into SVG, but skip its ordinary outline-trace step. The preparation transfers; the tracing mode changes.
2. Use centerline tracing in Inkscape
Import the prepared image into Inkscape, select it, and open Path → Trace Bitmap. Choose Centerline tracing (autotrace) rather than Brightness cutoff or Edge detection. The Inkscape Beginners' Guide describes this mode as reducing a shape to an open path and recommends it for handwriting and other line drawings.
Preview the result and pay attention to difficult areas:
- close parallel strokes may collapse into one;
- a loop can gain a shortcut across its interior;
- an intersection may choose the wrong branch;
- a faint stroke can break into several pieces;
- dust can become a tiny isolated path.
Apply the trace, move the vector away from the raster, and compare them side by side. Set the traced object to no fill and a contrasting stroke so its route is visible. If nothing appears, the result may simply have no stroke styling yet; select it and assign one.
Menu names and available trace engines can change between versions, so use the current centerline option shown in your installed Inkscape rather than copying old extension instructions blindly.
3. Inspect endpoints, branches, and accidental loops
Switch to the node tool. Start at one endpoint and mentally follow the route. A good centerline should stay near the middle of the ink and make the same decisions a pen would make.
Correct the geometry in this order:
- Delete specks and short fragments. They cause needless pen taps.
- Reconnect broken strokes. Join endpoints only when the source line was continuous.
- Remove doubled segments. Two identical paths plot twice even if they overlap perfectly.
- Repair branch points. Decide which path continues and which ends at the junction.
- Smooth local wobble. Move or remove a few nodes; do not simplify the entire drawing blindly.
- Open accidental closed loops. A centerline loop is fine when the drawing contains one, but a thin capsule around a stroke means outline geometry survived.
Turn on outline or wireframe view if your editor offers it. Styling can hide duplicates, while a bare path view exposes them immediately.
4. Decide where the pen should lift
Fewer pen lifts can make a plot faster and reduce travel marks, but zero pen lifts is not automatically better. Separate eyes, dots, and disconnected ornaments must either remain separate or gain visible connector strokes.
Join paths when:
- their endpoints already meet in the drawing;
- the intended mark is continuous;
- joining does not change the route through an intersection.
Keep paths separate when:
- joining them would draw across blank paper;
- the pen must change color or nib;
- the elements overlap visually but are not one stroke;
- a deliberate lift prevents ink pooling at a junction.
Path-ordering software can reduce pen-up travel without altering the artwork. AxiDraw's current command-line reference describes reordering as an optimization that changes element order and, optionally, path direction to reduce pen-up travel. That is separate from centerline tracing. First build the correct marks, then reorder them.
5. Set stroke appearance and document size
The plotter follows geometry, not the decorative thickness you see in the editor. Use a modest on-screen stroke width that makes paths easy to inspect; changing that width usually does not change the physical nib.
Set the SVG page to the intended paper size and keep a safety margin around the drawing. Confirm the document units and dimensions rather than scaling by eye in the plot dialog. If the import changes size in another application, use the known-size SVG test before editing any nodes.
When several pen colors are involved, place them on clear layers or use a styling convention your plotter software can separate. Run one color at a time and preserve registration by keeping the page origin unchanged.
6. Preview and test before the final plot
Use your plotter software's preview or simulation to look for:
- unexpected doubled travel;
- long pen-down connectors across empty space;
- tiny fragments that cause dots;
- excessive pen lifts;
- paths outside the page;
- a route that begins in a wet, dense area and returns before the ink dries.
Test at the final physical size on inexpensive paper. A path that looks smooth at 400% zoom may reveal mechanical wobble, ink pooling, or gaps with the actual pen. Adjust speed, pen height, and pressure in the plotter setup rather than changing good SVG geometry to compensate for the machine.
Where PerfectVector fits—and where it does not
PerfectVector is an outline vectorizer. It is useful when your scanned drawing needs clean filled shapes for printing, cutting, coloring pages, or further editing. It does not convert a broad ink mark into the single center path a pen plotter needs.
One workable mixed workflow is to use PerfectVector to recover clean silhouettes or filled regions, then redraw the few true pen strokes with a centerline tool. For a drawing made entirely of strokes, go directly to Inkscape's centerline trace or trace the important curves manually. Manual drawing is often faster than repairing a poor automatic centerline on a small, expressive sketch.
FAQ
Why does my pen plotter draw every line twice? An ordinary vector trace follows both edges of each dark stroke, creating a thin closed shape. The plotter follows both boundary paths. Use centerline tracing and inspect the result as bare paths rather than relying on its filled preview.
Does single-line SVG mean the whole drawing is one path? No. It usually means each visible stroke is represented by one center path instead of two outlines. Disconnected details can remain separate paths and require pen lifts; forcing them into one path can create unwanted connector lines.
Can Inkscape convert a drawing to centerlines? Yes. In current Inkscape versions, Trace Bitmap includes a Centerline tracing mode intended for handwriting and line drawings. Results still need inspection because intersections, faint marks, and varied stroke widths can create wrong branches or gaps.
Should a single-line SVG have a fill? Normally no. Give the paths a visible stroke and set fill to none so you can inspect the route the pen will follow. The physical line width comes from the pen nib and plotter setup, not merely from the SVG's displayed stroke width.
Can PerfectVector create a single-line SVG for a pen plotter? Not directly. PerfectVector produces clean outline paths suited to filled graphics, printing, and shape cutting. For one path through the middle of each drawn stroke, use a centerline tracer or redraw the path manually.
Sources
- Inkscape Beginners' Guide — Tracing an image — Centerline tracing mode for handwriting and line drawings.
- AxiDraw Python API Reference — default plotting of SVG paths and treatment of fill and stroke appearance.
- AxiDraw CLI Reference — path order, direction, preview, and pen-up travel optimization.
- W3C — SVG Paths — open paths, subpaths, endpoints, and path geometry.
If part of the artwork needs clean filled vector shapes before you build the plotter paths, trace that raster artwork with PerfectVector and inspect the outlines. For the marks the pen must follow once, finish with centerline tracing and a real paper test.
More from the blog
Digitize a Sewing Pattern Without Losing Scale
Turn a scanned sewing pattern into editable vector lines, preserve its physical scale, rebuild notches and grainlines, and verify the result with a test print.
Dashed SVG Lines for Laser Cutting: Check the Paths
Diagnose dashed SVG lines that become solid in a laser preview. Compare stroke paint, separate centerlines, and outlined dashes before preparing your own file.