Digitize a Sewing Pattern Without Losing Scale
Turn a scanned sewing pattern into editable vector lines, preserve its physical scale, rebuild notches and grainlines, and verify the result with a test print.
On this page
- What should the vector pattern contain?
- 1. Protect the paper and choose a capture method
- 2. Assemble the scan without stretching it
- 3. Prepare a traceable raster
- 4. Trace the piece, then rebuild the pattern language
- 5. Calibrate the vector from a known measurement
- 6. Use PerfectVector as the tracing stage, not the pattern editor
- 7. Build a master file and prove it with a test print
- Common digitizing failures
- When to use specialist pattern software
- FAQ
- Sources
To convert a scanned sewing pattern to vector without losing scale, capture the paper with a known-size reference, trace the pattern pieces as editable paths, and calibrate the entire drawing before you clean up details. The vector trace preserves visible geometry; the reference measurement restores physical size.
That distinction is the heart of the workflow. A crisp SVG can still be the wrong size, and a one-inch test square cannot prove that a skewed photograph is accurate everywhere. Preserve the original paper, check more than one measurement, and treat notches, grainlines, seam lines, and labels as pattern information—not image noise.
The scale-safe workflow
- Flatten or support the paper without stretching it.
- Scan in overlapping sections or photograph it square-on with a ruler in the same plane.
- Deskew and assemble the raster without changing width and height independently.
- Trace the cutting and seam lines, then rebuild markings as simple vector objects.
- Calibrate the full vector from a known measurement.
- Verify a second width and length, then print a test page at actual size.
What should the vector pattern contain?
A sewing pattern is more than an outline. The result needs enough structure for a sewist to understand what to cut, align, fold, and assemble.
| Pattern information | Better vector treatment | Why |
|---|---|---|
| Cutting line | One clean closed path | Defines the edge of the piece |
| Seam line | Separate path or layer | Must not be confused with the cutting edge |
| Notches | Deliberate short marks or shapes | Tiny traced blobs are unreliable |
| Grainline and fold line | Redrawn straight lines with arrow or label | These communicate orientation |
| Drill holes, circles, and balance marks | Rebuilt geometric symbols | Easier to inspect and resize |
| Piece name, size, and cut quantity | Retyped text | Traced letters are hard to edit |
| Paper creases, stains, and scanner shadows | Omit | They are capture artifacts, not pattern data |
If your goal is only archival preservation, a high-quality raster or PDF may be enough. Vectorize when you need to edit curves, grade or annotate the piece, create a projector file, or build a cleaner printable master.
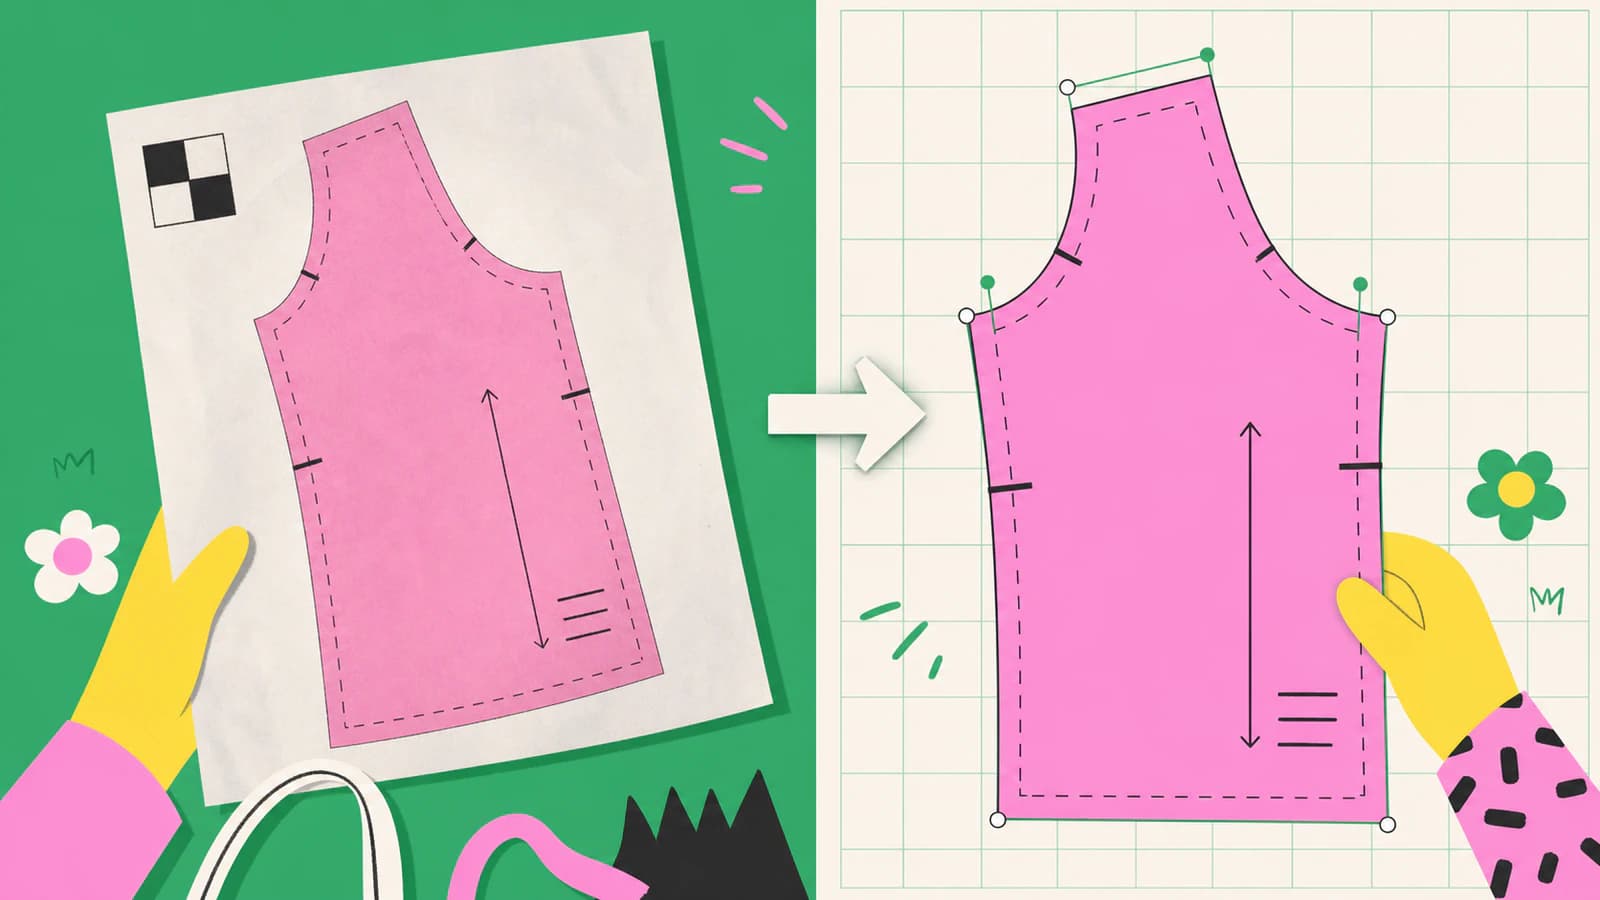
1. Protect the paper and choose a capture method
Do not cut an irreplaceable pattern merely to fit a scanner. For sturdy paper, a flatbed scan gives consistent focus and little perspective distortion. Capture large pieces in overlapping sections and include alignment marks or obvious shared features.
Fragile tissue needs gentler handling. If the scanner lid or repeated repositioning could damage it, photograph the piece from directly above. Keep the camera sensor parallel to the work surface, use even light, and place weights outside the cutting line. A ruler or calibration square must sit in the same plane as the paper; a ruler on a raised cutting mat or at the edge of a bowed sheet will not correct the pattern accurately.
The Projector Sewing digitizing tutorial recommends smoothing the pattern and using a visible ruler when photographing. It also treats digitizing as a manual, time-intensive job rather than a one-click conversion.
Preserve the untouched scans or photos as your archive master. Work on copies so every crop, contrast adjustment, and assembly choice can be reversed.
2. Assemble the scan without stretching it
For a tiled scan, overlap each section generously. Align the same printed line, corner, or registration mark in both tiles. If one scan is slightly rotated, rotate it; do not drag one side until the edges appear to match.
For a photograph:
- correct four-corner perspective before tracing;
- confirm the paper's horizontal and vertical references remain square;
- crop away the floor, cutting mat, weights, and shadows;
- compare two known lengths in different parts of the piece.
A single reference restores one global scale factor. It cannot repair local distortion caused by curled tissue, camera perspective, or a stitched panorama that drifted. If the top of a piece calibrates correctly but the bottom does not, recapture it or rebuild the affected area from measurements.
The older but practical Indietutes paper-pattern workflow uses alignment marks and a one-inch square, then checks the printed result against the original. The tools have changed; that verification habit remains useful.
3. Prepare a traceable raster
Make the pattern lines easy to distinguish without erasing information you still need. Convert uneven paper tone into a clean light background, increase line contrast carefully, and remove isolated dust. Keep a copy of the unedited capture beside the prepared version.
Avoid pushing a threshold until fine notches vanish or two nearby lines merge. Old patterns often use several line styles for sizes, fold lines, grainlines, and seam allowances. If those distinctions matter, separate them manually instead of asking one trace setting to understand their meaning.
For black-and-white pattern lines, a monochrome trace can provide a starting point. Inkscape's official Trace Bitmap tutorial describes tracing as a way to create paths from a raster image and notes that the result is not intended to reproduce the source exactly. That is a useful warning here: choose which lines should become geometry.
4. Trace the piece, then rebuild the pattern language
Start with the perimeter and any seam line you need. Follow the visible curve with enough nodes to preserve its shape, but do not reproduce every paper fiber or scanner wobble. Long smooth curves should remain easy to edit.
Automatic tracing works best when the source has dark, unbroken lines. Manual Pen or Bézier tracing is safer when:
- the line is faint or crosses handwritten notes;
- several nested sizes overlap;
- a notch controls assembly;
- a curve must meet another line precisely;
- a seam allowance needs a measured offset rather than a visual copy.
Once the main contours are sound, rebuild the secondary information:
- draw notches consistently and place them at their original positions;
- redraw grainlines and fold lines as straight vector strokes;
- recreate circles and drill marks as simple shapes;
- retype labels instead of outlining printed letters;
- keep cutting lines, seam lines, and annotations on separate layers when the editor supports them.
PatternLab's paper-pattern digitizing tutorial similarly treats the SVG as an editable intermediate and separates digitization from later seam-allowance and PDF preparation.
5. Calibrate the vector from a known measurement
After tracing, measure the vector version of the calibration square or ruler segment. Calculate:
scale factor = known real length / measured vector lengthIf the reference should be 100 mm but measures 96 mm, scale the entire pattern uniformly by 100 / 96, or about 1.0417. Do not fix only the reference square, and do not scale width and height by different amounts unless you have diagnosed and corrected a real directional distortion.
SVG has a coordinate system and a viewBox; its coordinates do not by themselves guarantee a physical sewing-pattern size in every application. The broader wrong-size SVG guide explains how to separate document-unit mapping from distorted geometry.
After the correction, verify:
- the same reference length again;
- one horizontal measurement elsewhere;
- one vertical measurement elsewhere;
- the distance between at least two important notches or balance points.
If those checks disagree, the problem is not the global scale factor. Return to capture, stitching, or the traced curve.
6. Use PerfectVector as the tracing stage, not the pattern editor
When the scan is clean, high contrast, and composed of visible graphic lines, PerfectVector can convert the image into editable vector paths. It can save time on the initial reconstruction, especially for clear outlines and printed symbols.
It does not understand garment construction. It will not know which nested line is your size, calculate seam allowance, preserve a grainline as semantic data, or certify the scale. Open the SVG in a vector editor and apply the calibration and pattern-marking workflow above.
For a TIFF scan, open the TIFF to SVG converter after using the preparation advice in how to preserve line detail when tracing TIFF. For a photographed or sketched line source, line art to SVG explains the boundary-versus-centerline choice.
7. Build a master file and prove it with a test print
Keep one editable vector master with named layers and a visible calibration square. Export a PDF or projector-ready file from that master rather than repeatedly editing exported copies.
Before you cut fabric:
- print a page containing the calibration square at actual size or 100%;
- disable “fit to page” or automatic scaling;
- measure the square with a physical ruler;
- tile and assemble enough pages to check one larger dimension;
- compare the test against the original paper where possible.
Printing a correct square proves that page's output scale. Checking a larger span catches tiling, page-overlap, or assembly drift. Keep the original measurements with the master so a future export can be verified again.
Common digitizing failures
| What you see | Likely cause | Fix |
|---|---|---|
| Test square is wrong by one constant factor | Import or print scaling | Apply one uniform correction; print at actual size |
| Width matches but length does not | Perspective or non-uniform stretch | Recapture or correct the distorted raster |
| Nested size lines merge | Threshold or trace setting was too aggressive | Trace sizes separately or redraw the required size |
| Notches become blobs | Automatic trace followed ink thickness | Rebuild them as consistent vector marks |
| Curves have hundreds of points | Paper texture or pixel edges were traced | Clean the raster and simplify selectively |
| Text cannot be edited | Letters were converted into shapes | Retype the labels in the master file |
When to use specialist pattern software
Use dedicated patternmaking software when you need rule-based grading, measured seam allowance, walkable seams, size nests, production markers, or an auditable apparel-development workflow. A general SVG editor is useful for preservation, cleanup, projector files, and simple adjustments, but it does not replace pattern engineering.
Likewise, do not sell or distribute a digitized commercial pattern unless you have the rights to do so. Digitization changes the file format, not the underlying ownership.
FAQ
Can I scan a sewing pattern and turn it into an SVG? Yes. Capture the pattern with a known-size reference, trace the visible lines into vector paths, then calibrate and verify the SVG. Rebuild notches, grainlines, and labels instead of treating them as trace noise.
What resolution should I use to scan a sewing pattern? Use enough resolution to distinguish the thinnest line and smallest mark you need. A clean, focused scan with a scale reference and no resampling is more useful than an oversized file full of paper texture.
How do I keep a digitized sewing pattern at the correct size? Include a known measurement in the capture, measure it after tracing, and scale the whole vector uniformly by the required ratio. Verify another horizontal and vertical distance, then test-print at actual size.
Should I auto-trace or manually trace a sewing pattern? Auto-trace is useful for clear, isolated outlines. Manual tracing is safer for overlapping sizes, faint lines, critical notches, and curves that must meet precisely. Most usable results combine both.
Does PerfectVector add seam allowances or grade pattern sizes? No. PerfectVector reconstructs suitable scanned artwork as vector paths. Add and verify seam allowances, grading, labels, and production details in a vector editor or specialist patternmaking application.
Sources
- Projector Sewing — Transform Paper Patterns into Digital Patterns — source handling, real units, tracing, and ruler-based photo calibration.
- PatternLab — Digitising Paper Sewing Patterns — editable SVG reconstruction and the later pattern-preparation stages.
- Inkscape — Tracing Bitmaps — official tracing behavior and the distinction between path generation and exact reproduction.
- Indietutes — How to PDF Your Handmade Pattern — alignment marks, a one-inch reference square, tiled capture, and print-size verification.
Have a clean scan ready? Convert it into editable vector paths, calibrate the SVG from a known measurement, and prove the export with a test print before cutting fabric.
More from the blog

How to Vectorize a Floor Plan Without Losing Scale
Turn a scanned floor plan into clean vector lines, calibrate it from one known measurement, and verify the scale before you use the SVG or DXF downstream.
Turn a Drawing Into a Single-Line SVG for Plotters
Convert a scanned drawing into centerline SVG paths a pen plotter follows once, without the doubled edges produced by ordinary outline tracing.