SVG Hatch Fill: Make Real Paths for Pen Plotters
Generate real open hatch paths from a closed SVG area. Reproduce hole, spacing, angle, and saved-file checks with an original Paper.js example.
On this page
To hatch fill an SVG for a pen plotter, generate open lines inside the intended closed area, split them at its boundaries, and export the remaining segments as geometry. Check the saved file for routes across holes and outside the shape before preparing the machine job.
A colored fill or a striped preview does not by itself provide those drawing routes. This tutorial builds an original five-sided emblem with a rectangular hole, uses Paper.js to intersect open lines with that area, and reopens the saved SVGs for inspection. The checks establish digital centerline geometry, not a successful physical plot.
1. Choose an area to fill, not a line to recover
You need a closed region whose holes are part of its geometry. A white rectangle placed above a solid shape may look like a hole but still leave the underlying region intact. GRBL-Plotter's hatch-fill documentation illustrates this distinction with overlapping objects versus an opening within one path. We did not run GRBL-Plotter here.
If you want to recover one stroke down the middle of a thick raster line, use the single-line SVG guide. Hatching creates multiple strokes across an area; it does not recover an original pen centerline.
Keep a copy of the filled artwork. The example deliberately produces hatch routes without adding an outline pass. If you want to draw the outer boundary or the hole boundary too, prepare those as separate, intentional routes.
2. Distinguish clipped appearance from trimmed paths
An SVG pattern paints a repeated tile. A clipping path restricts the rendered region without changing the underlying geometry. Both can make a useful screen image, but an application still needs a method for turning that appearance into pen routes.
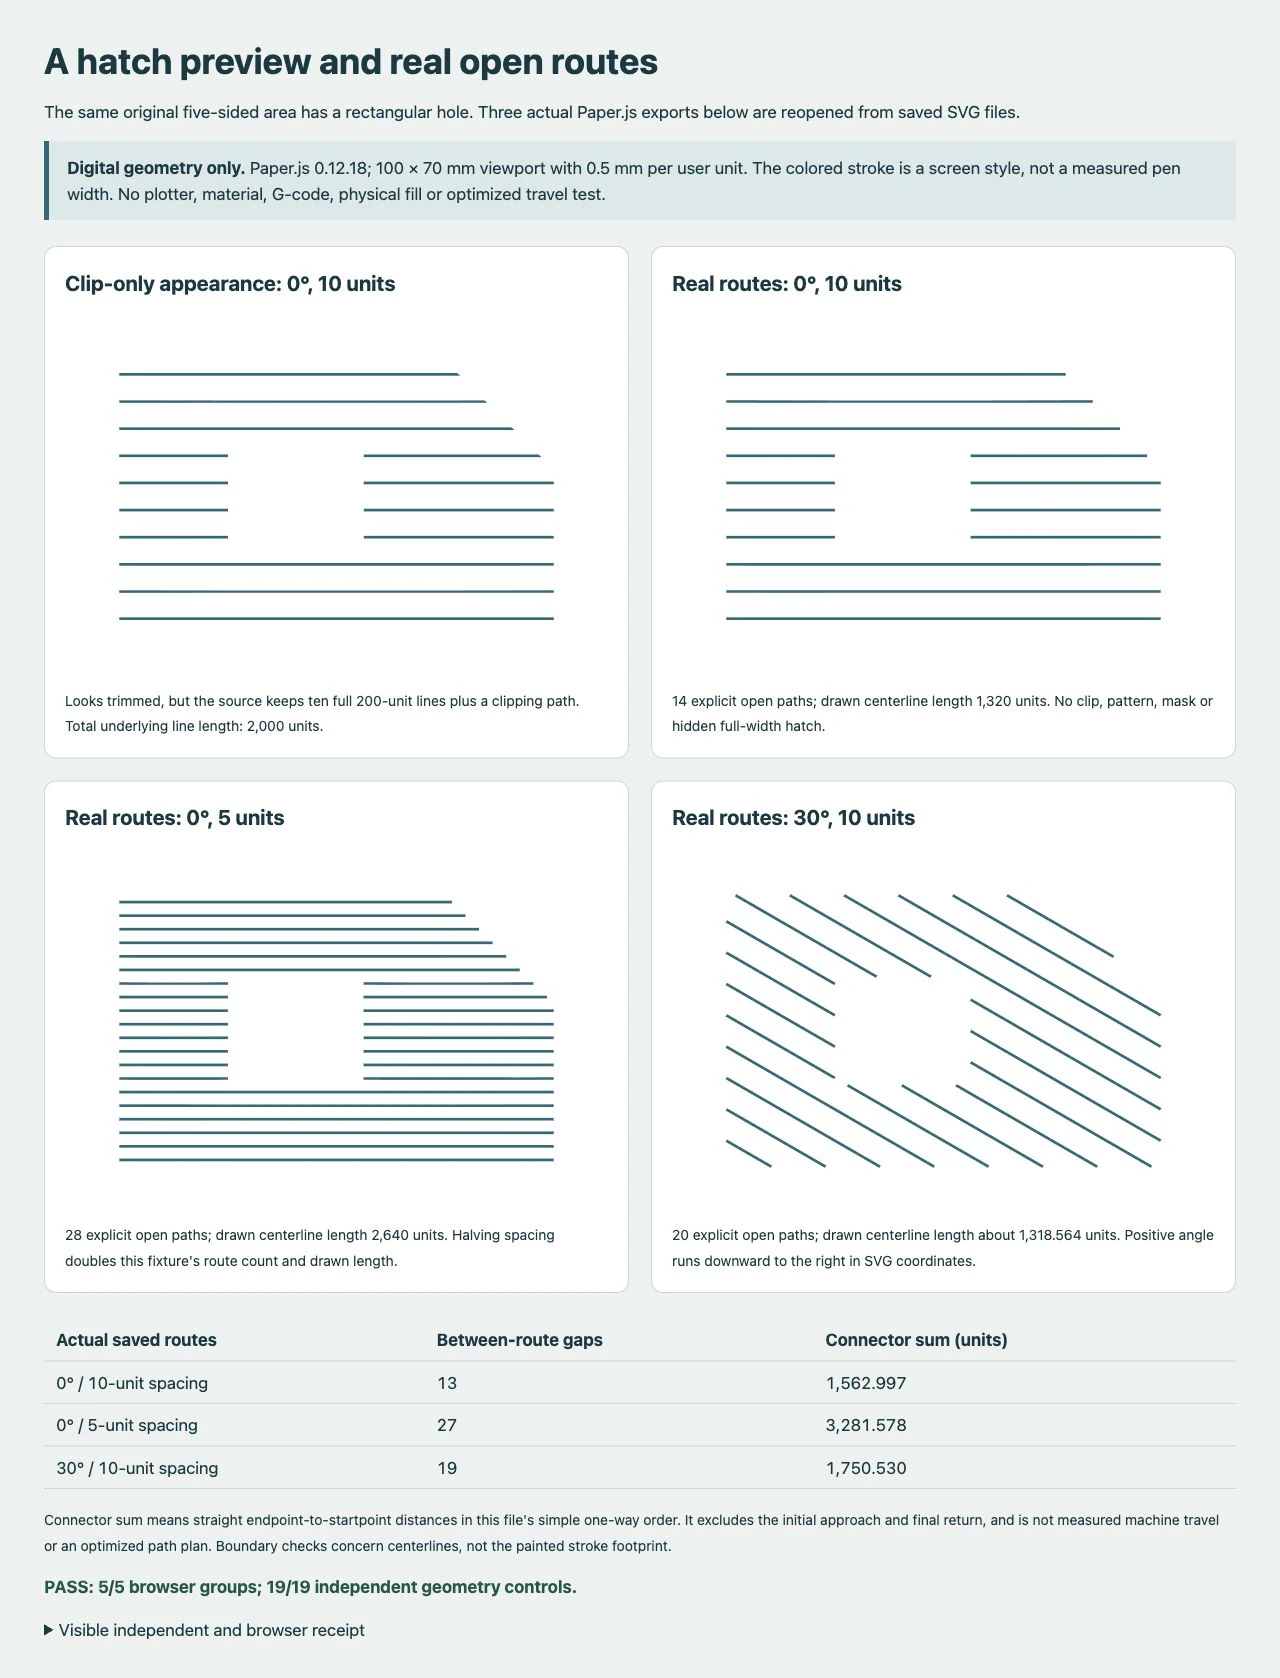
Our clip-only control stores ten horizontal lines, each 200 user units long. The clip hides their exterior portions and the rectangular opening. The stored line lengths still total 2,000 units.
The trimmed coarse export contains 14 separate open paths totaling 1,320 units. It has no clipping path, pattern, mask, embedded image, or reused symbol. Four hatch rows split into two paths around the hole. That difference is inspectable in the saved SVG, even when the clipped and trimmed previews look alike.
The SVG pattern-units guide covers repeating paint when that is the intended output. Here the required output is explicit open geometry.
3. Run the complete Paper.js example
Use a browser, a text editor, and the full Paper.js 0.12.18 build from the official release. Put paper-full.min.js in a library folder. Save this HTML as generate.html and the following JavaScript as hatch.js beside that folder. The original emblem is included in the code.
<!doctype html>
<html lang="en">
<meta charset="utf-8">
<title>Generate original hatch routes</title>
<canvas id="work" width="200" height="140" hidden></canvas>
<p id="status">Running</p>
<pre id="export-receipt"></pre>
<h2>0 degrees, 10-unit spacing</h2>
<img id="preview-coarse" width="400" alt="Coarse hatch">
<pre id="svg-coarse"></pre>
<h2>0 degrees, 5-unit spacing</h2>
<img id="preview-dense" width="400" alt="Dense hatch">
<pre id="svg-dense"></pre>
<h2>30 degrees, 10-unit spacing</h2>
<img id="preview-angled" width="400" alt="Angled hatch">
<pre id="svg-angled"></pre>
<script src="library/paper-full.min.js"></script>
<script src="hatch.js"></script>
</html>paper.setup(document.getElementById('work'));
// Original area: a five-sided boundary with a rectangular hole.
const areaData = 'M20 20 L140 20 L180 60 L180 120 L20 120 Z ' +
'M60 50 L60 90 L110 90 L110 50 Z';
const configurations = [
{ id: 'coarse', angle: 0, spacing: 10 },
{ id: 'dense', angle: 0, spacing: 5 },
{ id: 'angled', angle: 30, spacing: 10 }
];
function makeHatch(angle, spacing) {
const area = new paper.CompoundPath({
pathData: areaData,
fillRule: 'nonzero',
insert: false
});
const radians = angle * Math.PI / 180;
const direction = new paper.Point(Math.cos(radians), Math.sin(radians));
const normal = new paper.Point(-direction.y, direction.x);
const center = new paper.Point(100, 70);
const delivery = new paper.Group({ insert: false });
for (let offset = -200 + spacing / 2; offset < 200; offset += spacing) {
const origin = center.add(normal.multiply(offset));
const line = new paper.Path.Line({
from: origin.subtract(direction.multiply(300)),
to: origin.add(direction.multiply(300)),
insert: false
});
const kept = line.intersect(area, { trace: false, insert: false });
const parts = kept instanceof paper.CompoundPath ? [...kept.children] : [kept];
const routes = parts.filter(path => path.length > 1e-7);
for (const path of routes) {
if (path.closed || path.segments.length !== 2) {
throw new Error('Expected one open straight segment');
}
if (path.firstSegment.point.dot(direction) > path.lastSegment.point.dot(direction)) {
path.reverse();
}
}
routes.sort((a, b) => a.firstSegment.point.dot(direction) - b.firstSegment.point.dot(direction));
for (const path of routes) {
path.fillColor = null;
path.strokeColor = '#2f6977';
path.strokeWidth = 1;
path.strokeCap = 'butt';
delivery.addChild(path);
}
if (kept instanceof paper.CompoundPath || routes.length === 0) {
kept.remove();
}
line.remove();
}
area.remove();
const geometry = delivery.exportSVG({ asString: true, precision: 6 });
const svg = '<svg xmlns="http://www.w3.org/2000/svg" width="100mm" height="70mm" ' +
'viewBox="0 0 200 140">' + geometry + '</svg>';
const routeCount = delivery.children.length;
const drawnLength = delivery.children.reduce((sum, path) => sum + path.length, 0);
let transitionLength = 0;
for (let index = 1; index < routeCount; index += 1) {
transitionLength += delivery.children[index - 1].lastSegment.point
.getDistance(delivery.children[index].firstSegment.point);
}
delivery.remove();
return { svg, routeCount, drawnLength, transitionLength };
}
const receipt = { paper: paper.version, units: 'viewBox user units; 0.5 mm per unit', rows: [] };
for (const configuration of configurations) {
const result = makeHatch(configuration.angle, configuration.spacing);
document.getElementById('svg-' + configuration.id).textContent = result.svg;
const preview = document.getElementById('preview-' + configuration.id);
preview.src = URL.createObjectURL(new Blob([result.svg], { type: 'image/svg+xml' }));
receipt.rows.push({ ...configuration, route_count: result.routeCount,
drawn_length: result.drawnLength, transition_length: result.transitionLength });
}
document.getElementById('export-receipt').textContent = JSON.stringify(receipt, null, 2);
document.getElementById('status').textContent = 'Generated. Save each exact SVG shown below, then reopen those saved files for independent checks.';Open generate.html in the browser. We ran this with Paper.js 0.12.18 in Chromium 155. Each result displays both a preview and its exact SVG markup. Copy the three complete SVG strings into hatch-coarse.svg, hatch-dense.svg, and hatch-angled.svg, then open those saved files independently.
The critical call is line.intersect(area, { trace: false, insert: false }). Paper.js documents trace: false as splitting the first path at intersections and retaining its curves inside the second path's area. This keeps the open hatch segments. The default area-tracing mode answers a different Boolean question; the Paper.js filled-shape guide covers that workflow.
The function sets fillColor to null and gives each route a stroke. It also checks for two-point open results before exporting. The closed area remains a construction helper and is not included in the delivery group.
4. Check spacing, angle, and physical scale together
All three exports declare width="100mm", height="70mm", and viewBox="0 0 200 140". This maps one user unit to 0.5 mm in the SVG. A 10-unit hatch spacing therefore represents 5 mm; 5 units represents 2.5 mm.
These deliberately wide example spacings make the individual routes easy to inspect. They are not recommendations for solid ink coverage. The screen stroke is one user unit wide, but its appearance does not measure a real pen's mark on a material.
The offset loop fixes the hatch phase at half a spacing. Changing that phase can change which boundary features a line meets. At positive 30°, the direction runs downward to the right in this SVG coordinate system. Spacing is measured perpendicular to the parallel lines, rather than as their vertical separation on screen.
| Saved file | Angle | Spacing | Open routes | Drawn centerline length |
|---|---|---|---|---|
hatch-coarse.svg | 0° | 10 units / 5 mm | 14 | 1,320 units / 660 mm |
hatch-dense.svg | 0° | 5 units / 2.5 mm | 28 | 2,640 units / 1,320 mm |
hatch-angled.svg | 30° | 10 units / 5 mm | 20 | About 1,318.564 units / 659.282 mm |
We calculated expected line/polygon intersections independently, then compared the saved coordinates with a tolerance of 0.000002 user unit. Every exported route matched its expected endpoints. Each route was open, and no sampled centerline point crossed the hole or exterior beyond that tolerance. All three saved SVGs retained the declared physical-size mapping.
For another shape, check the actual exported routes rather than assuming this fixture's counts will carry over. Curves, very small gaps, self-intersections, transformed groups, and arbitrary imported SVG documents are outside this example's test scope.
5. Separate route gaps from an optimized travel plan
The coarse file has 14 open routes and 13 gaps between consecutive routes in its serialized order. Connecting those gaps with the pen down would add unwanted marks. Your plotting workflow must handle transitions as intended before drawing.
The script keeps a simple one-way order: it visits hatch offsets in sequence and follows each segment in the same direction. Summing straight distances from each route's end to the next route's start gives about 1,562.997 user units for the coarse file. The denser file has 27 gaps and a connector sum of about 3,281.578 units.
Those sums exclude the initial approach and final return. They are geometric consequences of this ordering, not measured machine travel, a time estimate, or an optimized plan. A plotting application may reverse or reorder routes. Halving the spacing doubled this fixture's drawn length and route count; it did not establish a universal doubling of job time.
Reopen the file in the application that will control your plotter, verify its size, and inspect its route preview and lift behavior. Test the pen, material, spacing, border clearance, and movement settings on your own setup. We did not execute a plotter job, generate machine code, or test Cricut Draw/Attach.
Recover from the common geometry failures
| Symptom | What to inspect and change |
|---|---|
| Hatching crosses the intended hole | Inspect the filled region. Replace a white overlay with an actual opening in the compound geometry before intersecting. |
| The preview is correct but full lines remain | Look for a clip or pattern dependency. Inspect the saved route coordinates rather than relying on the rendered silhouette. |
| Lines become closed shapes | Confirm that the first operand is an open line and that trace: false is present. The example rejects closed or multi-segment results. |
| Ink extends beyond a boundary | Distinguish the centerline from the stroke footprint. This example does not inset the area for a nib radius; prepare suitable clearance and test the actual tool. |
| Filling is sparse or the surface becomes too wet | Adjust using a controlled pen/material sample. The digital spacing alone does not establish coverage or drying behavior. |
| The file takes unexpected jumps | Inspect ordering and pen-up transitions in the destination software. Keep the original routes before applying an optimizer, then recheck holes and boundaries. |
If the source is only a flat raster silhouette, PerfectVector's clipart to SVG workflow can help recover closed artwork first. Inspect the outline and each opening, then generate hatch routes from the accepted geometry. Existing clean vector artwork can go directly to hatch preparation.
Vectorizing the silhouette and generating hatch routes are separate steps. This article's original emblem was authored as vector geometry; it is not a PerfectVector conversion sample.
FAQ
Does an SVG fill automatically become pen hatching? No. A fill describes painted appearance. A plotting workflow needs hatch routes or another supported way to create drawing strokes from that area.
Why does my hatch preview still contain lines through the hole? A clip can hide parts of full lines without trimming their stored geometry. Check the saved coordinates and make the hole part of the actual area before producing explicit routes.
What hatch spacing should I use? Choose it through a pen and material test at the intended scale. This digital example uses 5 mm and 2.5 mm spacing to make routes visible; it does not establish solid coverage or a universal pen setting.
Is this a single continuous path? No. The coarse result contains 14 separate open routes. Its hole splits four rows, and the drawing workflow must handle the gaps between routes without adding unwanted marks.
Sources
- Paper.js PathItem intersection — Documents the open-path splitting behavior of trace false.
- SVG patterns — Defines repeating paint separately from explicit route geometry.
- CSS masking and clipping paths — Explains why clipping changes rendering without trimming the underlying shape.
- GRBL-Plotter hatch fill — Shows the distinction between overlaid objects and a hole within one path.
- Paper.js 0.12.18 release — Identifies the library version used for the runnable example.
If a raster-only silhouette needs editable boundaries, prepare a clipart SVG candidate, inspect its holes, and generate and verify the hatch routes separately before testing the physical job.
More from the blog

SVG Score Lines vs Cut Lines: Read the Geometry
Read SVG fold geometry before assigning Score or Cut. Compare open paths, filled bands and dashed marks, then check the documented Cricut operation workflow.

Glass Etching Stencils: Choose What to Remove
Choose which glass-mask regions stay protected and which are exposed. Audit an emblem, counter islands and complementary layouts within supplier limits.