Glass Etching Stencils: Choose What to Remove
Choose which glass-mask regions stay protected and which are exposed. Audit an emblem, counter islands and complementary layouts within supplier limits.
On this page
- Label the removed region and the retained mask
- Audit an original emblem before preparing a mask
- Follow the counter as the regions change
- Plan islands for the actual stencil construction
- Keep the supplier restriction beside the chosen layout
- Recover contours only when the source needs them
- Finish the artwork decision with an explicit region map
- FAQ
- Sources
Choose the region you intend to expose before deciding which stencil pieces to remove. If the motif should be exposed, retain the surrounding mask and any protected counters. If the surrounding field should be exposed, the retained pieces describe a different mask. Write those regions explicitly rather than relying only on “positive” or “negative.”
The product and process must allow that choice. In its Peel ’N’ Etch guidance, Etchworld restricts negative artwork to sandblasting. Do not treat the two digital complements below as two approved options for every etching cream or stencil product. Confirm the actual artwork/process combination with the supplier.
This article tests the artwork decision: which regions the digital mask retains and which it leaves open. It does not demonstrate a chemical procedure, transferred stencil or finished etched glass.
Label the removed region and the retained mask
Polarity here means the relationship between the motif and its surrounding field: which region is open and which remains protected. A dark motif in an SVG preview is not a complete removal instruction. Its fill color does not tell the next person whether to retain that material or remove it.
Use a work note that names both sides of the decision:
| Digital layout | Region intended to be exposed | Material intended to remain |
|---|---|---|
| A: remove the motif | The filled emblem and its detached accent | Surrounding field and the emblem's counter island |
| B: retain the motif | The surrounding field and the emblem's counter | The filled emblem and its detached accent |
These are our diagram labels, not a redefinition of a supplier's positive/negative categories. A geometry map can describe either complement even when a particular product or process permits only one.
Cricut's Smart Stencil / Stencil Film instructions describe removing the cut regions intended to receive the applied medium. That is a material-specific instruction for its stencil workflow, not proof that every SVG fill should be removed or that every masking product supports the same process.
Audit an original emblem before preparing a mask
You need an editable emblem, its meaningful internal openings and a defined working field. Keep the artwork master and prepare a separate, labeled mask plan. The actual product's supported process and transfer requirements are prerequisites for production.
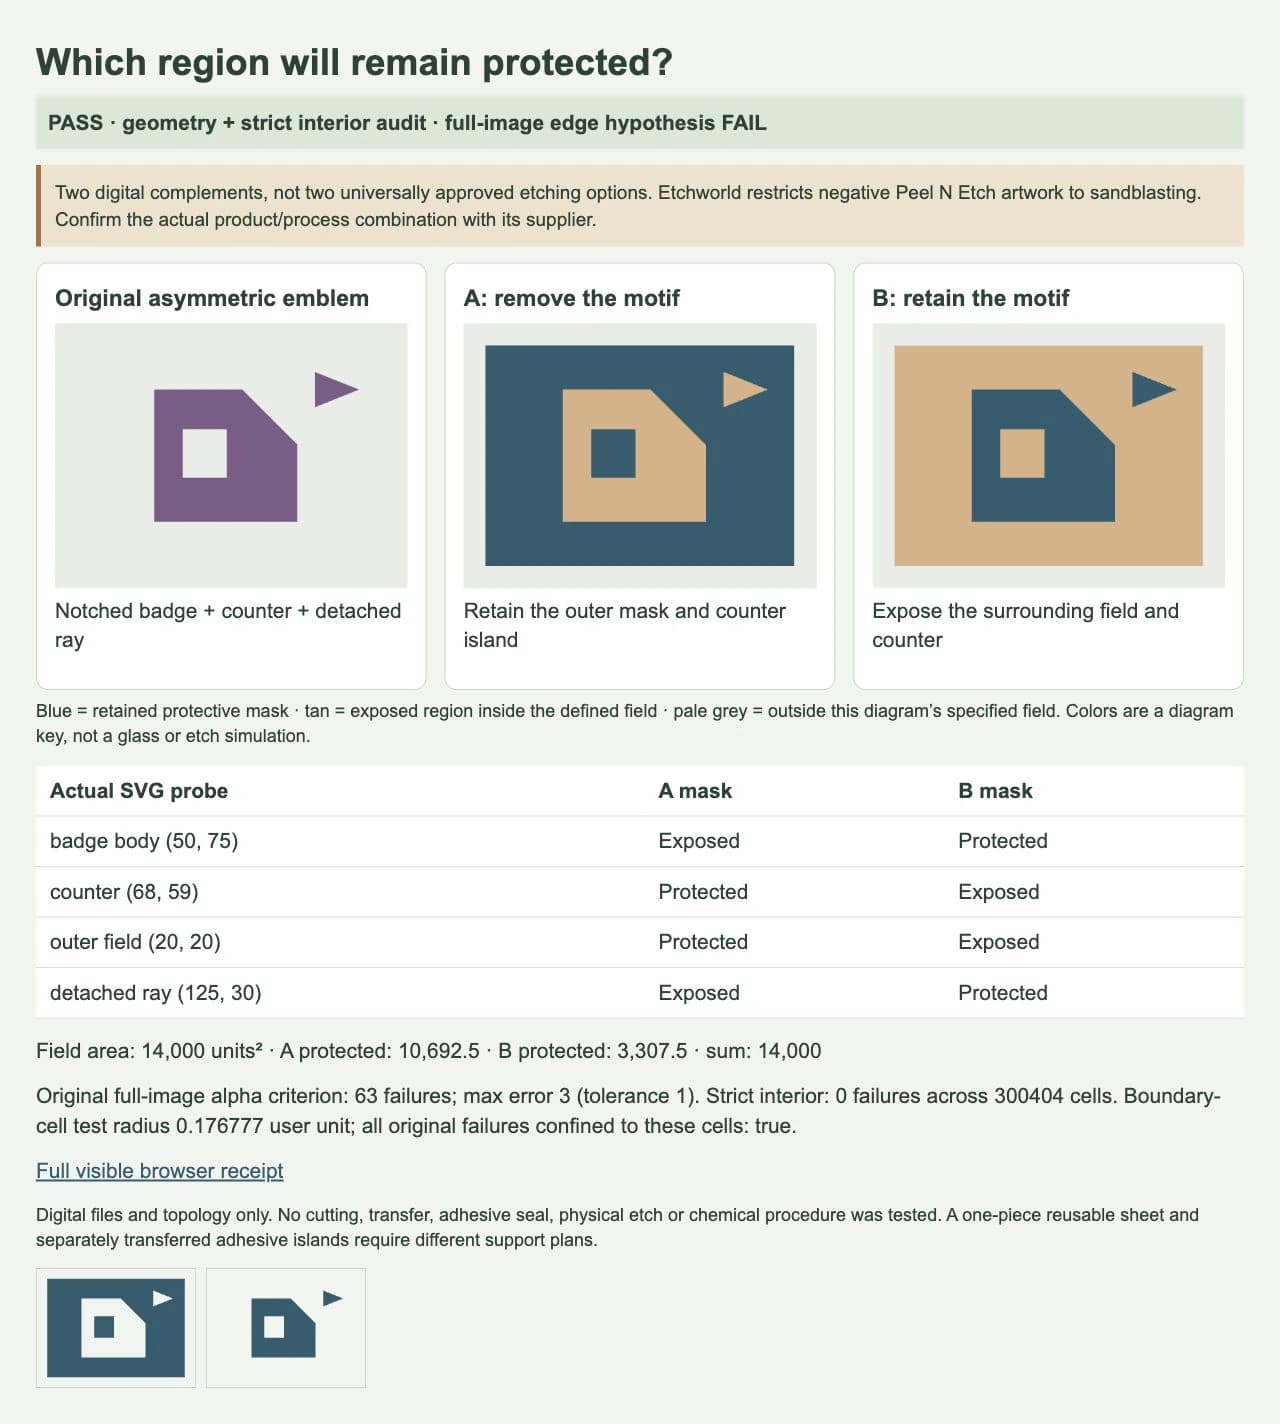
Our original emblem is a notched badge with a rectangular counter and a detached triangular ray. It is asymmetric, so its right-hand notch and accent remain identifiable in both layouts. We keep its position and orientation unchanged; complementing the regions does not mirror the artwork.
The working field is a rectangle from (10, 10) to (150, 110) in a 160 × 120 SVG viewport. The margin outside that field is deliberately outside this diagram's coverage claim. A real project needs an explicit surrounding-protection plan for its actual surface and product.
The original motif contains these closed contours:
<path fill-rule="evenodd"
      d="M45 30L85 30L110 55L110 90L45 90Z
         M58 48L78 48L78 70L58 70Z
         M118 22L138 30L118 38Z" />
The counter is the enclosed region inside the badge. It is not a white object painted over the motif. Our files use fill-rule="evenodd" to distinguish filled regions from openings; MDN's fill-rule reference explains how that rule determines the inside of a shape. The SVG holes guide covers related export failures.
Follow the counter as the regions change
In layout A, the badge body and triangular ray are open. The surrounding field stays masked. The small counter remains protected, even though its surrounding badge region is removed. That makes the counter a separate retained island in this digital plan.
In layout B, the badge material and ray remain protected. The counter and surrounding field are open. The badge and detached ray are separate retained pieces; there is no retained outer frame connecting them.
The same four points make the distinction inspectable:
| Probe in our original file | A: remove motif | B: retain motif |
|---|---|---|
Badge body at (50, 75) | Exposed | Protected |
Counter at (68, 59) | Protected | Exposed |
Outer field at (20, 20) | Protected | Exposed |
Detached ray at (125, 30) | Exposed | Protected |
The field has an area of 14,000 square user units. Layout A retains 10,692.5; layout B retains 3,307.5. Those areas sum to the whole field. We parsed the actual saved SVG contours to check their enclosed areas and nesting, then used the browser to check region membership in the saved mask files.
The renders were not pixel-perfect complements. Our initial 640 × 480 alpha-sum check allowed an error of one but failed at 63 pixels, with a maximum error of three. We retained that failure. A separate boundary-distance check placed all 63 failures in cells touching a polygon edge; all 300,404 cells clear of those edges had an exact alpha partition. The saved vector regions and interior check passed, while the original whole-image criterion remained failed. That narrows what the rendering evidence establishes.
This verifies a digital partition. It does not measure how a mask will adhere, how a glass surface will look or whether a small piece can be handled successfully at a chosen physical size. The fixture's user units are artwork coordinates, not recommended stencil dimensions or minimum feature sizes.
Plan islands for the actual stencil construction
A separate island is a material-support question as well as an artwork question. If you cut an unsupported one-piece sheet, an enclosed retained counter has no connection to the surrounding sheet. A bridge would connect those regions, but it also changes the open artwork. Keep that alteration visible in the design proof.
Do not apply “every island needs a permanent bridge” to all adhesive masks. Cricut's stencil instructions specifically discuss transfer tape for intricate island pieces, including letter centers. That documents a way its stencil workflow handles separate pieces; it does not establish adhesion or process suitability for our emblem, your material or every etching product.
For the mask plan, name the separate retained pieces and ask how the selected construction will keep them positioned. A reusable sheet, an adhesive mask transferred from a liner and a screen-based stencil do not necessarily need the same geometry. This example creates no automatic bridges and makes no claim that a particular transfer method was physically tested.
Our decal artwork guide covers related source and application-orientation checks. A decal that retains its motif is still a different removal plan from a mask intended to expose that motif.
Keep the supplier restriction beside the chosen layout
Etchworld describes different stencil families with different process limits. Its Peel ’N’ Etch section allows positive or negative imagery through different removed pieces, then limits negative artwork to sandblasting. Its separate stencil-family descriptions also have their own product restrictions. Keep the instruction attached to the exact product; do not combine the most permissive phrases from different products into a general rule.
For a supplier handoff, identify the intended exposed region, retained mask and counter pieces, viewing orientation, intended size and exact stencil/process combination. Ask the supplier to confirm that combination. Our two region maps answer the geometry question while leaving that product decision open.
The pottery-polarity guide uses the related habit of naming the intended result first. A stamp's raised/recessed geometry and a steel or glass gobo have different support and output models; their production rules do not automatically apply to an adhesive glass mask.
Recover contours only when the source needs them
If you already have editable vector artwork, prepare the mask plan from that original. If a suitable flat emblem exists only as a PNG or JPG and you need editable contours, PerfectVector's Cricut artwork workflow can create an SVG candidate first. Inspect the silhouette, counter and detached pieces before assigning removal instructions. Vectorization creates paths from pixels; it does not choose mask polarity, invent support bridges or approve a material/process combination. The emblem in this article was authored directly and was not traced.
A textured image or photograph may need a deliberately simplified motif rather than an automatic trace of every tonal change. Preserve its source master. If the job actually needs a single open route, the single-line SVG guide addresses that different geometry task.
Finish the artwork decision with an explicit region map
- Identify the exact stencil product and supported process before choosing a production layout.
- Name the region intended to be exposed and the material intended to remain.
- Inspect counters, detached pieces and the coverage boundary; keep orientation and physical-size assumptions explicit.
- Save a labeled mask plan beside the editable master and inspect the exported contours.
- Obtain supplier confirmation for the actual artwork, product and process, followed by the appropriate physical check.
The digital polarity task is complete when the saved plan identifies the exposed and protected regions, including counters and islands, without contradicting itself. We completed that geometry audit for the original emblem. We did not cut, transfer or use these files on glass.
If the counter has the wrong role, revise the region map before changing material or process. If a retained piece has no support plan, resolve the construction with the supplier rather than silently deleting that piece or adding an unreviewed bridge.
FAQ
Which parts should I remove from a glass-etching stencil? Use the selected product's instructions and your intended exposed region. Label both the removed material and retained mask, including letter centers and detached details. Positive/negative wording alone is insufficient for the handoff.
Can I reverse the design with every etching cream? Do not assume that. Etchworld's Peel ’N’ Etch guidance restricts negative artwork to sandblasting. Confirm the actual product and process before using a reversed region plan.
Does every stencil counter need a bridge? Its support depends on the stencil construction. A one-piece unsupported sheet and separately transferred adhesive pieces have different requirements. Cricut documents transfer tape for island pieces in its own stencil workflow; that is not universal material approval.
Will tracing a PNG decide the correct stencil polarity? Tracing can recover candidate contours. It does not decide which regions should remain protected, choose the process or verify the physical mask. Review the geometry and supply explicit removal instructions.
Sources
- Etchworld: What Stencils Are — Product-specific stencil/process restrictions, including negative Peel ’N’ Etch artwork being limited to sandblasting.
- Cricut: Smart Stencil / Stencil Film instructions — Product-specific removed regions and transfer handling for island pieces.
- MDN: SVG fill-rule — Filled regions, openings and the evenodd rule used in the original digital files.
Need editable contours from a bitmap-only emblem? Create an SVG artwork candidate, inspect its counters and separate pieces, then label the intended exposed region and confirm the mask plan with the actual supplier.
More from the blog

SVG Score Lines vs Cut Lines: Read the Geometry
Read SVG fold geometry before assigning Score or Cut. Compare open paths, filled bands and dashed marks, then check the documented Cricut operation workflow.

SVG Hatch Fill: Make Real Paths for Pen Plotters
Generate real open hatch paths from a closed SVG area. Reproduce hole, spacing, angle, and saved-file checks with an original Paper.js example.