How to Make Car Decals With a Cricut (From Your Own Design)
Make a car decal from your own logo, drawing, or pet photo: design rules that survive at distance, a cut-ready SVG, and the honest cases for buying instead.
On this page
Making a car decal with a Cricut is a short job: cut your design from permanent adhesive vinyl, weed it, and apply it with transfer tape onto clean glass. Every tutorial covers those steps. What almost none of them cover is the step before: where the design comes from. They all start with a ready-made template, a free SVG collection, or a name typed in a script font.
This guide is for the decal you can't download: your business logo, your own drawing, your kid's doodle, your actual dog. Getting one of those onto a car window is mostly a file problem, and that part, turning your design into a bold, single-path, cut-ready SVG, is what decides whether the vinyl half goes smoothly.
The quick version
- Design for distance. A car decal is read from meters away: bold silhouettes work, fine detail disappears and weeds terribly.
- One color is the sweet spot. Single-color vinyl decals are the classic look, cut in one pass with no layer registration.
- Your own art needs vectorizing. Logo, drawing, or photo, it must become clean vector paths before Design Space can cut it.
- Don't mirror for outside glass. Standard decals apply right-reading on the outside; mirror only if you're sticking it inside the glass facing out.
- Full-color or photo-real? That's a printed decal; ordering one is the honest answer, not a failed cut.
Design rules that survive on a car
A sticker on a laptop is viewed from 40cm. A decal on a rear window is read from across a parking lot, through glare, on tinted glass. That changes what a good design is:
- Bold beats detailed. Thick strokes and solid silhouettes stay legible; thin script tails and hairline details vanish at distance, and before that, they make weeding miserable.
- One color per layer, and ideally one layer. A single-color decal cuts in one pass, weeds in one sitting, and applies with no alignment stress. Multi-color designs mean cutting each color separately and registering the layers on glass.
- Think in silhouette. If the design still reads when filled with solid black, it will read as a decal. If it needs its inner detail to make sense, simplify it first.
- Size to the panel. Measure the window or door space and design at real scale; a 12 cm decal that looks bold on screen can turn into a fussy miniature on an SUV tailgate.
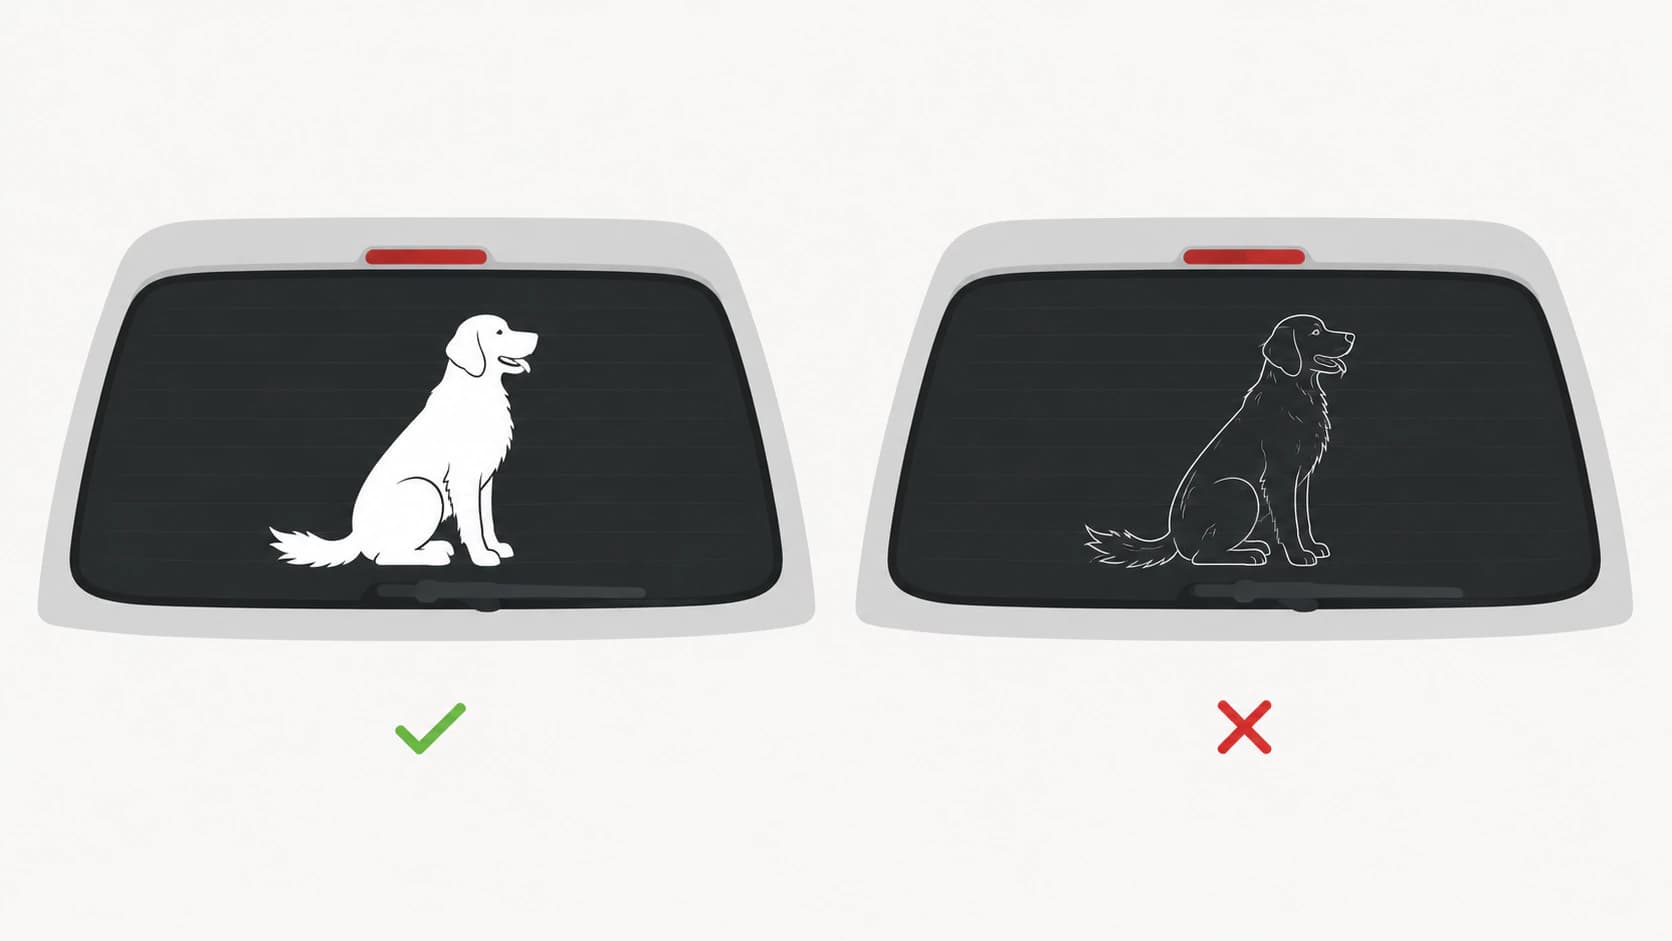
Getting your design into cut-ready form
This is the missing chapter in decal tutorials, and it depends on what you're starting from:
A logo. Most small-business decals start as a PNG or JPG logo that was never a vector. Vectorize the logo into clean paths first; a decal is the least forgiving place for a fuzzy trace, because the blade cuts exactly what the file says. The logo vectorization guide covers the quality checks.
A drawing or graphic. Flat art converts cleanly: trace it into an SVG, then simplify. If the trace comes back with several colors, collapse them: a decal usually wants everything merged into one color so it cuts as one layer.
A photo (the pet decal). A photo can't be cut directly, but a well-prepped photo becomes a beautiful silhouette or simple layered portrait; the pet portrait workflow is exactly this pipeline, and its output doubles as a car decal.
Whatever the source, run the same pre-cut checks as any cut file: single paths for every intended cut, no stray background rectangle, and a file that passes the Cricut preparation checklist.
The vinyl half, briefly
The cutting-and-applying half is well covered by material vendors. Cricut markets Permanent Vinyl for car and outdoor decals, and its Transfer Tape instructions cover burnishing and application. Clean and dry the surface, then follow the selected vinyl's own application and durability instructions.
One question worth answering plainly, because it ruins decals: do you mirror a car decal? For a normal decal applied to the outside of the glass or body panel: no, cut it right-reading. Cricut's Design Space guidance says ordinary vinyl does not require Auto Mirror. Mirror only for an inside-the-glass design that must read correctly from outside.
What this looks like with PerfectVector
PerfectVector handles the file half of this project. Upload your logo, drawing, or prepped photo (PNG, JPG, or WebP up to 5MB), then inspect how it reconstructs the artwork as vector paths and editable color shapes. For a decal, the built-in color editor is the simplification tool: merge everything down to the one or two colors you actually intend to cut, then verify each layer before using material. Vectorizing and previewing are free; one credit unlocks the finished SVG.
The boundary is the same as everywhere in this guide: PerfectVector produces the cut file. Vinyl choice, cut settings, and application live with your machine and material instructions.
When buying the decal is the right call
Two cases where DIY is the wrong tool, said without hedging. If you want a full-color or photo-realistic decal, that's a printed product; decal printing services exist precisely for it, and a cutter full of layered vinyl won't get you there. And if you need fleet quantities or large-format graphics, a wholesale print shop beats an evening of weeding. The DIY route wins for personal one-offs, bold single-color designs, and anything where the point is that you made it from your art.
Before you cut
- The design reads as a solid silhouette at arm's length on screen.
- Colors merged to the number of vinyl layers you truly want to align (ideally one).
- Every cut is a single path; no doubled outlines, no background rectangle.
- Sized to the actual panel, with a tape measure on the glass first.
- Not mirrored, unless it's going inside the glass.
FAQ
What do I need to make a car decal with a Cricut? A cutting machine, permanent adhesive vinyl, transfer tape, a weeding tool, and a cut-ready SVG of your design. Rubbing alcohol for cleaning the glass and a squeegee or scraper for application round it out. The file is the part this guide adds: your own design, vectorized and simplified to cut cleanly.
Can you use Cricut permanent vinyl for car decals? Permanent adhesive vinyl is the standard choice for vehicles, and it's what craft communities consistently use outdoors. Check the specific vinyl's own outdoor-durability rating for how long it's expected to last; removable indoor vinyl isn't made for weather.
Do you mirror a car decal? Not for a normal application on the outside of the glass or bodywork; cut it right-reading. Mirror the design only if you plan to apply it to the inside of the window facing outward.
Can I make a car decal from my logo? Yes, and it's the most common business use. The logo must first exist as a clean vector: vectorize the PNG or JPG version into editable paths, simplify it to one color if possible, and check every cut line is a single path before cutting.
Can I make a car decal from a photo? Not directly, but a suitable photo can become a strong silhouette decal: remove the background, boost contrast, trace it, and merge the colors down. Check the silhouette at final size before cutting because photographic detail will not survive as vinyl.
What file format do car decals use? SVG is the working format for cutting machines: it carries the vector paths the blade follows. Design Space also accepts PNG and JPG, but those need tracing before they can cut, so starting from a clean SVG skips the machine's rougher built-in conversion.
Sources
- Cricut: Permanent Vinyl — Manufacturer guidance for permanent vinyl and car/outdoor decal uses.
- Cricut: Transfer Tape instructions — Documents transfer, burnishing, and application steps.
- Cricut: How Auto Mirror works — Explains which materials are automatically mirrored and that standard vinyl is not.
- Cricut: Upload images into Design Space — Confirms SVG, PNG, and JPG upload handling.
- Cricut: Custom decals — Vendor workflow for cutting, weeding, and applying a decal.
The decal on the car is the last step of a file that was checked before the mat loaded. Design bold, trace the artwork into paths, merge the colors, and inspect every cut layer before using vinyl. General cutting-machine prep is covered on the Cricut SVG page.
More from the blog
The Sign Shop Asked for a Vector File: Here's What to Send
Why sign makers insist on vector art, how to check whether your logo file actually is one, and how to deliver an SVG, EPS, or vector PDF they can cut and scale.

SVG Paint Order: Keep Thick Outlines Behind Lettering
Use SVG paint-order to put a thick stroke behind the fill. Compare real text and path renders, check small sizes, and keep an editable master for delivery.