Resize a Rhinestone SVG Without Changing Hole Size
Learn when to restore a rhinestone SVG's import size and when to rebuild its layout. Keep hole diameters fixed, check spacing, and test with your actual stones.
On this page
You can resize a rhinestone SVG, but scaling the whole design also scales its holes. If you want a larger design with the same stones, move or rebuild the stone positions while keeping each hole's physical diameter fixed. If an imported file is simply the wrong size, restore the creator's intended dimensions before redesigning anything.
A rhinestone template is a layout of openings that hold stones while you arrange them. Those openings have physical sizes. Scalable Vector Graphics (SVG) can preserve their round geometry at any zoom, but a sharp circle can still be the wrong diameter for your stones.
This guide is for makers adapting a supplied template or designing one from artwork. It demonstrates SVG geometry and gives you checks to carry into your cutter software. The examples have not been cut in template material or tested with stones.
Decide which size you need to change
Separate the artwork's overall size from the hole diameter and the distance between hole centers. Changing one does not tell you what should happen to the other two.
| Your goal | What to change | What to check |
|---|---|---|
| Restore a supplied file that imported too small or large | The whole import, back to the creator's intended size | Overall dimensions and individual hole diameters |
| Make a larger pattern using the same stones | Hole positions, layout density, or stone count | Fixed hole diameter and new gaps |
| Make a smaller pattern using the same stones | Rebuild positions and remove holes where necessary | Overlap, narrow gaps, and lost details |
| Switch to another stone size | Hole diameter and the arrangement around it | The new stone and template-material requirements |
The Rhinestone World makes the physical constraint explicit in its rhinestone resizing FAQ: its SS10 example specifies a constant 0.130-inch hole for Magic Flock, and shrinking the design can require moving or deleting holes. That is a supplier-specific example, not a universal hole setting for every stone sold under the same size label.
Use the template creator's dimensions and your material supplier's instructions. Do not calculate a hole diameter from the stone's label alone.
See what whole-design scaling changes
We authored a simple ring with 24 circles. Each circle has a 3.2 mm diameter, and its center sits 20 mm from the ring's center. The 3.2 mm value is an illustrative geometry choice, not a recommended setting for a particular stone size.
Scaling that whole ring to 150% changes its holes to 4.8 mm. Rebuilding the ring with centers 30 mm from its center, while retaining 3.2 mm holes, produces a larger layout with wider spaces between holes.
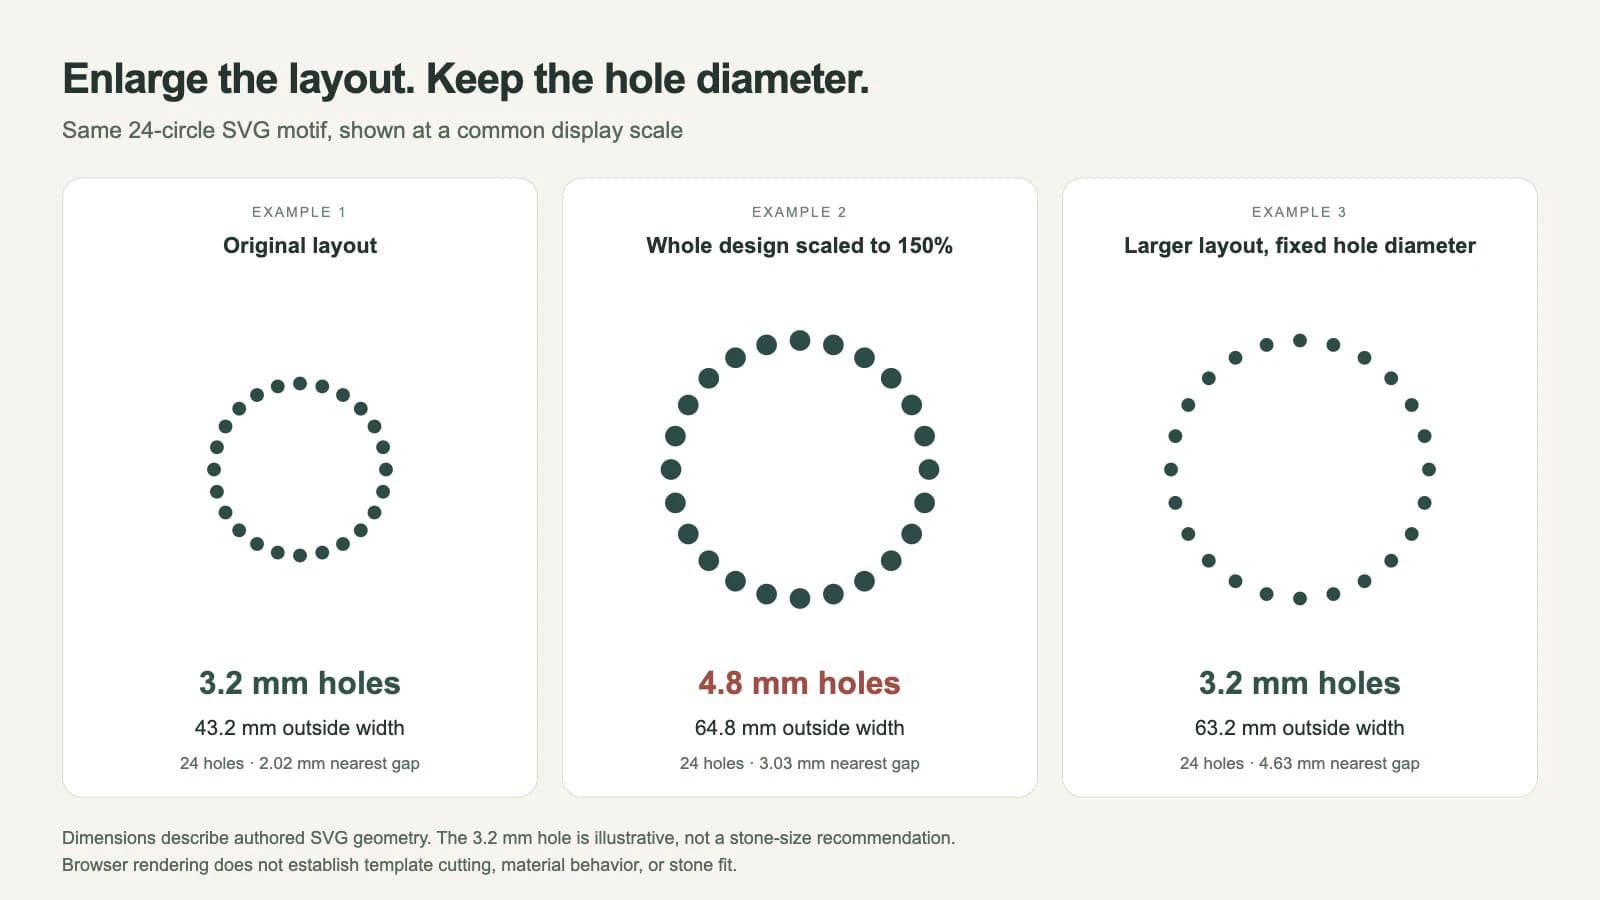
| Measured property | Original ring | Whole ring at 150% | Larger ring with fixed holes |
|---|---|---|---|
| Hole diameter | 3.2 mm | 4.8 mm | 3.2 mm |
| Outside width | 43.2 mm | 64.8 mm | 63.2 mm |
| Nearest gap between hole edges | About 2.02 mm | About 3.03 mm | About 4.63 mm |
| Hole count | 24 | 24 | 24 |
The rebuilt ring is not 64.8 mm wide because its edge holes did not grow. If your design must fit an exact width, measure the outer edges after restoring hole diameter. Do not assume that scaling center positions gives the same outside bounds as scaling complete circles.
Method note: we inspected the authored SVG files and their browser rendering, including circle radii, transforms, and bounding boxes. The figure shows those actual files at a common display scale. This verifies the stated geometry, not a Cricut import, a successful cut, or stone fit.
The SVG coordinate-system specification explains how transforms and viewBox map geometry into a viewport. Enlarging the displayed viewport while keeping the same viewBox can enlarge the holes too. Changing only an outer width value is therefore not a way to keep their physical diameter fixed.
Rebuild the layout with the same hole diameter
You need an untouched master, an SVG editor that lets you inspect individual shapes, the intended finished dimensions, and the hole setting required by your stones and template material. For a purchased pattern, first check whether its creator provides the size you need.
- Confirm the original scale. Record the creator's overall width and height, then measure several holes in your working file. If everything is wrong by the same factor, follow the wrong-size SVG diagnosis before changing the layout.
- Set the target layout bounds. Decide whether you need a wider motif, more space between stones, or additional rows. Keep the original beside your working copy so you can compare the silhouette and details.
- Reposition or regenerate holes. Keep the required diameter constant while changing the centers. Use a rhinestone-layout tool or edit the shapes in a vector editor. Check whether the editor's resize command acts on each hole separately or on the whole selection; those operations produce different results.
- Inspect the new gaps and details. Compare neighboring hole edges, especially in tight curves and small lettering. Add or remove holes to obtain the intended density. A larger arrangement of the same holes will usually look more open; a smaller arrangement can overlap.
- Save, reopen, and measure. Export a new SVG, reopen it, and confirm its final outside bounds and several hole diameters. Check the exported file rather than relying on the editor's earlier selection values.
A small code example shows the distinction. This file places two 3.2 mm circles 15 mm apart, measured center to center:
<svg xmlns="http://www.w3.org/2000/svg"
  width="40mm" height="20mm" viewBox="0 0 40 20">
  <circle cx="10" cy="10" r="1.6" />
  <circle cx="25" cy="10" r="1.6" />
</svg>
In this file, the matching viewport and viewBox dimensions make one user unit correspond to one millimeter at the declared size. The SVG circle definition separates center coordinates (cx and cy) from radius (r). Changing the second cx from 25 to 30 increases center spacing to 20 mm while leaving the diameter at 3.2 mm. An inherited scale transform would change that result, so inspect parent groups too.
For our smaller control, we moved the same 24 hole centers onto a 12 mm radius. Neighboring centers were about 3.13 mm apart, less than the 3.2 mm diameter: the circles overlapped. Restoring the hole size after shrinking a pattern is only part of the repair. Rebuild the crowded section, remove holes, or simplify the motif.
Check the exported size in Cricut Design Space
Use Cricut's current SVG upload instructions for your platform. Cricut distinguishes vector uploads from raster uploads; a file importing successfully does not establish the physical fit of a rhinestone template.
Before uploading, record the exported pattern's intended outside width and height. In Design Space, compare the imported dimensions with that record. When you can inspect individual holes, compare several of their diameters too. A creator-supplied reference shape or known-size square can help diagnose a change in scale, but exclude that diagnostic shape from the final cut.
If the import is wrong, restore the intended scale once and check again. If the import is correct but the design does not fit your project, return to the layout master. Enlarging an already correct template changes its holes.
Continue with the Cricut SVG preparation guide for layers, operations, and mat checks. Then cut a small sample in the actual template material and try the actual stones. Confirm that the stones settle into the openings and that the material holds the layout as intended. File dimensions cannot establish those physical results.
Start from a silhouette when the template needs rebuilding
If you already have usable rhinestone holes, edit that vector master. A screenshot of the dots does not establish the creator's intended physical dimensions. Ask for the original template before reconstructing its holes.
If your starting point is a flat PNG or JPEG logo, PerfectVector can recover SVG artwork for the layout stage. Vectorization creates geometry from a raster image's pixels; it does not place stones, choose a hole allowance, or generate a rhinestone template. The Rhinestone World's image-to-vector FAQ likewise treats vector conversion as a step before creating the stone design.
For a raster source, prepare the artwork as SVG, inspect its silhouette and small details, then build the holes separately. The logo vectorization guide covers that source-recovery step. For basic geometry terms, start with what an SVG file contains.
Keep the recovered artwork and the rhinestone layout as separate masters. That lets you change the motif without treating a trace as a measured template.
FAQ
Can I make a rhinestone SVG bigger with the same stones? Yes, by rebuilding or repositioning the holes while keeping their required physical diameter fixed. Scaling the whole design enlarges the holes too. Check the new outside bounds, spacing, and stone count before testing the template.
Can I make a rhinestone design smaller without changing the holes? You can keep the diameter fixed, but a smaller layout may crowd or overlap the holes. Move or remove holes and simplify tight details. Recheck the exported geometry and test with the actual template material and stones.
Is correcting a wrong-size import the same as resizing a pattern? No. Correcting an import restores the creator's intended physical scale. Resizing a pattern changes that intended layout. Confirm the original dimensions before deciding which task you need.
Will converting a PNG to SVG create a rhinestone template? No. Vectorization can recover the artwork's shapes. Stone positions, hole diameter, spacing, and template-material testing remain separate design and production steps.
Sources
- The Rhinestone World: Can I Resize A Rhinestone Design? — Explains fixed hole sizes and the need to move or delete holes when reducing a design.
- W3C: SVG 2 Coordinate Systems — Defines viewport mapping,
viewBox, and transforms. - W3C: SVG 2 Circle Element — Defines circle centers and radius independently.
- Cricut: How to upload images into Design Space — Documents the SVG vector-upload workflow.
- The Rhinestone World: Converting JPG or PNG Before Creating a Rhinestone Design — Places vector recovery before rhinestone-layout creation.
Have a raster logo that needs a new stone layout? Prepare its SVG artwork, compare the recovered silhouette with the source, then build and measure the holes separately before testing your template.
More from the blog

How to Make Car Decals With a Cricut (From Your Own Design)
Make a car decal from your own logo, drawing, or pet photo: design rules that survive at distance, a cut-ready SVG, and the honest cases for buying instead.

How to Convert PDF to SVG: Export or Trace It
How you convert a PDF to SVG depends on what's inside it. If it's vector, you export it; if it's a scan, you trace it. Here's how to tell, and how to do both.