OpenToonz Raster to Vector: Choose a Conversion Mode
Convert selected OpenToonz drawings into vector levels. Choose Centerline or Outline, inspect stroke structure, and understand where PLI and SVG files fit.
On this page
OpenToonz can convert raster drawings into native vector levels. Its conversion manual offers Centerline and Outline modes. Choose according to the edits you need after tracing: changing a line's width is a different job from reshaping the colored area it occupies.
Start with one drawing that contains the details you care about. A successful conversion of a simple frame does not tell you whether a tight hand pose, intersecting branches or a small mouth will remain useful elsewhere in the level. Keep the original drawings until you have reviewed the sequence.
Know which level you are converting
OpenToonz's level definitions distinguish PLI vector strokes, TLV bitmap lines and paint, and standard Raster images. TLV is not vector simply because it has a palette.
Decide whether you need new geometry at all. A painted background that will stay at its intended display size can remain raster. Converting every soft shadow into a shape can add editing work without helping the shot.
For a character with inked contours and flat colors, make a short list of intended changes. Perhaps the arm needs a different bend, the outline needs thinning, and the sleeve needs recoloring. Test those edits separately; a result can be convenient for one and awkward for another.
Choose Centerline or Outline by the next edit
The documented mode distinction is structural:
| Mode | Result | Editing consequence |
|---|---|---|
| Centerline | Variable-width strokes | Bend the stroke or change thickness with Pump |
| Outline | Boundaries around lines and between colors, with zero-width boundary strokes | Reshape boundaries to change the visible line |
Zero-width boundary strokes do not render; the enclosed painted areas carry the appearance.
Choose a mode for a representative task, rather than judging only the filled preview. If you want to make an eyebrow thinner repeatedly, test that exact change. If you want to preserve an irregular brush silhouette as a filled graphic, inspect its outside contour and enclosed gaps.
Centerline does not mean the entire character must become one continuous path. Separate marks can remain separate. The single-line drawing guide explains that distinction for plotters; here the destination is an editable animation level.
Convert selected drawings and inspect the preview
The native procedure is:
- Select the source level frames in the Xsheet/Timeline.
- Open Level → Convert → Convert to Vectors.
- Set the mode and parameters; use Preview and Centerlines Check.
- Click Convert. A new PLI level appears beside the source.
In Centerline, Max Thickness set too low can split thick marks into paired strokes. In Outline, Preserve Painted Areas retains colors; Max Colors and Transparent Color apply to Raster inputs. Accuracy trades closer fitting for complexity; Despeckling removes small marks.
Change one setting at a time. Pick a deliberate small mark, such as an eye highlight, and a patch of unwanted dust. A setting that removes the dust but also erases the highlight needs reconsideration. For thick lines, inspect the path structure before increasing smoothing or adding more detail.
If the selection is invalid
Return to a cell containing the actual source drawing and reduce the test to that one drawing. Check that you are selecting the source level in the Xsheet/Timeline, rather than an empty cell or a shape inside the Viewer.
The level-editing guide explains the distinction between a level's drawings and their scene references. A cell can refer to a drawing that has been deleted; its level name and number then turn red. Confirm that the drawing still exists before treating the failure as a tracing-settings problem.
If a valid single drawing still fails, record the installed version, source format and dimensions, selected frame, and conversion mode. Those details give a reproducible case. An old report of a stalled conversion is not enough to diagnose the current file.
Inspect what a visible line contains
The example below uses an existing team-created dove image and its real PerfectVector SVG. The pair was already shipped as product proof; this article adds a fresh inspection of its branch geometry. It was not converted or imported in OpenToonz.
The full result contains 28 paths, five fill colors, no embedded images and no stroke attributes. The selected brown stem is one closed, filled path. Its boundary encloses a tapered area. The blue contour shows that unchanged path; the leaves and other shapes are hidden only in the detail panel.
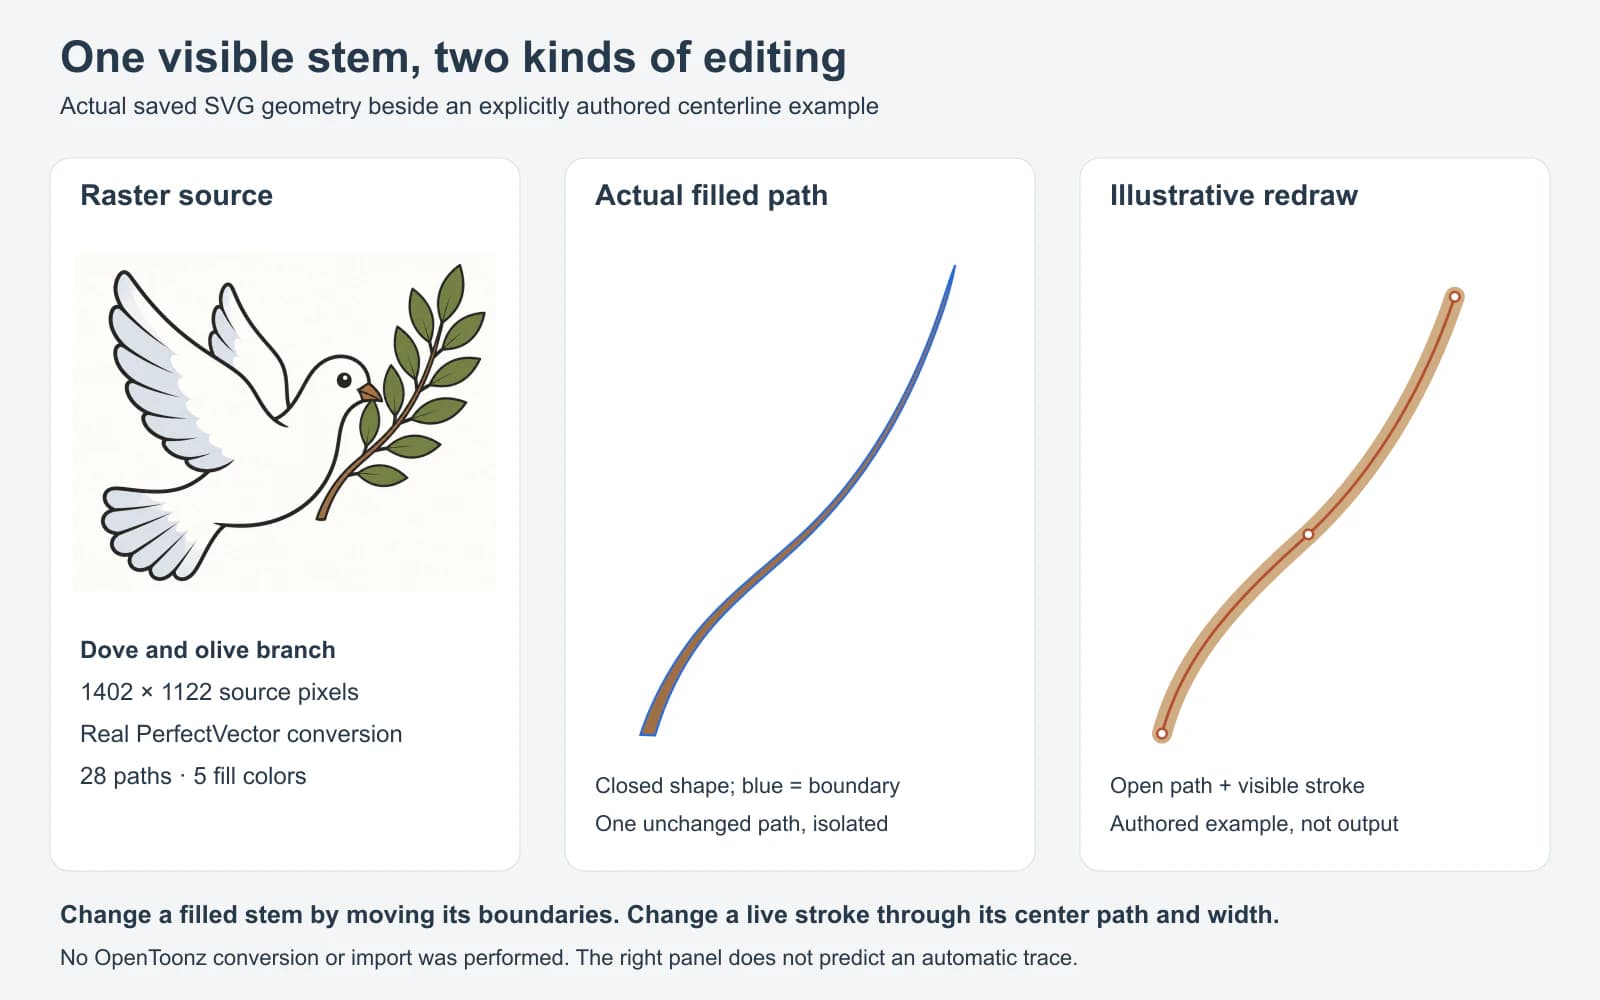
To widen that filled stem, move its boundaries. Adding a stroke around it would add an edge to the existing shape, not turn the shape into its original drawing gesture.
The right panel is a deliberately different construction: one authored open curve with a visible stroke. Its endpoints and middle anchor lie along the route through the shape. It illustrates the editing idea; it does not predict where an automatic centerline tracer would put its paths or how OpenToonz would reproduce the taper.
This is why counting paths alone is insufficient. One closed path and one open path can each count as one while offering different controls. Inspect the geometry that supports your intended edit. For another view of filled boundaries, see how line art becomes SVG shapes.
Check the level across several drawings
Use a small review set before committing to the whole sequence:
| Drawing to inspect | Concrete check |
|---|---|
| A broad, simple pose | Does the silhouette still read at the shot's viewing size? |
| The tightest overlap | Are intended gaps still open between fingers, leaves or limbs? |
| A frame with fine details | Did a useful small mark disappear with the dust? |
| A thick-to-thin contour | Can you make the width edit you planned? |
| A colored drawing | Can you change the intended region without affecting unrelated parts? |
Play the selected drawings in sequence after inspecting them individually. Look for a small feature appearing and disappearing, a gap closing for one drawing, or the outline changing noticeably between poses. A still preview will not reveal those changes over time.
Palette editing also needs a deliberate check. In Toonz Vector and Toonz Raster levels, styles are linked to lines and painted areas. Editing a style updates every element using it. Standard Raster marks do not retain that link. Try a temporary contrasting color and inspect which regions respond, then undo the change.
Keep the source level and save the reviewed result. The saving instructions say that level edits need saving; Save All saves the scene's level changes too. Treat the original, converted level and any exported file as separate things to preserve.
Use SVG for interchange, PLI for the native level
OpenToonz's file-browser documentation says loaded SVGs are converted into PLI. Its file-conversion command can also export PLI to SVG. Those are format transfers, separate from tracing raster pixels.
When sending a vector drawing elsewhere, test a representative drawing first. Open the exported SVG in the receiving editor and inspect fills, visible boundaries and scale. Do not use a successful preview as evidence that every native style, scene exposure or editing control survives the transfer. Retain the OpenToonz project and levels for animation work.
If a separate raster illustration needs filled SVG shapes before you bring it into the scene, PerfectVector's image-to-vector converter can prepare that external asset. Inspect the SVG first, then test its import in OpenToonz. PerfectVector does not produce a native PLI animation level or the Centerline strokes needed for Pump-based width editing. Use OpenToonz's native conversion when that is the job.
For another animation application's tracing boundary, see Adobe Animate image tracing. More file-preparation workflows are in the PerfectVector blog.
FAQ
Is a Toonz Raster level already vector? No. TLV contains bitmap lines and paint. PLI is the native vector level. A palette does not by itself make the underlying drawing vector geometry.
What should I check when conversion says the selection is invalid? Start with one existing source drawing selected in the Xsheet/Timeline. Confirm that its cell refers to an available drawing. If that still fails, record the version, source file details and mode for a reproducible test.
Does one SVG path mean one editable centerline? No. A single path can enclose a filled area or follow an open route. The illustrated stem is a closed filled path; the separately authored example is an open path with a stroke.
Should I convert painted backgrounds before animating? Only when editing their geometry helps the shot. Preserve raster painting when its texture and shading matter more than changing individual shapes, and retain the original even if you make a vector version.
Sources
- OpenToonz: Drawing Animation Levels — native level types, conversion modes, selected-frame procedure and preview controls.
- OpenToonz: Editing Animation Levels — drawing references, missing drawings and saving level changes.
- OpenToonz: Managing Palettes and Styles — linked styles in Toonz levels and the separate Raster palette behavior.
- OpenToonz: Working in Xsheet/Timeline — SVG loading as PLI and PLI-to-SVG file conversion.
Need a separate filled vector illustration for the scene? Convert the raster artwork with PerfectVector, inspect its shapes, and test one SVG import. Keep native Centerline conversion for editable stroke width and keep the source level for changes the trace cannot reconstruct.
More from the blog
Blender Trace Image to Grease Pencil: Choose Your Route
Trace an image to Grease Pencil in Blender, fix missing commands and dense strokes, or prepare a color SVG for import. Choose the route your drawing needs.
Harmony Vectorize Image: Native Drawing or SVG Import?
Vectorize an image in Toon Boom Harmony, distinguish bitmap envelopes from editable contours, and choose native line-art conversion or Harmony 25 SVG import.