Harmony Vectorize Image: Native Drawing or SVG Import?
Vectorize an image in Toon Boom Harmony, distinguish bitmap envelopes from editable contours, and choose native line-art conversion or Harmony 25 SVG import.
On this page
- What does vectorizing an image mean in Harmony?
- Choose the route for your drawing
- Vectorize images on import for native line art
- Import into the intended drawing layer
- Choose Black and White or Grey deliberately
- Vectorize bitmap artwork already in a drawing
- Import an SVG into Harmony 25
- Choose the drawing destination before confirming
- Choose a palette you can inspect
- Diagnose the result before retracing everything
- What this looks like with PerfectVector
- FAQ
- Sources
Toon Boom Harmony can vectorize an image into editable drawing contours, including scanned line art you want to paint in the scene. But a bitmap placed in a vector layer is not necessarily a traced drawing. Harmony can also keep bitmap content inside a vector boundary, and its Grey vectorization option combines vector contours with bitmap texture. Choose the result you need before choosing the import option. Toon Boom's image-vectorization guide and art-mode documentation explain these distinctions.
For artwork already prepared as SVG, Harmony 25 documents a separate vector-file import route. That can suit a flat color illustration whose shapes you want to prepare before it reaches Harmony. Native line-art conversion is the more direct starting point when your scan already fits that job.
Decide what must become editable
- Solid vector line art: use native Black and White vectorization and inspect the resulting contours.
- Scanned line texture: Grey preserves texture using a mixture of vectors and bitmap filling.
- A bitmap inside a vector boundary: changing the layer type alone does not trace the picture's internal shapes.
- Prepared SVG artwork: use Harmony 25's Vector File import, then check the destination drawing, palette, and imported shapes.
What does vectorizing an image mean in Harmony?
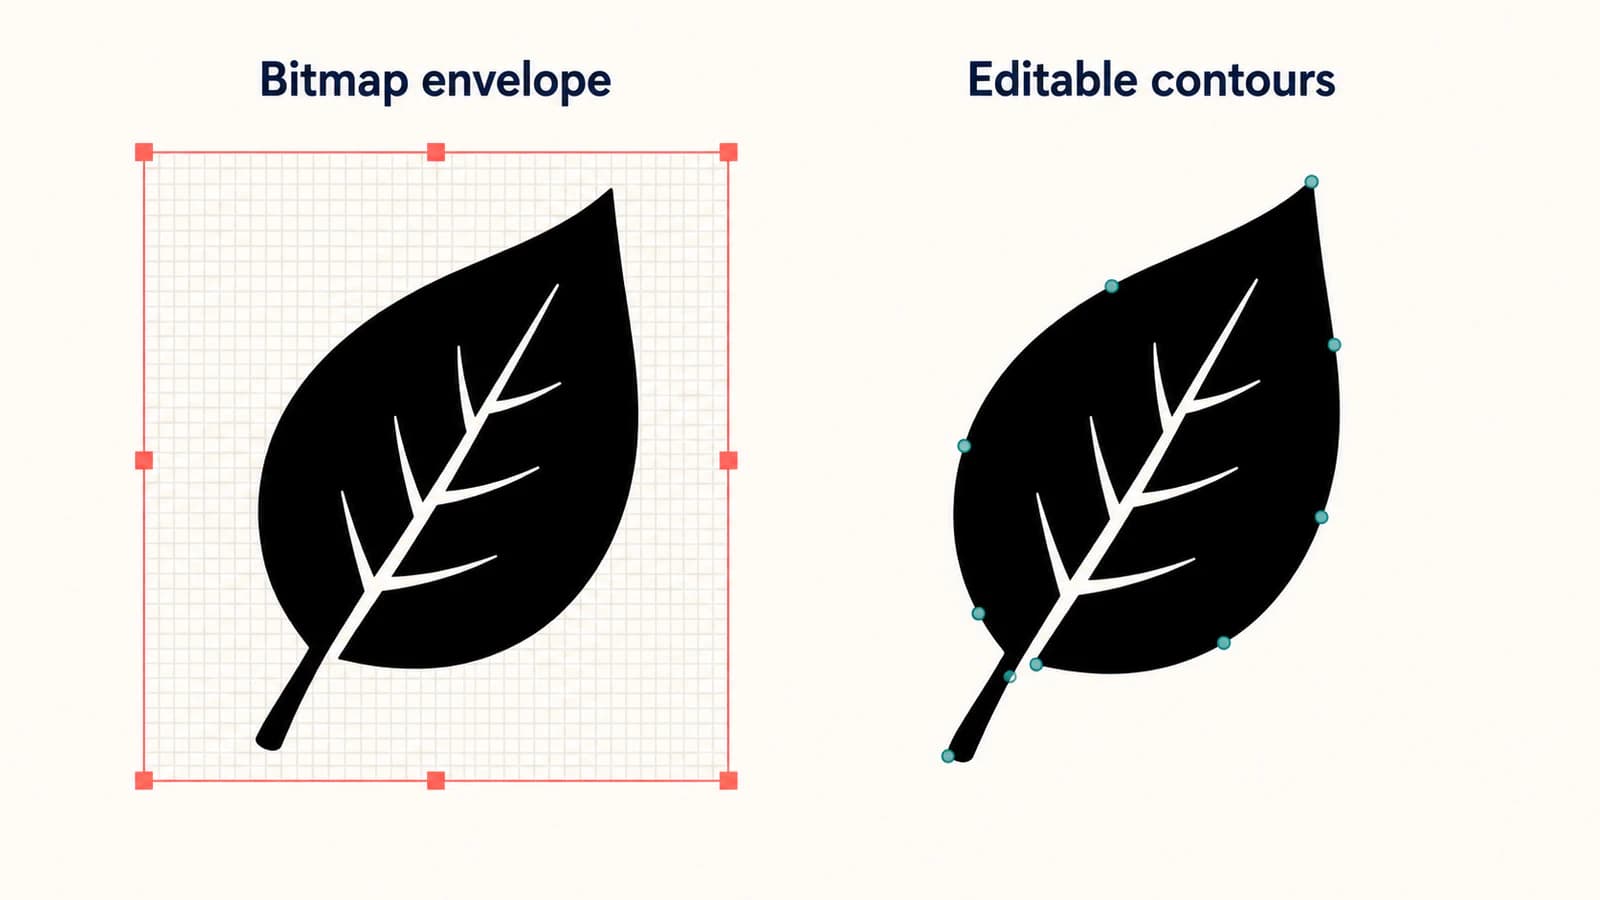
There are two separate questions: can you manipulate the object, and can you edit the artwork's contours? Moving a rectangle containing a picture answers the first question. Adjusting the outline of a drawn leaf answers the second.
Harmony 25 Advanced's Changing Art Modes documentation says that switching bitmap artwork into a vector layer initially makes it a single drawing object. Convert Drawings to Match Layer Type can make a vector rectangle whose texture is the bitmap. You can change that canvas contour, but this does not turn the picture itself into editable vector outlines.
That boundary is what this guide calls a bitmap envelope. It can be useful when the bitmap appearance is what you want. It is a different result from reconstructing the drawing's lines as contours.
The same inspection habit helps with exchange files: an SVG extension alone does not establish that every visible element is a vector path. The guide to SVGs containing raster images explains how to check the actual content before a handoff.
Choose the route for your drawing
| Starting artwork and goal | Route to try | Acceptance check |
|---|---|---|
| Scanned black line art that needs solid editable contours | Native Black and White vectorization | Thin marks, gaps, solid line appearance, and paintable areas |
| A scan whose pencil or ink texture matters | Native Grey vectorization | Texture retained where intended; accept bitmap filling |
| Bitmap artwork already on a bitmap drawing's Line Art layer | Vectorize Line Art in Selected Drawing, following your edition's workflow | New outlines land in the intended vector drawing layer |
| A picture you only need to place and transform | Keep the bitmap content | Appearance and useful display size, rather than internal vector editing |
| Flat color artwork prepared as SVG | Harmony 25 Vector File import | Drawing destination, palette, silhouette, and color boundaries |
The instructions below identify the Harmony 25 edition documentation they follow, checked on September 8, 2026. That is a reference point for menu labels, not a claim that a feature is exclusive to that edition. Match your installed version and edition when the dialog differs. A Storyboard Pro tutorial is also a different product's workflow, even if it appears in a Harmony search.
Vectorize images on import for native line art
For a scanned drawing, begin with one test image containing a thick line, a thin line, and a small enclosed area. Keep the untouched scan and make a working copy. Remove obvious dust and uneven paper shadows without erasing intentional texture.
The line-art preparation guide covers source cleanup in more detail. In Harmony, decide whether that texture belongs in the result before choosing between Grey and Black and White.
Import into the intended drawing layer
In the Harmony 25 Essentials procedure, open File → Import → Images, browse to the file, choose a new or compatible existing layer, and enable Vectorize Image. A vectorized drawing requires a vector drawing layer as its destination. Those steps come from Toon Boom's Vectorizing Images on Import guide.
Use a new, clearly named test layer for your first pass. That makes it easier to compare the result and confirm where the drawing landed before importing several files or working in a populated scene.
Choose Black and White or Grey deliberately
Black and White produces solid vector line artwork, using the scene palette's Vectorized Line swatch. Grey retains the scan's line texture through greyscale bitmap filling inside vector contours, and makes the white paper transparent. These are the documented choices in the Essentials 25 vectorization procedure.
Choose Black and White if the next task needs solid lines you can edit and paint. Choose Grey if the scan's textured marks are part of the intended appearance. Don't select Grey and then judge every remaining trace of bitmap texture as a failed conversion; retaining that texture is part of its purpose.
For Black and White, Threshold controls which source values survive, and Smooth controls the detail-versus-smoothing tradeoff. The manual describes lower Threshold values as producing a darker result and lower Smooth values as retaining more detail.
Start with a small adjustment, then inspect the same thin mark and enclosed area. More smoothing can make a curve look tidy while changing an intentional corner. A threshold adjustment can rescue a light stroke while also admitting paper noise. These are reasons to compare the drawing, not to copy a universal numerical preset.
Vectorize bitmap artwork already in a drawing
Changing the layer's art mode is not the tracing step. Harmony 25 Advanced documents a dedicated operation for bitmap line art already in a drawing: Drawings → Vectorize Line Art in Selected Drawing.
The Vectorizing Bitmap Artwork procedure requires the source to be line art on the bitmap drawing's Line Art layer. Create a vector drawing layer immediately below it, select the source drawing frames together with the destination vector frames, then run the command. The selection must contain the bitmap frames above and vector frames below, with no other layers included.
Choose a vectorization preset in the conversion dialog, then inspect the new drawing with the original bitmap layer hidden. Keeping the original available lets you switch back for comparison without mistaking two superimposed versions for one successful result.
If the command rejects the selection, check that arrangement before changing the image itself. An unsuitable source/destination selection is a different problem from a noisy scan. If the drawing contains painted areas or a full color illustration rather than line art, return to the route table before forcing it through a line-art procedure.
Import an SVG into Harmony 25
Harmony 25's Importing Vector Files guide explicitly lists SVG, alongside AI and PDF. Use File → Import → Vector File and browse to the SVG. If you're using older Harmony documentation that lists different formats, check your installed release's manual before converting the file again.
An existing SVG should be inspected and imported directly. A flat colored PNG may need vector preparation first. In either case, start with one drawing whose silhouette, holes, and color boundaries are easy to compare.
Choose the drawing destination before confirming
For a first test, Create New Elements Using Base Name gives the artwork a new drawing destination. Importing into an existing drawing is a deliberate second choice once you've confirmed the file behaves as expected.
The Harmony 25 Premium Vector Import dialog reference adds a detail that matters in an existing scene: Selected Element creates a drawing substitution and replaces the selected exposure. Append to First Frame's Drawing merges the imported artwork when Selected Element is enabled. Confirm the selected drawing and exposure before choosing those options.
Choose a palette you can inspect
The same dialog provides Use Existing Palette and Create New Palette. Imported colors or textures are added to the chosen destination. For a small trial, a new named palette makes the incoming material easier to identify before you decide how it belongs in the scene's color system.
Palette import does not establish that every SVG feature reproduced perfectly. The cited import documentation does not promise universal preservation of complex effects, fonts, gradients, or embedded content. Compare the actual Harmony drawing with the source. Check a solid color region, an overlap, an internal hole, and a thin feature before importing a whole character sheet.
If you're moving between animation applications, the Adobe Animate image-trace guide covers that application's separate tracing and SVG handoff. Keep each application's commands and drawing model with its own workflow.
Diagnose the result before retracing everything
| Symptom | First check | Useful next action |
|---|---|---|
| You can move the image but cannot edit its internal contours | Whether it is bitmap content in a vector boundary | Use actual line-art vectorization if outlines are the requirement |
| The drawing still has scanned texture | Whether you chose Grey | Keep it intentionally, or compare a Black and White pass |
| A thin line disappears or paper noise appears | Source contrast and Threshold | Adjust one variable and compare the same local detail |
| The conversion command reports a selection problem | Source Line Art and adjacent destination vector frames | Rebuild the documented source/destination selection |
| A transparent PNG becomes an unwanted block | Import route and a simple source comparison | Test clean black lines on white paper before applying advanced settings from an old forum post |
| SVG artwork changes an existing drawing's exposure | Selected Element and append settings | Test in a new drawing destination and inspect the affected exposure |
The transparent-PNG case deserves a controlled comparison, not a promise that one alpha setting fixes every file. Save the original PNG, try a simple line-art copy, and establish whether the problem follows the image or the selected import route. If transparency is essential to the artwork, verify it again in the imported drawing rather than assuming a pleasing source preview proves the result.
What this looks like with PerfectVector
If your source is a flat colored PNG or JPG and you want to prepare SVG shapes before Harmony import, use PerfectVector's image to vector converter to make a candidate file. Inspect the silhouette, internal holes, color boundaries, and any background shape, then download the SVG and test it through Harmony 25's Vector File import. For scanned line art that needs native Harmony drawing contours, try Harmony's own vectorization first.
The decision rests on the drawing you can use in the scene. A clean preview does not establish the right exposure, palette organization, or editable parts for your animation. Keep a source reference until those checks are complete.
FAQ
Can Toon Boom Harmony vectorize a PNG? Yes. Harmony documents bitmap-image vectorization for creating editable line art. Choose a route that matches the source: Black and White for solid vector lines, Grey when retaining scanned texture is intentional, or prepared SVG import for vector artwork made elsewhere.
Does changing a bitmap layer to vector trace the drawing? No. The art-mode change can leave the image as one object, and converting drawings to match the layer type can wrap bitmap texture in a vector rectangle. Use the dedicated vectorization workflow when you need the drawing's own contours.
Is Harmony's Grey vectorization fully vector? No. The Harmony 25 Essentials manual describes vector contours combined with greyscale bitmap filling. Black and White is the documented choice for solid, fully vector line artwork.
Why does Vectorize Line Art in Selected Drawing report an error? Check the source and destination selection described for your edition. The Harmony 25 Advanced procedure requires bitmap drawing frames above matching vector drawing frames, with no other layers in the selection, and source line art on the Line Art layer.
Can Harmony import SVG files? Harmony 25 documentation lists SVG under File → Import → Vector File. Check the documentation for your installed release, then verify the imported drawing, destination, palette, and appearance with one test file.
Sources
- Toon Boom — Harmony 25 Essentials: Vectorizing Images on Import — Defines native Grey and Black and White vectorization, compatible destinations, Threshold, and Smooth.
- Toon Boom — Harmony 25 Advanced: Changing Art Modes — Distinguishes a bitmap in a vector rectangle from actual vectorization of its artwork.
- Toon Boom — Harmony 25 Advanced: Vectorizing Bitmap Artwork — Documents the Line Art source and adjacent destination-frame selection required for native conversion.
- Toon Boom — Harmony 25 Essentials: Importing Vector Files — Documents SVG support and the Vector File import menu.
- Toon Boom — Harmony 25 Premium: Import Vector Files Dialog Box — Explains drawing substitutions, append behavior, and imported palette destinations.
Preparing a flat colored image for Harmony? Convert your own image to SVG, inspect its holes and color boundaries, then import one drawing into a new destination and check the palette and editable artwork before preparing the rest.
More from the blog

OpenToonz Raster to Vector: Choose a Conversion Mode
Convert selected OpenToonz drawings into vector levels. Choose Centerline or Outline, inspect stroke structure, and understand where PLI and SVG files fit.

SVG Edge Detection: A feConvolveMatrix Preview
Build an SVG feConvolveMatrix edge preview, diagnose alpha and border artifacts, compare a sharpening kernel, and check whether the source contains real paths.