Adobe Animate Image Trace: Turn a Bitmap Into Editable Art
Use Adobe Animate Image Trace to convert a bitmap into editable vector artwork, tune paths, corners, noise, fills, and overlaps, then clean the result.
On this page
- What Image Trace does in Adobe Animate
- Trace a bitmap step by step
- 1. Prepare the raster source
- 2. Open Trace Bitmap
- 3. Pick a preset as a starting point
- 4. Choose mode and palette deliberately
- Understand the advanced controls
- Paths
- Corners
- Noise
- Method
- Fills, strokes, and white
- Clean the traced artwork before animation
- Export or keep the art in Animate
- When to use a separate vectorizer instead
- FAQ
- Sources
Adobe Animate can trace a JPEG, PNG, PSD, or other raster image into editable vector artwork. In the current interface, select the placed bitmap and use Object > Trace Bitmap or Modify > Bitmap > Trace Bitmap, choose a preset or settings, preview the result, and then inspect the new shapes.
Adobe calls the help feature Image Trace, while the command is labeled Trace Bitmap. If you have been searching for either name, they refer to this workflow in Animate. If you are working in After Effects, use the Auto-Trace masks versus SVG shape layers guide to choose the appropriate kind of object for the animation.
The useful version
- Import or place the cleanest raster source you have.
- Select it and open Trace Bitmap.
- Start with a preset that matches the artwork, not the most detailed preset available.
- Preview changes to color mode, paths, corners, noise, method, fills, and strokes.
- Accept the trace and inspect the resulting editable shapes.
- Remove specks, merge accidental fragments, and simplify only redundant points.
- Compare the artwork at its final animation or export size before deleting the raster reference.
What Image Trace does in Adobe Animate
Adobe's current Animate Image Trace documentation says the feature converts raster images such as JPEG, PNG, and PSD into modifiable vector artwork. It can also trace a scanned pencil sketch so you can build a new drawing from it.
That conversion reconstructs visible pixels as shapes. It does not recover the original artist's layers, brush settings, live type, symbols, rig, or hidden geometry. For another animation workflow, the Moho bitmap-to-vector guide explains when to keep layered raster art, use native tracing, or prepare SVG parts for a rig.
| Starting image | Likely result | Better choice when it fails |
|---|---|---|
| Flat icon or limited-color illustration | Separate filled vector regions | Clean the shapes after tracing |
| High-contrast line art or logo | Black-and-white fills or strokes | Redraw critical lines if the trace doubles them |
| Pencil sketch | Editable interpretation of visible marks | Ink or clean the scan first to reduce noise |
| Photograph | Many color shapes or a simplified posterized result | Keep the raster unless stylization is intentional |
| Tiny or blurred image | Wobbly, merged, or invented-looking edges | Find a larger source or redraw |
Trace a bitmap step by step
1. Prepare the raster source
Crop away irrelevant margins and use the highest-quality original available. For a flat illustration, remove compression halos and accidental background pixels before tracing. For a scan, adjust the paper and mark contrast without erasing intentional detail.
Keep the original beside the trace until review is complete. A trace can look clean while changing a letter counter, facial feature, or small silhouette.
Adobe's Imported bitmaps guide covers how Animate handles bitmap assets. Importing the bitmap and tracing it are separate decisions: placement keeps pixels; Trace Bitmap creates new vector artwork.
2. Open Trace Bitmap
Select the placed raster. Adobe documents these routes:
- choose Object > Trace Bitmap from the context menu;
- use the Bitmap control in the Properties panel and choose Edit;
- choose Modify > Bitmap > Trace Bitmap.
Turn on Preview while tuning the options. Adobe notes that the placed image's resolution affects tracing speed, so a very large source may take longer even when its extra detail does not improve the final-size art.
3. Pick a preset as a starting point
Animate includes presets for broad jobs such as high- or low-fidelity photos, shades of gray, and a black-and-white logo. A preset is not a quality score. It is a bundle of starting settings.
Use the simplest preset that preserves the details the artwork actually needs. A logo with three solid colors should not become a photo-like stack of tiny regions. A soft photograph should not be expected to become a compact editable illustration just because the trace finished.
4. Choose mode and palette deliberately
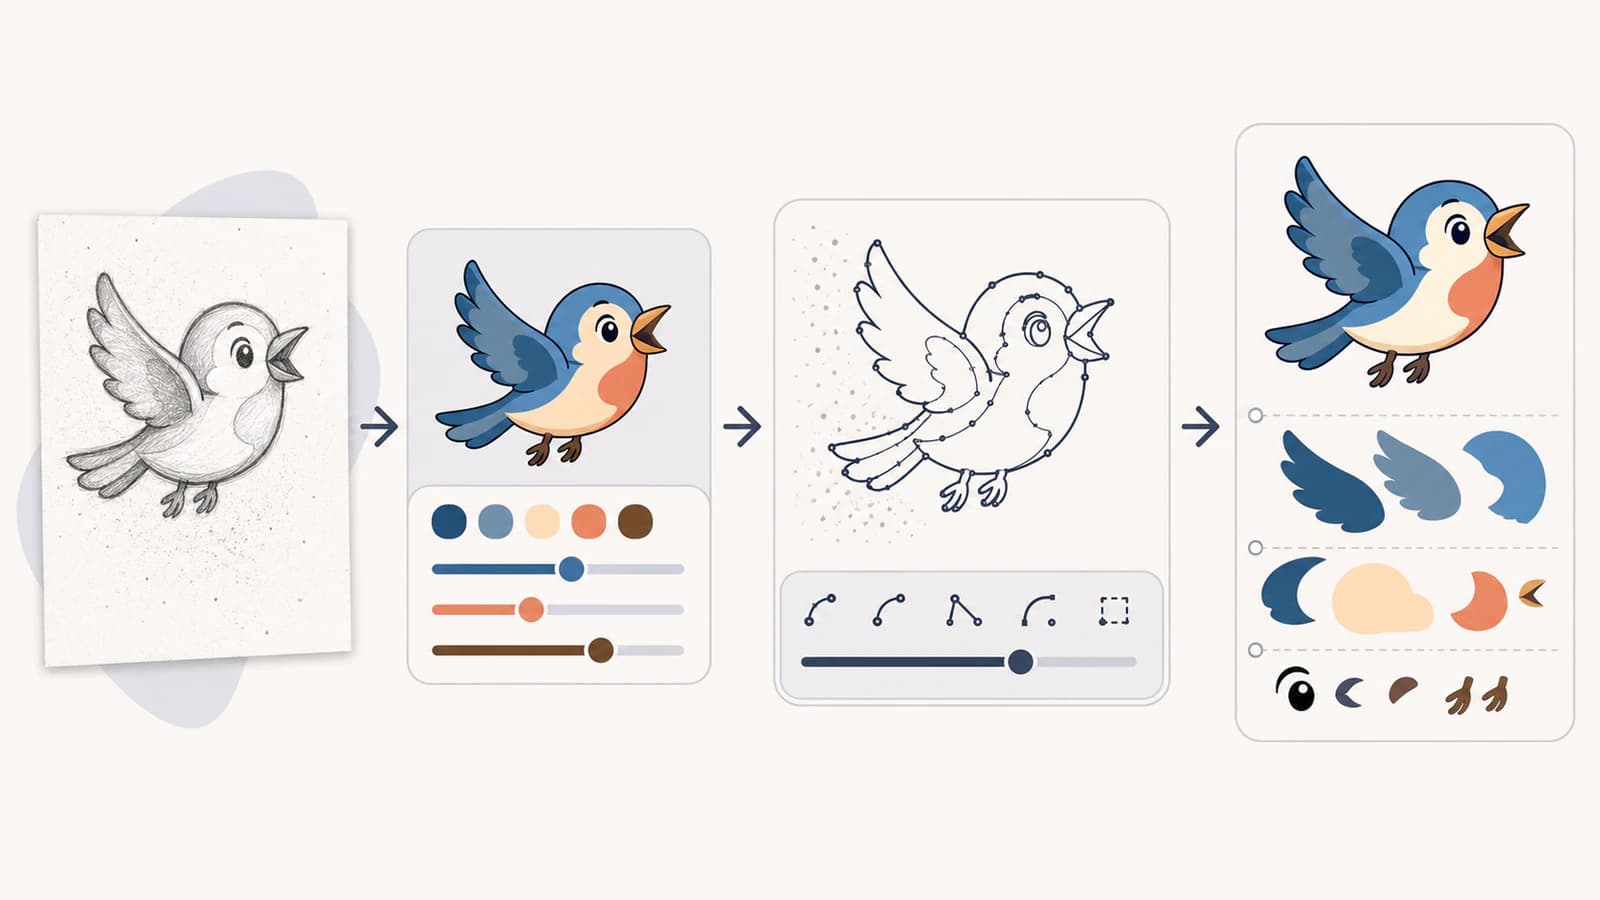
The basic controls cover Preset, Mode, Palette, and Colors. Color mode decides whether the result uses color, grayscale, or black and white. The available palette and color controls then shape how many regions Animate creates.
More colors can preserve small tonal changes, but they can also produce fragments that are hard to edit or animate. Reduce the palette until every remaining distinction has a purpose.
Understand the advanced controls
Adobe's current definitions are specific enough to guide a first pass:
Paths
Paths controls how tightly the traced shape follows the original pixel edge. Adobe says lower values fit more tightly and higher values fit more loosely.
A tighter fit is not automatically better. It may preserve compression bumps and hand-drawn wobble that the finished art does not need. A looser fit can smooth the result but may shave off intentional detail.
Corners
Corners controls how strongly sharp bends become corner points. Higher values produce more corners. Raise it for angular badges or blocky lettering; lower it when rounded organic shapes are turning brittle.
Noise
Noise sets the pixel area Animate can ignore while tracing. Higher values remove larger small regions. This is useful for dust and compression flecks, but it can also erase freckles, texture dots, and small counters you meant to keep.
Method
Adobe documents two methods:
- Abutting creates cutout paths whose neighboring edges meet.
- Overlapping creates stacked paths that slightly overlap adjacent shapes.
Abutting can be easier to read as a flat mosaic. Overlap can avoid hairline seams in some compositing situations but creates covered geometry. Choose based on how you plan to edit and animate the art.
Fills, strokes, and white
In black-and-white mode, Animate can create filled regions and can treat sufficiently narrow features as strokes. The Ignore White option can omit white regions, which is useful when a white paper background should not become a large shape.
Check the actual result. A thin black line may trace as two edges around a filled strip when you expected one centerline. If a single editable stroke matters, redraw it or use a centerline-oriented workflow.
Clean the traced artwork before animation
Do not animate the first preview immediately. Select and inspect the vector result:
- delete isolated specks and invisible leftovers;
- check holes and counters inside letters or shapes;
- verify that neighboring colors meet as intended;
- remove accidental background rectangles;
- combine fragments that should behave as one object;
- simplify redundant nodes without changing the silhouette;
- separate the parts you intend to animate independently;
- convert reusable art into symbols only after the shapes are clean.
Zoom out to the final viewing size as well as in to the nodes. A tiny error may not matter in motion, while an over-detailed trace can make editing unnecessarily slow.
Export or keep the art in Animate
If the trace is part of an Animate project, keep an editable project master with the original bitmap and the cleaned vector artwork on separate, named layers. That gives you a reference when a later edit reveals a fidelity problem.
If you need an SVG handoff, use Animate's documented SVG export workflow and inspect the exported file in the application that will receive it. Exporting a frame does not recreate source layers or live type that were absent from the trace. For Synfig, compare direct SVG import and Inkscape SIF export, then inspect the moving parts and group origins before animating. For Toon Boom projects, the Harmony vectorization and SVG import guide explains native drawing contours, bitmap envelopes, and the drawing and palette choices for a Harmony 25 import.
Adobe currently states that Animate is in maintenance mode: the application remains available and receives support, security updates, and bug fixes, but Adobe does not plan new features. That does not remove Image Trace from existing workflows, but it matters when choosing a new long-term production pipeline.
When to use a separate vectorizer instead
Animate's built-in trace fits when the artwork will be cleaned and animated in the same document. The broader Image Trace versus AI vectorizer comparison explains the tradeoff. A separate vectorizer may fit better when you want to convert outside Animate, compare several sources, or establish a reusable SVG master before animation begins.
PerfectVector's image-to-vector workflow reconstructs supported raster images as editable vector shapes in the browser. Compare its preview with Animate's trace on the same source. Judge:
- visible silhouette and internal-shape fidelity;
- anchor count for equivalent detail;
- useful separation of colors;
- time required to clean the file;
- behavior after import into Animate.
Use whichever result needs less correction. Neither route can infer an original font, hidden layer, or exact curve that a low-quality bitmap no longer contains.
FAQ
Does Adobe Animate have Image Trace? Yes. Adobe's help page calls the feature Image Trace, and the current commands include Object > Trace Bitmap and Modify > Bitmap > Trace Bitmap.
Can Adobe Animate turn a PNG into vector art? Yes. Trace Bitmap reconstructs visible PNG pixels as modifiable vector artwork. It does not recover original layers, live type, symbols, or hidden details.
What do Paths, Corners, and Noise do in Animate Image Trace? Paths changes how tightly shapes fit pixel edges, Corners changes how strongly bends become corner points, and Noise controls the size of pixel areas ignored during tracing.
Should I use Abutting or Overlapping in Animate? Use Abutting for neighboring cutout paths that meet at a shared edge. Use Overlapping for stacked shapes that slightly cover their neighbors. Inspect the result based on how you will edit and animate it.
Is Adobe Animate discontinued? No. Adobe says Animate is in maintenance mode, remains available, and will continue receiving support, security, and bug fixes, but no new features are planned.
Sources
- Adobe — Image Trace in Animate — Current trace commands, presets, preview behavior, modes, and advanced-control definitions.
- Adobe — Imported bitmaps in Animate — Current bitmap import and handling context.
- Adobe — Exporting SVG files from Animate — Current SVG export workflow and handoff context.
- Adobe — Capture FAQ — Adobe's current statement that Animate is available in maintenance mode with support and fixes but no planned new features.
- PerfectVector — Image to Vector — Current browser vectorization workflow, preview, output, and product boundary.
If you want a second result to compare before committing to cleanup, vectorize the same bitmap in the browser, inspect both sets of paths, and keep the version that preserves the art with less repair.
More from the blog

Adobe Capture Vectorize Image: Make an Editable Shape
Use Adobe Capture to vectorize an image on your phone, refine the captured shape, save it to a Creative Cloud Library, and inspect the editable result.
AI SVG Generator vs AI Vectorizer: Which Do You Need?
An AI SVG generator makes a new vector from a text prompt. An AI vectorizer converts the image you already have. Here's how to pick, and when you need both.