White Gaps Between SVG Shapes: Diagnose and Fix Them
White seams between SVG shapes may be anti-aliasing artifacts or real geometry gaps. Use zoom, background, raster, and outline tests before editing paths.
On this page
Thin white lines between SVG shapes are often rendering seams, not holes in the file. The SVG rendering model allows implementations to use anti-aliasing as they rasterize vector graphics; separately sampled adjacent edges can therefore expose a background-colored hairline at a particular scale. The line may disappear at another zoom level or in another renderer.
Sometimes the gap is real. Before overlapping shapes, adding strokes, or uniting paths, run four checks: change the zoom, change the background, raster-export the art, and inspect the paths in outline view. The results tell you whether to fix display sampling or geometry.
Renderer seam or real gap?
- Changes or disappears with zoom: probably a display seam.
- Changes color with the background: background is being sampled between edges.
- Absent in outline view: the vector boundaries may already meet.
- Visible in a high-resolution raster export: inspect export precision and geometry more closely.
- Survives in a mesh, cut preview, or path measurement: treat it as a real geometry problem.
Why touching paths can show a seam
Screens render vector shapes onto a pixel grid. When an edge cuts through a pixel, anti-aliasing blends that pixel between the shape and the background to make the edge look smooth. Two shapes rendered separately can each blend their boundary pixels, even when their vector coordinates meet.
Scale adds another variable. A shared coordinate that lands exactly on a pixel boundary at one size may land between pixels at another. Export rounding can also move one boundary by a tiny amount. That is why a line can appear only at 67% zoom, disappear at 100%, and return in a small web thumbnail.
The SVG may still be mathematically fine. Editing geometry before testing can create overlaps that become visible in transparent, print, cut, or animated uses.
The key distinction is whether the underlying outlines share an edge. A rendering seam can appear over touching geometry; a real gap remains visible between the outlines themselves.
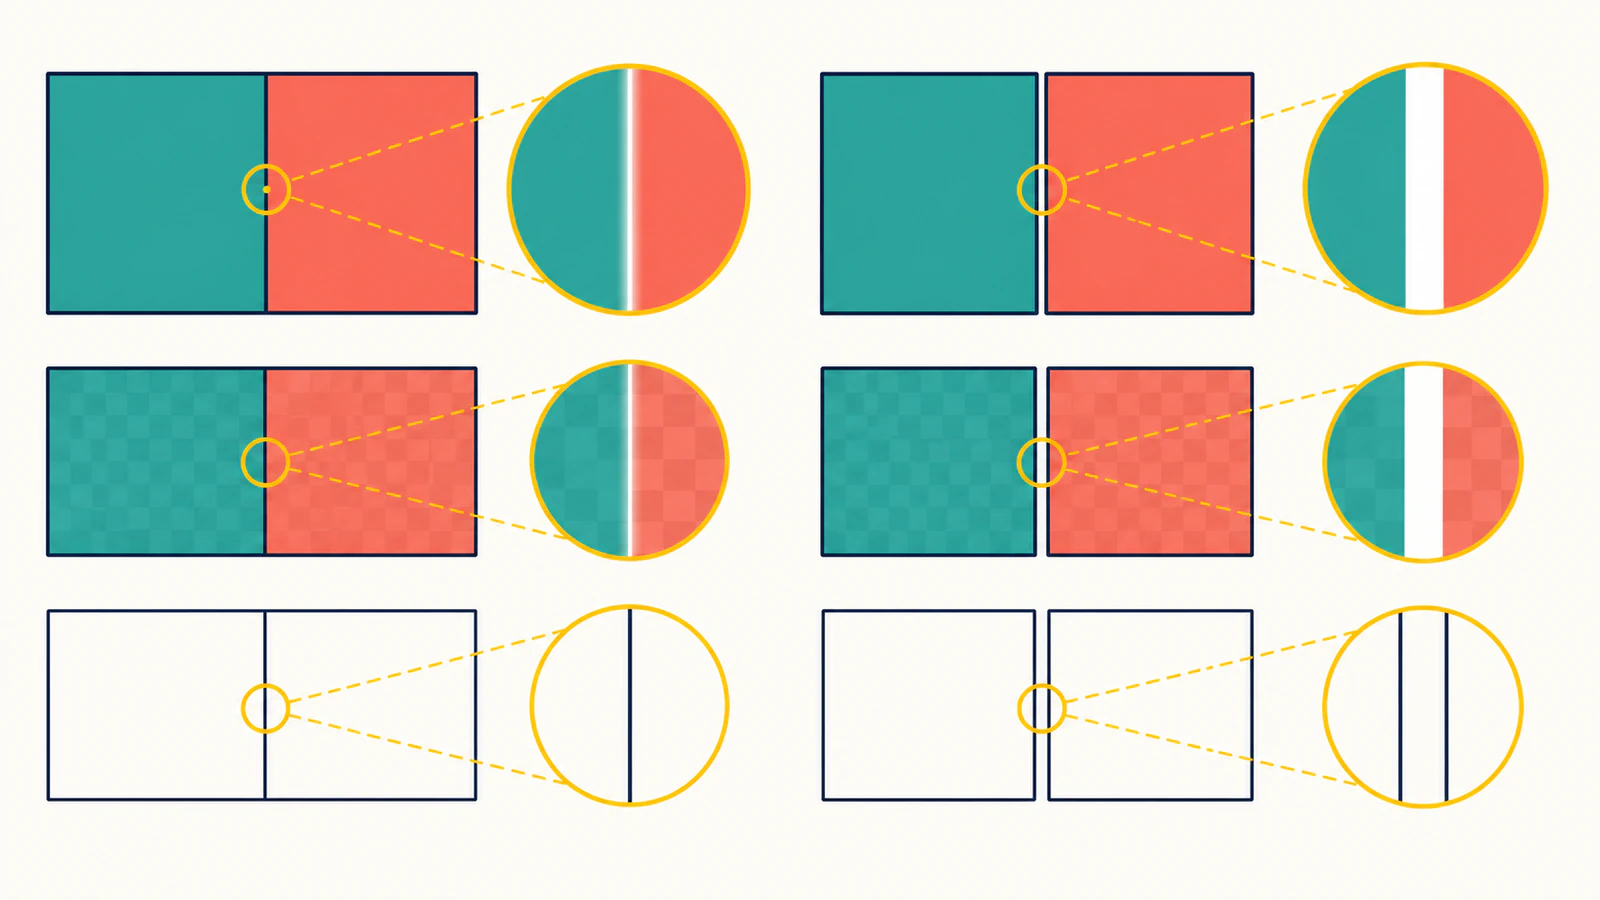
Run four tests before editing
1. Change the zoom
View the SVG at several zoom levels, including 100% and a deep zoom. A real gap remains between the paths as you magnify it. A sampling seam often flickers, changes thickness, or disappears.
Do not use zoom alone. Some geometric gaps are subpixel-small and can also change appearance.
2. Change the background
Place the SVG over white, black, and a bright color. If the hairline takes on the background color, the renderer is showing background between separately sampled edges. That may be either a sampling seam or a genuine transparent gap, so continue to outline inspection.
3. Export a high-resolution PNG
Export at two or four times the final dimensions, then inspect the reduced output. If the seam disappears in the high-resolution export, the problem was probably scale-dependent rasterization. If it remains and becomes measurable, inspect the coordinates and export precision.
4. Use outline or wireframe view
Turn off fills and inspect the actual boundaries. Select the neighboring nodes and compare their coordinates. If the paths meet exactly, the visible line is a renderer issue. If endpoints or edges do not match, repair the geometry.
For a broader set of path edits, see how to edit an SVG. Keep a copy because the best fix depends on how the file will be used.
Fix a display seam
For flat artwork whose adjacent fills should have no transparency between them, a tiny controlled overlap is usually the most reliable fix. Extend the underlying or darker shape under its neighbor by a small amount. The overlap should be invisible at normal size and should not alter the outer silhouette.
Other options include:
- Add a very thin stroke in the same color as a shape, aligned so it covers the seam.
- Put a matching base shape behind all adjacent pieces.
- Increase SVG export coordinate precision if rounding separated shared edges.
- Render a larger raster and downsample when the final deliverable is PNG.
The SVG shape-rendering property can request geometric precision or crisper edges, but MDN notes that it is a rendering hint, not a portable guarantee that every seam will disappear. See when crispEdges helps and where it does not before applying that hint to a whole file.
Choose one correction, then test it in the actual destination. Stacking several fixes can create dark ridges or bulges where shapes overlap.
Fix a real geometry gap
If outline view or downstream output confirms a hole:
- Snap the intended nodes to the same coordinate.
- Extend neighboring edges until they truly meet.
- Join endpoints only when the design calls for one continuous path.
- Remove duplicate or stray segments.
- Re-export with enough coordinate precision.
- Reopen the file and repeat the four tests.
Avoid using a white shape to cover the gap. It hides the symptom only on a white background and remains an extra object in the file.
If the gaps came from tracing a noisy raster, there may be many slivers and near-misses across the design. Repairing each one can take longer than retracing a cleaner source.
The destination changes the right fix
| Destination | Safe priority |
|---|---|
| Web illustration with flat adjacent fills | Small overlap or backing shape after renderer tests |
| Transparent logo | Repair or controlled overlap without a visible base rectangle |
| PNG export | Higher-resolution rasterization and downsampling may be enough |
| Cricut or laser cut | Use the intended cut geometry; decorative overlap may create extra cuts |
| CAD or 3D print | Confirm the generated face or mesh has no crack |
| Animated parts | Keep objects separate and overlap only where motion still works |
A crack that survives into a CAD face or downstream mesh is materially different from a one-pixel browser seam. If the downstream geometry separates, repair the source paths or the conversion tolerance. If only a browser thumbnail shows the line, production geometry may already be correct.
The pre-cut SVG checklist covers the machine-specific review. For screen softness or hidden pixels rather than seams, use the pixelated SVG diagnosis.
Where PerfectVector fits
When gaps are scattered through a trace made from a PNG or JPG, return to the raster source before patching dozens of paths. Clean obvious compression blocks, remove an unwanted background, and keep the strongest original edges. Then use the image-to-vector workflow to rebuild the visible regions as editable paths and inspect the preview.
PerfectVector cannot know whether two same-colored regions must remain separate for animation, cutting, or assembly. Use the preview to check silhouettes and negative space, then test the downloaded SVG in its real destination. Retracing is useful when source fragmentation caused the gaps, not when one browser is merely anti-aliasing correct adjacent geometry.
FAQ
Why are there white lines between SVG paths? The browser or app may be anti-aliasing adjacent edges separately, allowing the background to show through at certain scales. The paths can still meet exactly. Change zoom, background, renderer, and outline view before editing.
How do I remove anti-aliasing seams in an SVG? For flat adjacent fills, add a tiny controlled overlap, a same-color hairline stroke, or a backing shape. Test the result at the final display sizes. Do not use those fixes blindly for cut, CAD, transparent, or animated artwork.
Will joining all the paths remove the gaps? It may, but it also removes separate color and editing structure. Unite paths only when they should be one shape. Multicolor artwork usually needs separate objects, so matching edges or controlled overlap is safer.
Why do the gaps appear only when the SVG is small? Scaling moves vector boundaries relative to the pixel grid. At some sizes, both adjacent edges blend with the background in the same pixel row or column. A larger render or slight overlap can prevent the background from showing.
Do tiny SVG gaps matter for 3D printing or cutting? They matter if they survive into the face, mesh, or toolpath. A screen-only seam does not prove the geometry is broken. Inspect the downstream preview and repair any crack or open contour that changes the produced object.
Sources
- W3C — SVG 2 Rendering Model — Describes SVG painting order, clipping, compositing, and anti-aliasing.
- MDN —
shape-rendering— Documents the rendering hints available for SVG shapes. - W3C — SVG 2 Coordinate Systems — Defines the coordinate, viewport, and transform model behind scale-dependent rendering.
If a fragmented raster trace contains real gaps, rebuild it as editable vector paths and inspect the preview. If the paths already meet, preserve the file and apply only the smallest destination-specific display fix.
More from the blog

SVG z-index Not Working? Fix Path Stacking Order
When SVG z-index does not bring a path forward, check element order. Compare the same emblem before and after a reorder, then verify groups and exported files.

Konva SVG Import: Choose an Image or Editable Paths
Load SVG artwork into Konva as one image or separate editable paths. Test recoloring, scaling, and PNG export, then keep the original SVG for future edits.