
Konva SVG Import: Choose an Image or Editable Paths
Load SVG artwork into Konva as one image or separate editable paths. Test recoloring, scaling, and PNG export, then keep the original SVG for future edits.
On this page
Use Konva.Image when you want to place a complete SVG on a canvas. Use separate Konva.Path nodes when your application needs to recolor or manipulate individual path shapes. Loading an SVG image does not automatically create a Konva object for every element inside it. Konva's SVG guide describes these as different approaches.
For a logo picker or composition tool, one image may be enough. For a two-color badge whose regions need separate controls, the object structure matters. Decide what the user must edit before choosing the loader, and keep the SVG source alongside the canvas scene.
Choose the representation before importing
| Your app needs to… | Start with | What you must keep track of |
|---|---|---|
| Move or resize the entire SVG | Konva.Image | The source image and its display dimensions |
| Recolor known path regions independently | One Konva.Path per region | Path data, fills, positions, and grouping |
| Preserve a complex SVG's appearance | An image rendering, tested in your target browsers | The original SVG and any external resources |
| Edit arbitrary SVG documents | A deliberate SVG parsing and editing workflow | Transforms, styles, text, effects, and export fidelity |
Konva's Path tutorial accepts SVG path data through data. That is the value from a path's d attribute, not the full SVG document. Copying d values alone does not carry the parent group's transform, inherited color, or the SVG's viewBox behavior with them.
There is a separate source-file question too: does the SVG contain paths at all? Use the embedded-raster inspection guide when the artwork is a bitmap wrapped in SVG. A valid path-based SVG can still become one image node in Konva; that does not make the source file a fake vector.
A two-color example with a visible fill test
The original mark below contains two hand-authored paths with explicit fills. The left canvas loads both as one image. The right canvas constructs two Path nodes from the same geometry. Both receive a pink fill request and a scale of 1.3.
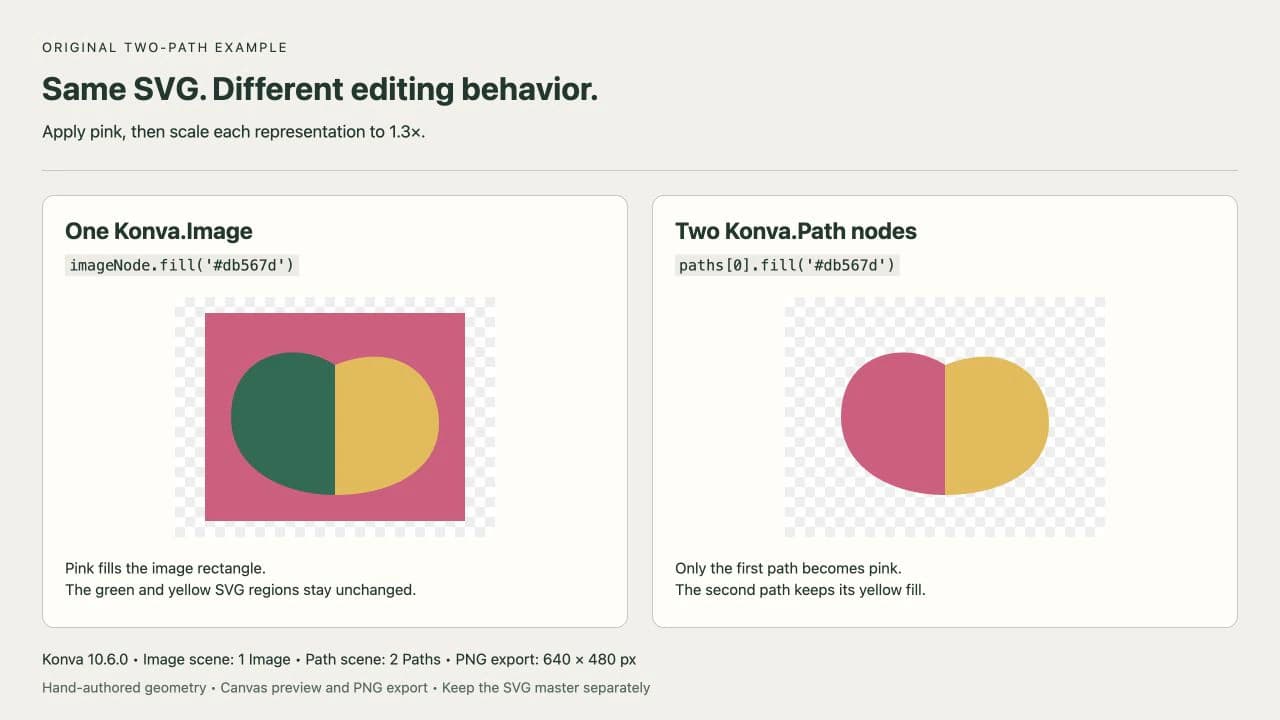
The pink rectangle on the left is useful evidence: imageNode.fill() changes the image shape's background, while the opaque green and yellow regions retain their source colors. On the right, paths[0].fill() changes only the first region. This test uses original geometry, not a PerfectVector conversion result.
Save the following as an HTML file and serve it through your local development server. It pins Konva 10.6.0, creates two 320 × 240 stages, and waits for the SVG image to decode before drawing. The code is the same comparison exercised for the capture.
<div id="image-scene"></div>
<div id="path-scene"></div>
<script src="https://unpkg.com/konva@10.6.0/konva.min.js"></script>
<script type="module">
const parts = [
  { data: 'M20 80 C20 30 70 20 100 40 L100 140 C60 140 20 120 20 80 Z', fill: '#176b55' },
  { data: 'M100 40 C150 20 180 50 180 85 C180 120 145 140 100 140 Z', fill: '#e9b949' }
];
const svg = `<svg xmlns="http://www.w3.org/2000/svg" width="200" height="160" viewBox="0 0 200 160">${parts.map(p => `<path d="${p.data}" fill="${p.fill}"/>`).join('')}</svg>`;
const source = new Image();
source.src = 'data:image/svg+xml;charset=utf-8,' + encodeURIComponent(svg);
await source.decode();

function makeStage(container) {
  const stage = new Konva.Stage({ container, width: 320, height: 240 });
  const layer = new Konva.Layer();
  stage.add(layer);
  return { stage, layer };
}
const imageScene = makeStage('image-scene');
const pathScene = makeStage('path-scene');
const imageNode = new Konva.Image({
  image: source, x: 30, y: 16, width: 200, height: 160
});
imageScene.layer.add(imageNode);
const group = new Konva.Group({ x: 30, y: 16 });
const paths = parts.map(p => new Konva.Path(p));
group.add(...paths);
pathScene.layer.add(group);

// Compare the same fill request on the two representations.
imageNode.fill('#db567d');
paths[0].fill('#db567d');

// Resize both without changing their source geometry.
imageNode.scale({ x: 1.3, y: 1.3 });
group.scale({ x: 1.3, y: 1.3 });
imageScene.layer.draw();
pathScene.layer.draw();

const png = pathScene.stage.toDataURL({ pixelRatio: 2 });
const exported = new Image();
exported.src = png;
await exported.decode();
</script>
In this deliberately small example, every path has its own paint and uses the same coordinates. The group gives the two editable paths one position and scale. Changing the group's scale leaves each path's data intact; it changes where and how large the group draws.
For an existing trusted SVG file that only needs whole-image placement, the Image tutorial shows the normal image-loading workflow. Load the SVG URL as an image, wait for it to load, then pass it to Konva.Image. A React component that renders SVG markup is a different value from the image object that the canvas expects.
Carry more than path data when the artwork is complex
The example's parts array is an explicit model for two known shapes. It is not an SVG importer. Before using a similar approach on exported artwork, inspect what creates its appearance:
- A group transform can move, rotate, or scale all its children. Preserve that relationship or bake the transform into the geometry deliberately.
- Paint may come from an ancestor or a CSS rule. Resolve the intended fill and stroke instead of assuming every path declares them.
- Gradients, clipping, masks, and filters have their own definitions and references. A copied
dstring does not reconstruct those effects. - Text and basic shapes may need separate treatment. Do not assume every visible object is already a path.
Keep a rendering of the original next to your reconstruction while testing. Start with one recognizable region, compare its position and color, and only then add the remaining shapes. The SVG editing guide covers source cleanup when the object structure is difficult to work with.
If individual path controls are unnecessary, loading the complete SVG as an image can avoid that reconstruction work. Konva also documents rendering SVG with an external library such as canvg and then placing the resulting canvas in a Konva.Image. That remains an image representation; it does not give the user separate Konva nodes for every source path. See the documented options.
For artwork that only needs a different source color, another approach is to update the SVG itself and reload its image. Konva's maintainer describes that workflow in react-konva issue 530. Use a structured edit suited to your known SVG, rather than replacing every fill indiscriminately and losing intentional color differences.
Treat canvas export as raster delivery
The example calls pathScene.stage.toDataURL({ pixelRatio: 2 }). Its 320 × 240 stage produces a decoded 640 × 480 PNG. Increasing pixelRatio changes the exported pixel dimensions; it does not turn the PNG into editable SVG. Konva's export documentation explains this setting.
Keep these three deliverables separate:
- The original SVG, for vector editing and comparison.
- Your application's scene data, including the path or image references and the edits your app supports.
- A PNG or other raster export, for uses that need a rendered picture.
Reopen the exported PNG and inspect its dimensions and small details. Also test the SVG image in the browsers your application supports; the Konva SVG guide notes rendering compatibility differences. This example tests one simple, self-contained SVG, so it does not establish support for every exported file or effect.
Avoid judging vector quality from the canvas preview alone. The pixelated SVG guide separates source geometry from raster previews and display sizing.
When PerfectVector helps with the source
If your starting asset is only a PNG or JPG motif, PerfectVector can help reconstruct editable SVG geometry before you build the Konva scene. Convert the image to vector, open the result in an editor, and inspect the silhouette, holes, and color regions before mapping any paths into your app.
Vectorization does not create a Konva scene model or an arbitrary SVG parser. You still choose the representation and carry over the properties it needs. If you already have a usable SVG master, work from that file. For photography or painted texture that should remain pixels, an image node is often the appropriate representation without tracing.
Check the import with your own artwork
Before adding an SVG to a reusable editor:
- Choose one whole-image node or separate shape nodes based on the controls the user needs.
- Change one region's color and confirm that only the intended object changes.
- Resize the complete design and check spacing, stroke appearance, and clipping.
- Export at the required pixel dimensions and reopen the raster file.
- Reopen the saved SVG master independently, so a canvas export never becomes your only copy.
FAQ
Does Konva.Image make the paths inside an SVG editable? No. It displays the SVG as one image node. To control individual path regions, create separate Path nodes from suitable path data or use an SVG editing workflow that preserves the document structure.
Why does fill add a rectangle instead of recoloring my SVG? On an Image node, the fill paints the image shape behind its image content. It does not rewrite fills inside the SVG. Edit the source SVG and reload it, or use separate Path nodes when your app needs individual color controls.
Does increasing pixelRatio export a vector file? No. In this example, pixelRatio 2 produces a PNG with twice the stage width and height. Keep the SVG source separately for vector editing.
Sources
- Konva — SVG on canvas — Explains Image, Path, and external-renderer options and browser compatibility limits.
- Konva — Path tutorial — Documents constructing a Path from SVG path data and explicit paint properties.
- Konva — Image tutorial — Shows loading an image and placing it in a Konva scene.
- Konva — High-quality image export — Explains raster export and the effect of pixelRatio on output dimensions.
- Konva — react-konva issue 530 — Records the maintainer's source-edit-and-reload approach to changing SVG image colors.
Starting with a raster-only icon? Turn your image into SVG paths, inspect the recovered color regions, and test one region in Konva before wiring up the rest of your editor.
More from the blog

PowerPoint SVG: Convert to Shape and Edit Parts
Convert an SVG to editable PowerPoint shapes, change individual parts, and diagnose missing commands. Check platform support and preserve the original artwork.
LibreOffice Draw: Edit SVG Shapes and Export Safely
Edit SVG artwork in LibreOffice Draw: choose Break or Ungroup, change shapes and colors, keep an ODG master, and check a separate SVG export before sharing.