Why Your Auto-Traced SVG Has Too Many Nodes (And How to Fix It)
Auto-traced SVGs are often clogged with hundreds of unnecessary anchor points that make them hard to edit and slow to cut. Here's why it happens — and how to get clean ones.
On this page
You traced a PNG into an SVG, opened it up to start editing — and the path is buried under anchor points. Hundreds of them, clustered along curves that should have taken five or six. Every time you try to nudge a shape, you're fighting a dozen handles you didn't ask for.
If that sounds familiar, your vectorizer isn't broken. It's doing exactly what most auto-tracers do: transcribing pixels instead of drawing shapes. Here's why that happens, why it slows you down more than you'd think, and how to get vectors that are actually clean from the start.
What "too many nodes" actually means
Every path in an SVG is built from anchor points (also called nodes) connected by curve segments. Each anchor carries a pair of Bézier handles that bend the line on either side of it. A few well-placed anchors can describe a long, smooth curve perfectly — that's the whole point of vector graphics.
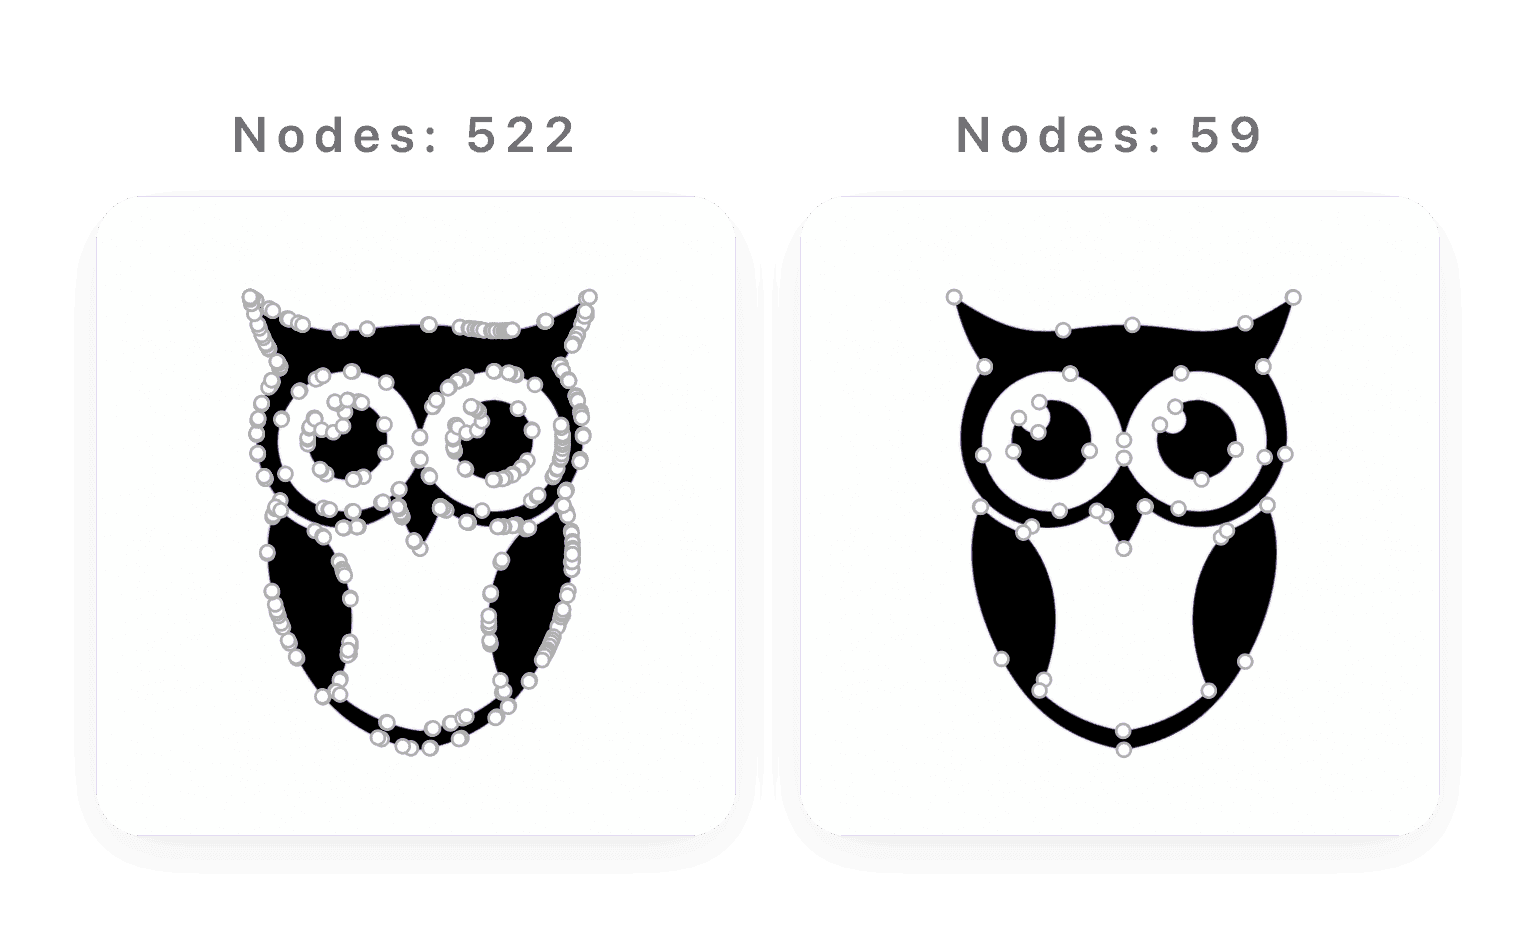
The trouble starts when there are far more anchors than the shape needs. A curve a designer would draw with five points ends up with fifty. The image still looks fine at a glance, but the underlying path is a mess.
You're probably looking at node bloat if:
- A simple curve has anchor points every few pixels instead of every few inches.
- Selecting one shape lights up dozens of points where you'd expect a handful.
- The file is surprisingly large for how simple the artwork is.
Why auto-tracers pile on nodes
Most tracing tools — Illustrator's Image Trace, and the potrace-based engines behind a lot of free online converters — work by following the boundary between colors in your raster image and dropping anchor points along it.
The catch is where that boundary sits. Your PNG has anti-aliasing: the soft, semi-transparent pixels that smooth out edges on screen. To a tracer, that soft edge looks like a slightly wobbly line, so it adds points to follow every wobble. It isn't asking "is this an arc or a straight segment?" — it's transcribing the pixel contour, jitter and all. How aggressively a tool does this varies widely — here's how the main AI image vectorizers compare.
You can see it in the path data itself. Here's roughly what one ear tuft of that owl looks like traced versus drawn cleanly:
<!-- Auto-traced: one ear tuft, 40+ points -->
<path d="M312.4,98.1 C313.0,97.8 313.9,97.2 314.6,96.9 C315.2,96.7
316.1,96.4 316.8,96.2 C317.4,96.0 318.3,95.7 319.0,95.5 ...(many more) Z"/>

<!-- Clean: the same tuft, 6 points -->
<path d="M312,98 C320,70 360,68 372,96 C378,112 340,140 312,98 Z"/>
Same curve. One is a transcription of every pixel; the other is a shape.
Why it slows you down
A bloated path doesn't just look untidy in the editor — it costs you in three concrete ways.
| Auto-traced (typical) | Clean vector | |
|---|---|---|
| Anchor points | Hundreds per shape | A few dozen |
| Editing | Fight handles on every tweak | Reshape directly |
| File size | Heavier, slower to load | Compact |
| Cutting machines | Stutter, rough cuts, long cut times | Smooth, fast cuts |
In design tools
In Illustrator or Figma, every extra anchor is something you have to select around, avoid, or clean up before you can make a real change. Reshaping a clean curve takes one or two points. Reshaping a transcribed one means wrestling the whole cluster — and good luck keeping it smooth.

On cutting machines
This is where it really bites. Cricut, Silhouette, and laser cutters follow the path literally. Too many nodes means the machine stutters along every micro-segment: rougher cuts, longer cut times, and more chances for the material to tear. A clean path cuts like butter. If your file is headed for a laser, convert it to a laser-ready SVG and skip the stutter entirely.
How to get clean nodes
There are three ways out, in rough order of how much pain they save:
- Simplify after the fact. Illustrator's Object → Path → Simplify can drop anchor points. It helps, but it's lossy — it approximates the path, which can soften corners and distort the shape. You're also still starting from a bloated trace.
- Lower the trace detail. Most tracers let you reduce complexity, but it's a blunt instrument: turn it down far enough to cut nodes and you start losing the details you wanted.
- Start clean. The real fix is to vectorize with something that outputs clean paths in the first place, so there's nothing to clean up.
That last one is the whole reason we built PerfectVector. Instead of transcribing the pixel boundary, its model was trained on real design files — where a human had already decided where anchor points belong and which segments are one curve versus three. The output mirrors that judgment: smooth Bézier curves, anti-aliasing handled, and a node count that reads like something a designer would have drawn.
And it isn't only illustrations — logos and lettering bloat exactly the same way, which bites hardest where you need crisp edges and clean vinyl cuts.

Try it
Drop a PNG or JPG into PerfectVector — no login, no credit card. You'll see the node and color count right on your result, so you can judge the difference yourself before you download anything.
Can't I just use Simplify in Illustrator?
You can, and it helps — but Simplify works by approximating an already-bloated path, so it tends to round off corners and shift curves in ways you have to babysit. It's a cleanup step on top of a messy starting point. Vectorizing with clean output skips the cleanup entirely: there's nothing to simplify because the points were placed well to begin with.
More from the blog

How to Convert an Image to an SVG for CNC (Clean Paths Your CAM Will Cut)
A CNC follows vector paths, not pixels, so your design has to become a clean SVG or DXF first. Here's how to convert an image into CAM-ready, closed-path vectors.

How to Convert an Image to an SVG for 3D Printing (and What Extrudes Cleanly)
A 3D printer can't extrude pixels, so flat designs start as an SVG. Here's how to turn an image into a clean, closed-path SVG that imports and extrudes the first time.