Signature to SVG: How to Vectorize Your Actual Handwriting
Three different things get called a signature SVG, and only one of them is your handwriting. Here is how to tell them apart and vectorize the real thing.
On this page
Search for a signature SVG and most of what you find will type your name in a script style and hand you the result. It is a real vector file. It is not your signature.
That distinction stops being academic the moment the file has to stand for you: engraved on a gift, printed on an artist's mark, or sitting at the bottom of a document. So before any of the how-to, it is worth knowing which of three things you are actually being offered.
Short on time? The three things people call a signature SVG
- Generated from typed text. You enter your name, a tool renders it in a handwriting style. Vector, instant, and not your handwriting.
- Drawn with a mouse or trackpad. Genuine vector, genuinely yours, and it looks like it was drawn with a mouse. Fine for a checkbox on a form.
- Vectorized from a real signature you signed on paper. The only one that gives you your own hand as a clean, scalable file. This is the one this guide covers.
Sign it properly first
Everything downstream is decided here, and this is the step the tutorials skip.
Use a pen that lays down solid black: a fineliner, a gel pen, or a marker. Ballpoint is the usual culprit behind a patchy trace, because it skips and leaves grey where you wanted black. Sign on plain unlined white paper, larger than you normally would, and sign it five or six times. You want options, and your third attempt is usually better than your first.
Then capture it. A flatbed scanner around 300–400 ppi is a practical target for a paper original; NARA uses that range in its digitization requirements. A phone photo works if you get even light with no shadow across the paper and hold the camera square to the page, not at an angle. Crop tight to the signature.
If the result looks grey and washed out, raise the contrast before you convert. A signature that is solidly black on clean white traces cleanly; one that is charcoal on beige gives the tracer nothing firm to follow.
Outline or centerline: the decision that matters
A signature uses thin strokes, so a result that looks right on screen can still fail in production.
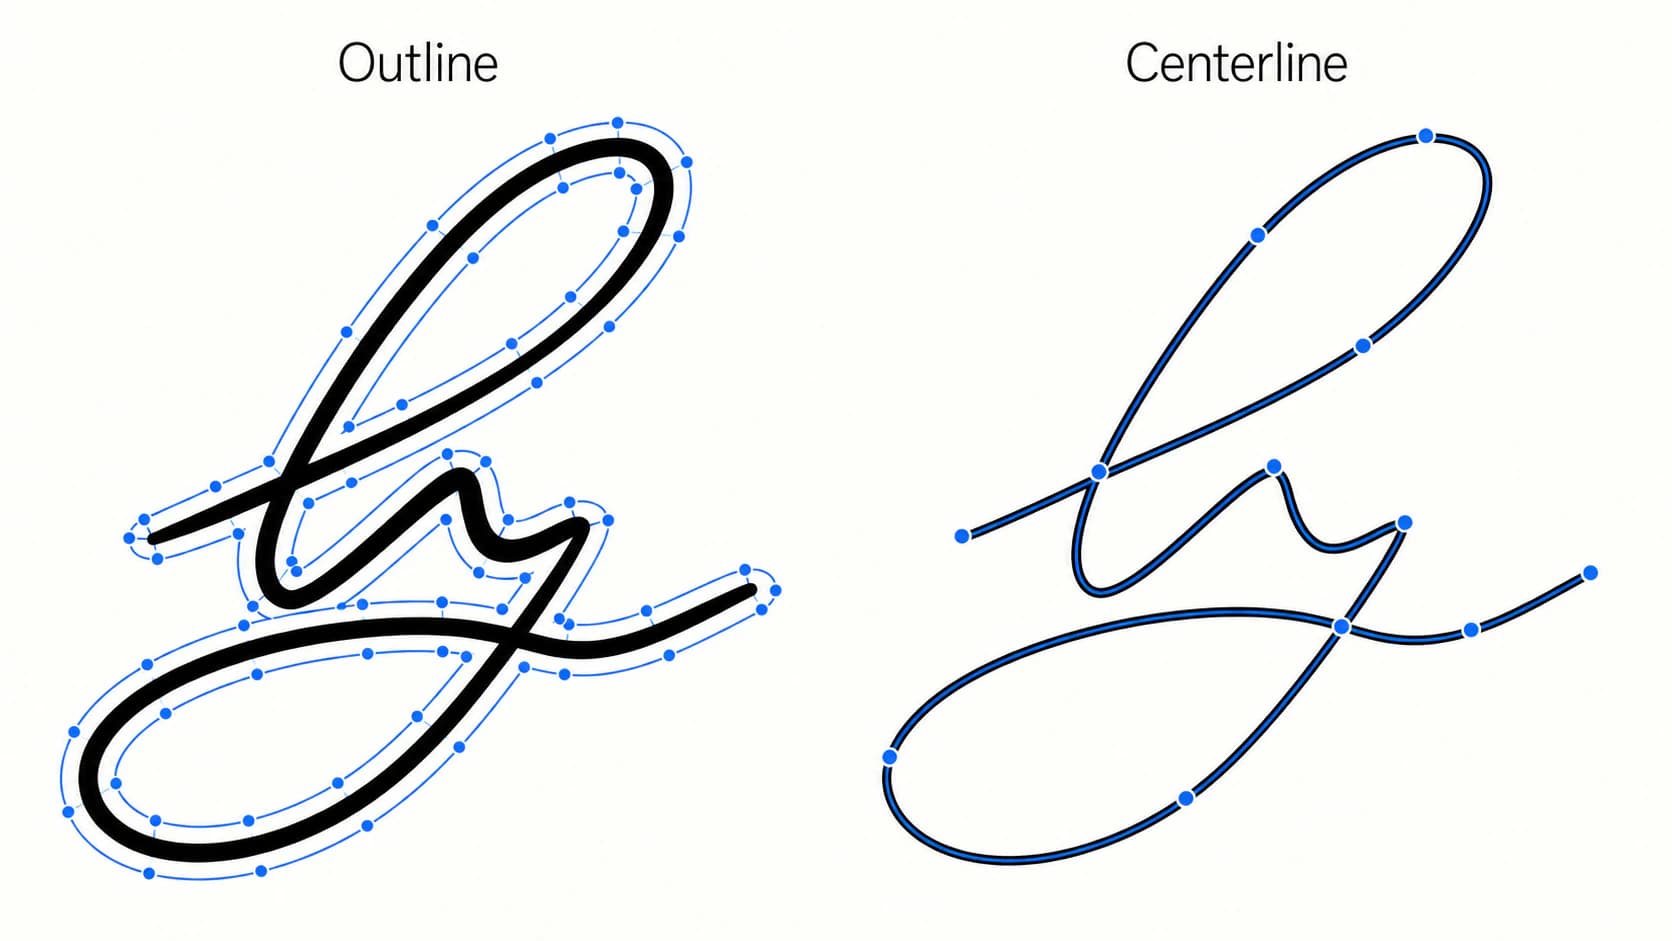
Trace a pen stroke normally and the tracer follows both edges of the ink and gives you a closed shape, like a long thin ribbon. That is an outline trace. It looks perfect. It also means a cutting machine or a plotter will follow both sides of every stroke, so a single pen line becomes two cut lines with a sliver between them.
A centerline trace reduces each stroke to one open path down the middle, which is what an engraver, a plotter, or a foil machine wants. Inkscape documents centerline tracing, and our guide to Trace Bitmap covers where to find it. We wrote about the same trap in the context of double cut lines, because it catches makers constantly.
Which do you want?
| What you are doing | Trace type |
|---|---|
| Vinyl decal, sticker, cut-out lettering | Outline |
| Laser or rotary engraving, single-line | Centerline |
| Laser fill engraving (solid, filled strokes) | Outline |
| Pen plotter, foil quill, drawing machine | Centerline |
| Website, PDF, print, logo lockup | Outline |
If you are unsure, outline is the safer default. It is what almost every automatic converter produces, and it is correct for everything except machines that follow a path with a physical tool.
For a full word or brush-lettered composition, the same outline choice is only the beginning. The hand-lettering vector guide covers the counters, terminals, joins, and deliberate ink texture that a signature-only workflow does not.
Convert it
With a clean scan in hand the conversion itself is short.
- Convert the image to vector. Upload the cropped scan and let it trace. A signature is high contrast black on white, which is the easiest possible input, so a good converter should return smooth strokes without you tuning anything.
- Check the node count. Open the SVG and look at the anchor points. A signature should be a few dozen to a couple of hundred points. If a five-letter name comes back with two thousand, the tracer spent its points on paper texture and edge noise instead of your strokes.
- Delete the background. Many traces include the white paper as its own shape sitting behind the ink. Remove it, or you will find a white rectangle underneath your signature when you place it on a coloured layout. Our post on transparent backgrounds in SVG covers how to check.
- Clean the stray specks. Dust on the scanner bed and pen skips become tiny separate shapes. Select and delete them.
- Test it at final size. Zoom to the size you will use in the end. A signature that looks smooth at 200 percent can show flat spots at engraving size.
What this looks like with PerfectVector
Thin signature strokes make scan noise unusually visible in the trace. When the tracer follows the paper texture along with the ink, node counts grow and the edges become harder to edit.
Run the cleaned scan through the logo and mark vectorizer, then compare the preview with the original signature. Check whether its paths preserve deliberate gaps and pressure changes without adding noisy nodes; thicken, close, or reshape a stroke in a vector editor only after that review. If the file is going to an engraver, prepare and test it for laser work next.
What people actually make with these
The demand for this is mostly physical, which is why file quality matters more here than it would for a web graphic. Makers report wanting signatures for laser engraving and sublimation work in particular. (The sibling keepsake job, a child's drawing traced wobble and all, shares this whole playbook, and often ships with a signature-style name caption.)
Common jobs, and what each one needs:
- Engraved gifts and signs. Cutting boards, pens, plaques, wedding signage. Centerline, and test on scrap first because a signature that is legible on paper can close up at small engraving sizes.
- An artist's mark on prints. Outline, and keep a version with generous margins so it places consistently. For a physical mark, the rubber stamp artwork converter can prepare editable shapes from a clean signature scan; have the maker check fine strokes at imprint size.
- A wax seal. Use the wax seal artwork workflow for a clean raster source, then review the smallest gaps and lettering with the maker. The SVG is artwork for review, not a manufactured die.
- Vinyl decals. Outline, and watch the thin strokes: anything narrower than your vinyl can hold will tear during weeding.
- Documents and email footers. Outline. SVG for anything that scales, and export a PNG at the size you need for tools that will not take vector.
- A brand mark. If the signature is becoming a logo, the process is the same one we describe in how to vectorize a logo, and the same rules about node count apply.
When it will not come out clean
Some signatures do not survive tracing, and it is better to know before you spend an evening on it.
A ballpoint signature on lined notebook paper photographed under a lamp is the worst case: patchy ink, a shadow gradient, and printed lines the tracer will happily vectorize along with your name. Re-signing takes two minutes and fixes all three.
Very fine strokes are the other limit. If your pen laid down a hairline, an engraver may not resolve it and a cutter certainly will not. Sign again with a thicker pen; fattening the paths afterward rarely looks right.
And if the only copy of the signature is a low-resolution JPG from a scanned contract, accept that you are tracing compression artifacts. It can be cleaned up by hand, but re-signing gives a better result in less time whenever it is an option.
A note on documents
If you are making this for contracts, the SVG file format alone does not establish a valid electronic-signature process. Under the U.S. E-SIGN Act, an electronic signature can be an electronic sound, symbol, or process attached to a record and executed with intent to sign; other record and consent requirements can also apply. Where a signature carries legal weight, use the process the document and your jurisdiction expect rather than treating a pasted image as sufficient by itself. Use the SVG for the design work: the mark on your prints, the engraving on the gift, the flourish in your brand.
FAQ
How do I turn my handwritten signature into an SVG? Sign in solid black ink on plain white paper, scan it at 300 DPI or photograph it in even light, crop tight, then run it through an image to vector converter. Afterwards delete the white background shape, remove any specks the scan picked up, and check the anchor point count. A signature should be tens to low hundreds of points, not thousands.
Is an SVG signature generator the same as vectorizing my signature? No. Most generators take your typed name and render it in a handwriting style, so the output is a script font in vector form, not your handwriting. Tools that let you draw with a mouse or trackpad do produce your own strokes, but mouse handwriting looks like mouse handwriting. Only tracing a signature you actually signed gives you your own hand as a vector.
Should I use outline or centerline tracing for a signature? Use centerline when a tool follows the stroke once, such as single-line laser engraving, a pen plotter, or a foil quill, because it turns each pen stroke into one line down the middle. Fill engraving is the exception: filling a solid shape wants the outline, not the centre. Use outline for vinyl cutting, print, documents, and web use. An outline trace of a thin stroke produces two lines where the tool should follow one.
Why does my signature SVG have a white box behind it? The tracer treated the paper as a shape and kept it. Open the file, select the rectangle sitting behind the strokes, and delete it. It only becomes visible once you place the signature on a coloured or photographic background, which is why it often goes unnoticed until late.
Can I use my signature SVG on a Cricut or a laser? Yes, and the trace type decides which. Cutting a decal on a Cricut wants an outline trace, and strokes must be thick enough to survive weeding. Laser or rotary engraving wants a centerline trace so the tool follows the stroke once. Test on scrap material before committing to the final piece.
Sources
- U.S. National Archives: Digitization standards for permanent records — Provides resolution guidance for scanned paper records.
- Inkscape: Tracing tutorial — Documents outline and centerline tracing behavior.
- Cricut: Upload images into Design Space — Confirms SVG upload and cut-path handling in Design Space.
- GovInfo: Electronic Signatures in Global and National Commerce Act — Primary U.S. statutory text for electronic signatures and records.
If the signature needs filled outline paths, trace the cleaned scan with PerfectVector and compare the preview with the ink before unlocking. If a plotter or engraver needs one centerline, use a centerline tracer instead and test on scrap.
More from the blog
Line Art to SVG: Get a Clean Trace Without Double Lines
Clean line art is the best image you can hand a vectorizer. Here's how to turn drawings and coloring pages into crisp SVGs, and dodge the double-line trap.

SVG Text on a Path: Rebuild Editable Badge Lettering
Build a badge with editable SVG text on a path. Center the words, check direction and fonts, and keep the emblem separate before making an outlined copy.