Remove a Logo's Drop Shadow Before Vectorizing
Remove a distinguishable shadow from a flattened logo on a copy. Test the mask, protect faint details, and recognize when an original or redraw is needed.
On this page
Remove a logo's drop shadow before vectorizing by obtaining a flat original when possible. If you have only a flattened raster, test whether the intended mark can be separated from the shadow by its tones. A dark mark over a lighter shadow may permit a useful mask; matching tones and faint artwork can make the same cleanup destructive.
Do not treat the cleanest-looking silhouette as proof that you recovered the logo. Compare holes, corners, thin details and the outer contour against an approved reference. When the intended boundary is obscured, seek the original or redraw deliberately instead of accepting a guessed shape.
A threshold separates tones, not intent
Keep the flattened file untouched. Test a duplicate, inspect every intended detail, and reject the mask if it deletes artwork or retains the shadow. The successful example below uses deliberately separable tones; its cutoff is not a universal logo setting.
First check whether the shadow is still an effect
If an editable source still contains the shadow as a separate effect or object, request a flat export from that source. Removing the effect there avoids reconstructing the mark from mixed pixels. This article does not test any application's effect controls.
A flattened PNG or JPG is different: the mark, shadow and background may already be combined into the image. Erasing a soft gray region does not reveal a hidden pristine contour underneath it. For smooth shading that belongs to the artwork rather than an unwanted effect, see the separate gradient-vectorization workflow.
Diagnose the mark before selecting a cutoff
A threshold classifies pixels by a chosen value. A mask uses those decisions to keep or hide parts of an image. The brightness-mask route here keeps dark pixels and hides lighter ones; it does not know which pixels are a logo or a shadow.
| Source condition | Possible route | Reason to reject the result |
|---|---|---|
| Dark flat mark and clearly lighter shadow | Test a brightness mask on a duplicate | Corners shrink, holes change, or pale details disappear |
| Mark and shadow share tones | Seek original artwork or redraw | One cutoff cannot distinguish matching values by intent |
| Light lettering or colored accents accompany a dark mark | Protect those details separately or use another method | A whole-image dark-pixel selection can delete them |
| Approved contour is hidden or ambiguous | Obtain a better reference | A plausible outline does not establish the original shape |
Use a pixel-value readout in your image editor to compare clear mark, clear shadow, and the weakest detail you need. Grayscale values in the example run from 0 for black to 255 for white. Sample several places; a single dark corner does not establish separation everywhere.
Test a dark-pixel mask on a working copy
This executable example requires Python 3 and Pillow. We tested with Pillow 11.3.0. Use an opaque RGB working copy named logo-flat.png, keep the original, and choose unused output names. This route is for a mark that should retain its dark shapes; it can discard legitimate light or colored artwork.
- Save this as
mask-dark-mark.py. The Pillow Image reference documents value mapping withpointand applying an alpha channel withputalpha:
from pathlib import Path
from PIL import Image
import sys

source = Path(sys.argv[1])
output = Path(sys.argv[2])
cutoff = int(sys.argv[3])
mask_path = output.with_name(output.stem + "-mask.png")
if not 0 <= cutoff <= 255:
    raise SystemExit("Use a cutoff from 0 to 255.")
if output.exists() or mask_path.exists():
    raise SystemExit("Choose new output names to preserve existing files.")
image = Image.open(source).convert("RGB")
mask = image.convert("L").point(lambda value: 255 if value < cutoff else 0)
result = image.convert("RGBA")
result.putalpha(mask)
mask.save(mask_path)
result.save(output)- Run the test. For the controlled source below, we used:
python3 mask-dark-mark.py logo-flat.png logo-cleaned.png 100This keeps pixels whose grayscale value is below 100. It writes logo-cleaned-mask.png, where white means retained, and logo-cleaned.png, which keeps the retained source colors with binary transparency. It leaves the working source unchanged.
- Inspect both files. The mask makes missing pieces and retained shadow easier to identify. View the transparent result on light and dark backgrounds so white display space does not conceal a changed hole or edge. Use another output name for each test rather than overwriting your comparison.
- Accept or stop. Change the cutoff only while comparing against the intended mark. If no setting preserves the artwork while excluding the shadow, this whole-image brightness method is unsuitable. Selective retouching may help a distinguishable local defect; an unknown contour needs an original or a deliberate redraw.
Using a graphical editor instead
GIMP documents Threshold as a black-and-white operation that can help create selection masks. Its manual also warns that thresholding removes antialiasing. A layer mask controls which parts remain visible.
Those are documentation-based alternatives, not a native GIMP walkthrough tested here. Our executed route is the Pillow script. A hard mask does not preserve the soft edge transitions of arbitrary source artwork; choose a selective or manually rebuilt contour when those transitions matter.
What the original controls showed
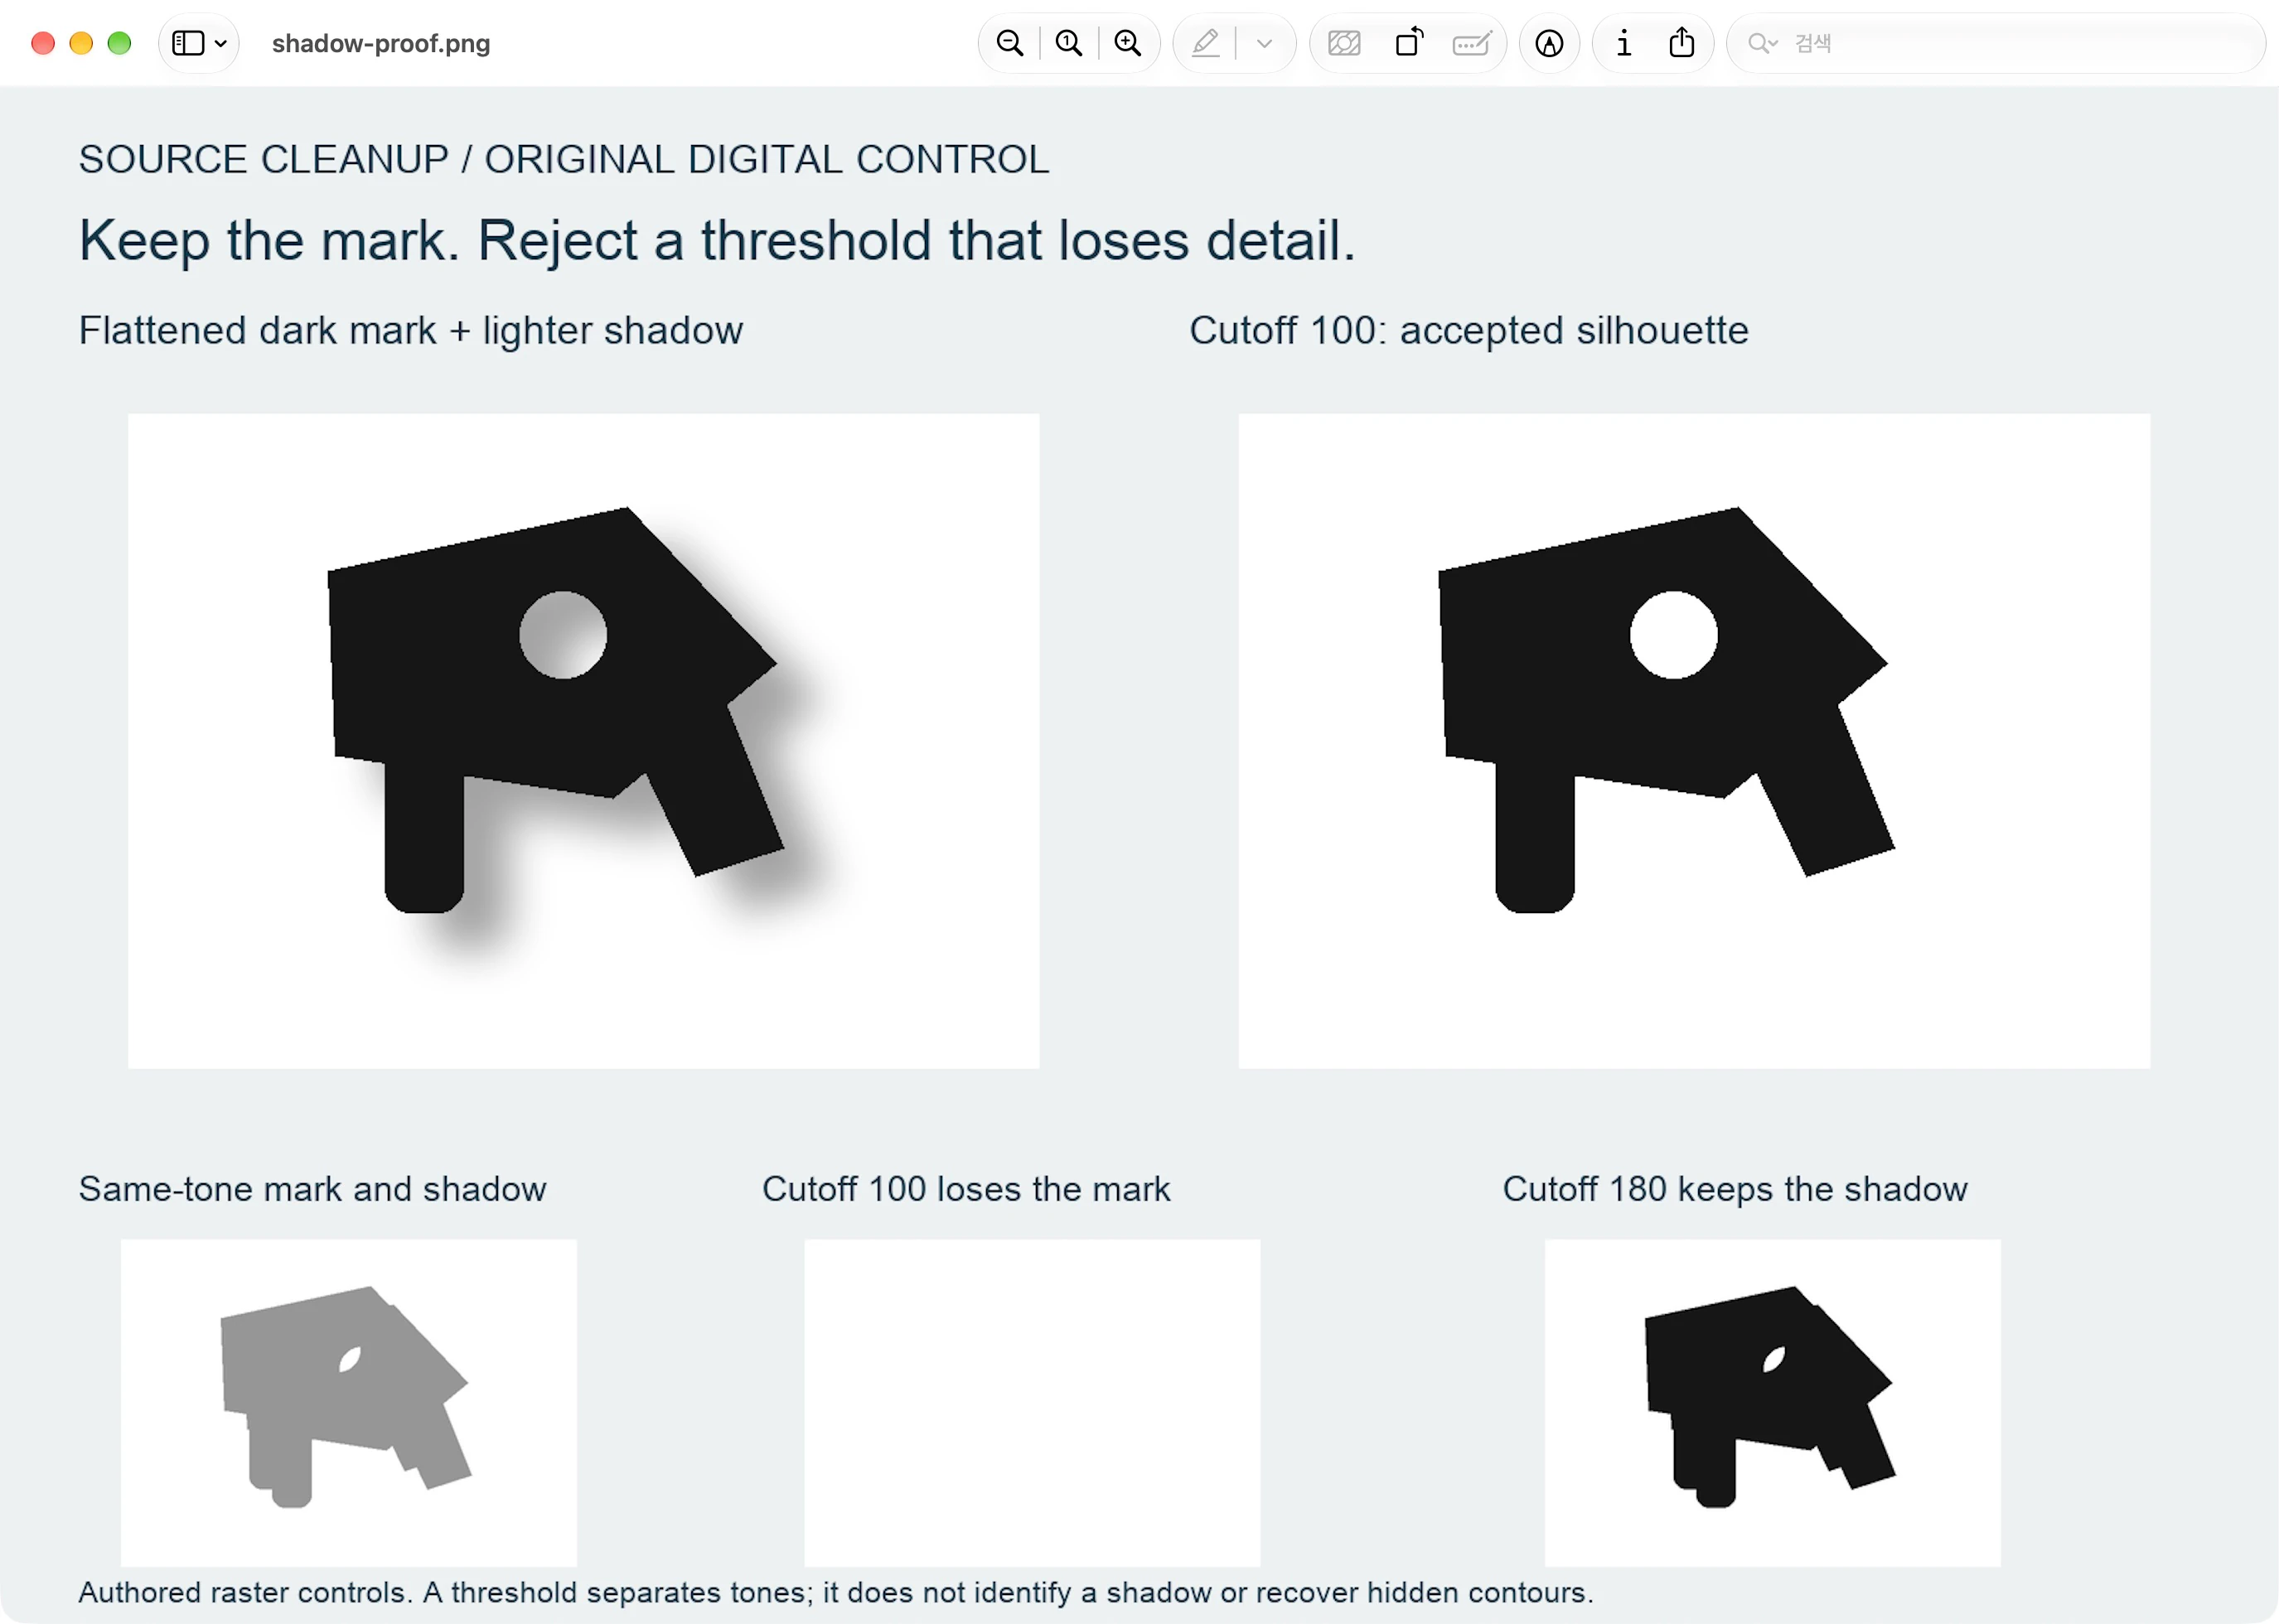
We authored a 640 × 460 flat mark, added a blurred shadow offset 32 pixels right and 26 down, and flattened the result onto white. The mark was gray 22, while every pixel outside its known support was between 163 and 255. A cutoff of 100 produced exactly the authored mark mask: zero extra retained pixels and zero missing mark pixels.
That result depends on this known, binary-edged digital control. It does not establish exact recovery of an unknown logo, preservation of antialiased edges, or a PerfectVector shadow-removal feature.
Two further controls show why inspection matters:
- Matching tones: we made the mark and offset shadow gray 150. Cutoff 100 removed all 54,527 intended mark pixels. Raising it to 180 retained the mark but also 16,128 unwanted shadow pixels. The overlap no longer distinguished their intended boundaries by brightness.
- Faint detail: we added an intended one-pixel line at gray 185. Cutoff 100 removed all 391 pixels of that detail even though the main dark mark remained intact.
These are measured failures of the selected masks, not a recommendation to keep raising the cutoff. The inputs and outputs are original digital controls, without a native image-editor or PerfectVector conversion test.
Audit the contour before tracing
Check the saved cleanup against the untouched source and an approved flat reference when available:
- The outside contour has no clipped corner, swollen area or missing extension.
- Counters and enclosed holes keep their intended shape and remain open.
- Thin lines, pale accents and small lettering survive wherever they belong.
- The offset shadow does not remain as a second silhouette, ring, patch or soft fringe.
If a detail disappears, return to the source. Restore it with a deliberate selection or redraw rather than assuming it was part of the shadow. If you cannot distinguish a hidden boundary, stop claiming recovery and ask for the original design. The logo-vectorization guide covers choosing automatic tracing versus a manual rebuild.
Removing a shadow and making the background transparent are separate acceptance decisions. Inspect the actual transparency and remaining objects as described in the transparent-background SVG guide; a white preview alone does not prove that the unwanted pixels are absent.
Trace the accepted mark with PerfectVector
PerfectVector fits once you have an accepted flat raster logo whose visible shapes you want as editable paths. Use the logo vectorizer with that source, then inspect the preview against the same approved contour, holes and fine details.
This source cleanup happens before vectorization. This workflow makes the shadow-removal decision in the source mask; a vector preview does not verify which pixels were intended as the mark. If the preview shows a leftover shadow shape or missing detail, revisit the raster rather than treating the trace as proof of the original logo. Editing and exporting a result require unlocking it; the protected preview is view-only.
FAQ
Can a threshold always remove a logo's drop shadow? No. It works only when the values you retain distinguish the intended mark from the unwanted pixels. Matching-tone overlap and faint details can make a whole-image threshold unsuitable.
Will removing the shadow reveal the original contour? Not reliably when the flattened pixels obscure it. Compare with an approved reference, obtain the original design, or redraw deliberately rather than treating a plausible boundary as recovered fact.
Why did small details vanish while the main mark survived? They may be lighter than the cutoff retains. In our control, the dark mark survived but a gray-185 line lost all 391 pixels. Return to the source and protect intended light details separately.
Sources
- Pillow — Image module — Documents the value-mapping and alpha-channel operations used by the tested script.
- GIMP — Threshold — Defines binary thresholding, selection-mask use and its antialiasing limitation.
- GIMP — Add Layer Masks — Explains masks controlling visible and transparent portions of a layer.
When the flat mark passes its contour checks, start free with that logo. Inspect the vector preview's holes, corners and faint details against your accepted source before using the result.
More from the blog

Signature to SVG: How to Vectorize Your Actual Handwriting
Three different things get called a signature SVG, and only one of them is your handwriting. Here is how to tell them apart and vectorize the real thing.

White Halo on a Transparent PNG Logo: Fix the Edge
A transparent PNG can carry white in its edge colors. Diagnose a pale logo fringe, preserve soft alpha, and verify a repair for a known single-color mark.