
White Halo on a Transparent PNG Logo: Fix the Edge
A transparent PNG can carry white in its edge colors. Diagnose a pale logo fringe, preserve soft alpha, and verify a repair for a known single-color mark.
On this page
A white halo around a transparent PNG logo can come from the color of its partly transparent edge pixels. The empty area may already be transparent. If those edge colors were mixed with white, they can leave a pale fringe over a dark background. Confirm the intended artwork before changing it; for a known single-color mark, you can replace contaminated RGB while keeping its soft alpha edge.
Keep the original PNG and an approved color reference. First check the PNG itself on light and dark backdrops, before tracing it or blaming the SVG export. A deliberate glow, a white outline, and contaminated edge color need different decisions.
Check color as well as transparency
- Inspect the original PNG over a dark color and a light color.
- Confirm whether the pale fringe is intended artwork.
- For a known flat-ink logo, repair edge color without cutting away soft alpha.
- Reopen the saved copy and check fine strokes, holes, and edges on both backdrops.
Why real transparency can still have a white fringe
A PNG with alpha stores color and opacity. RGB describes the pixel's red, green, and blue values; alpha describes how opaque it is. The PNG specification defines PNG color values as unassociated: the stored RGB is not multiplied by alpha.
That separation matters at the boundary of a logo. A half-transparent teal pixel and a half-transparent whitish pixel have the same opacity but produce different visible edges. The W3C compositing model combines source color, alpha, and backdrop color; checking alpha alone cannot establish that edge color is clean.
Here, white-matte contamination means that the RGB near the edge contains unwanted white from an earlier preparation step. It is different from an opaque white rectangle outside the subject. It is also different from a white outline that belongs to the design.
A fully transparent pixel contributes no visible color in ordinary source-over compositing. The diagnostic pixels in this article have alpha between fully transparent and fully opaque. Those partially visible colors are what we repair in the controlled example.
Locate the fringe before changing the logo
Use the untouched PNG, an approved reference, and two solid backdrops. Inspect at the intended display size, then zoom in to locate the affected edge. A large zoom is useful for diagnosis; it is not the only size at which the logo needs to look right.
| What you find | Next step |
|---|---|
| A pale fringe is already in the PNG, especially over dark color | Inspect partially transparent edge RGB and compare it with the approved ink |
| The pale outline is in the approved artwork too | Preserve it unless the owner requests a design change |
| A solid box or painted checkerboard surrounds the subject | Use the separate background-object and transparency diagnosis |
| The PNG edge is clean, but a new outline appears in the SVG | Inspect the vector result's shapes and paint before altering the PNG |
| You cannot establish the intended colors or edge treatment | Request the vector/layered master or an approved reference before recoloring |
A dark-backdrop comparison suggests where to look. It does not prove which earlier tool introduced the white, or that every pale pixel is wrong. Keep legitimate highlights, light-colored details, and translucent artwork out of a global color replacement.
Our same-alpha test: clean, contaminated, repaired
We made an original 400×400 single-ink symbol with a curved edge and a fine detached line. The approved ink was teal, #167D8D, or RGB 22,125,141. We saved a clean PNG, then built a white-matted control by mixing white into its RGB in proportion to transparency. The alpha bytes stayed exactly the same.
For this controlled contamination model, each channel was calculated as round(a × ink + (1 − a) × white), with alpha a expressed from 0 to 1. That describes how we constructed this fixture, not how every image editor exports a PNG.
We then ran the flat-ink repair below in ImageMagick 7.1.2-32 and reopened all files independently with Pillow 11.3.0 on November 9, 2026.
| Saved file | RGB at the same alpha-128 edge pixel | Partial-alpha pixels |
|---|---|---|
| Clean control | 22, 125, 141 | 5,926 |
| White-matted control | 138, 190, 198 | 5,926 |
| Repaired copy | 22, 125, 141 | 5,926 |
The complete alpha buffer was byte-identical across all three files, including the fine line. All 256 alpha values remained represented. The repaired copy's light- and dark-backdrop composites matched the clean control pixel for pixel. The contaminated control differed at all 5,926 partially transparent pixels on each backdrop.
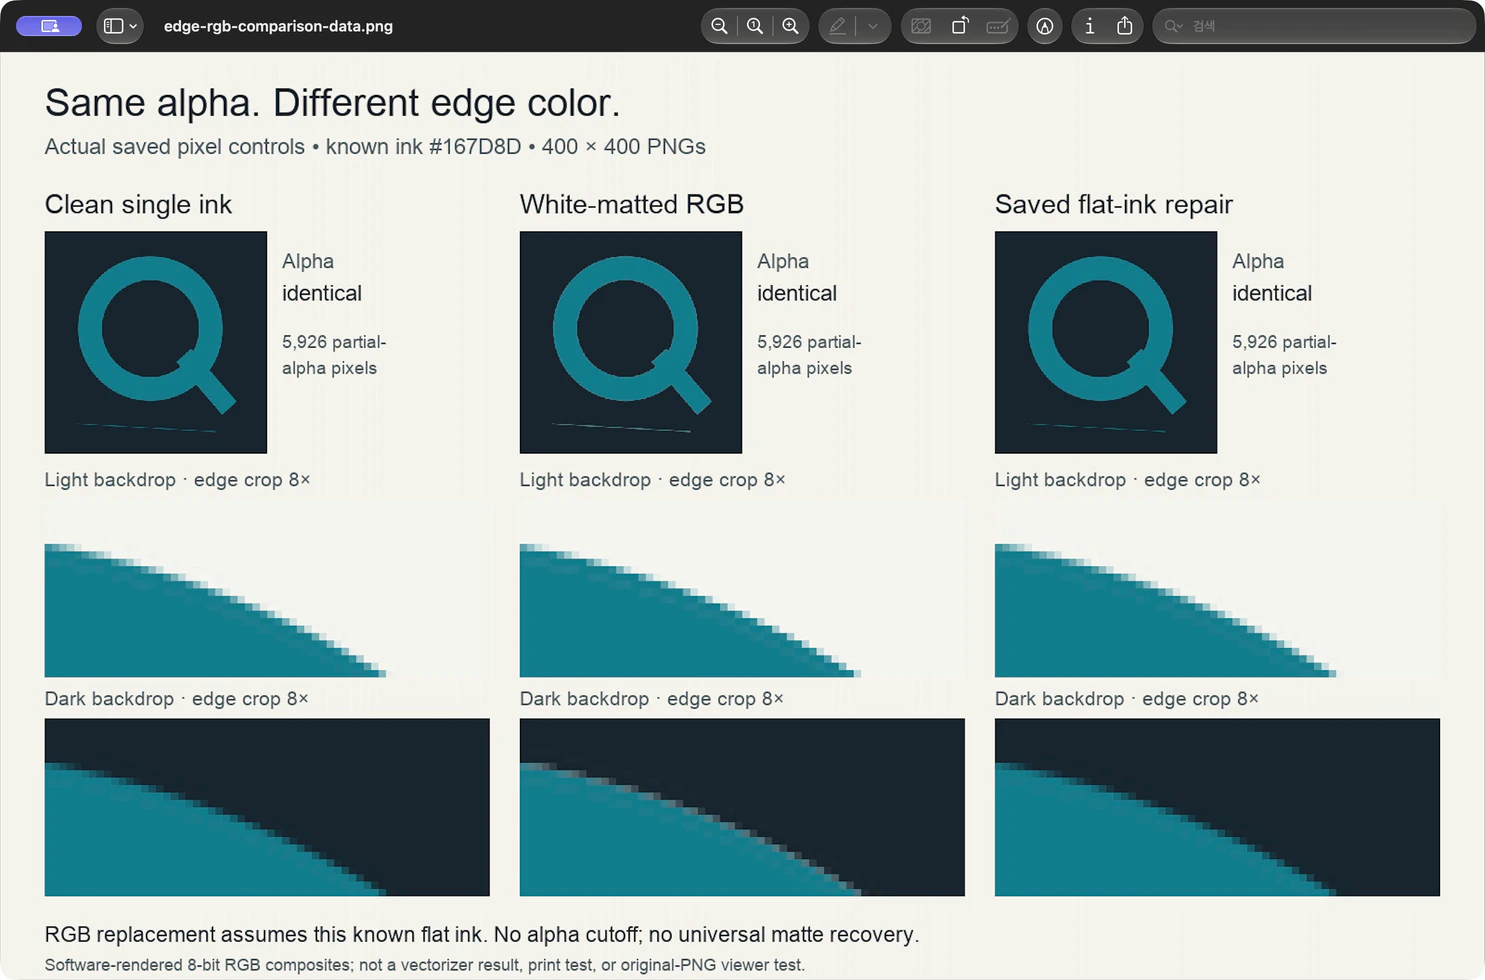
The composites are software-rendered 8-bit RGB controls, not a calibrated print prediction. We tested saved raster preparation, not a PerfectVector conversion, browser decoder, or physical output.
Repair a confirmed single-color PNG without trimming alpha
You need an untouched PNG, the approved single ink color, and ImageMagick installed for this command route. If a usable vector or layered master exists, request a fresh transparent copy from that master first. Check its edge on both backdrops before using it.
For a raster-only mark, use RGB replacement only when every visible part should have the same flat color. Our example deliberately replaces all RGB with the approved teal and retains the original alpha:
magick white-matted-edge.png -channel RGB -fill "#167D8D" -colorize 100 +channel -define png:color-type=6 repaired-flat-ink.pngChange the input/output filenames and replace #167D8D with the approved ink for your mark. Write a new output file. Do not use this command on a multicolor logo, a gradient, a photograph, or artwork with intentional translucent color variation.
The ImageMagick options reference documents -colorize with the current fill color and channel selection. In our actual run, RGB was replaced and the reopened alpha bytes were unchanged. The command does not discover the correct color: we supplied it from the known design.
This is a flat-ink reconstruction, not a universal “remove white matte” operation. When the original edge colors and previous matte are unknown, one image does not give you an approved design to recover. Ask for a better source or have the artwork rebuilt against a reference.
Do not substitute a blanket alpha cutoff for this color repair. That changes which edge pixels remain visible and can sacrifice fine details. Our saved correction kept every alpha value; it changed the RGB that was being shown through those values.
Verify the saved copy before tracing
Reopen the actual output file, rather than accepting a corrected-looking working document. Place it over the same light and dark backdrops used for diagnosis.
- Check the whole mark at its intended size. The unwanted pale fringe should be gone without changing the approved silhouette.
- Inspect the smallest details. Compare thin strokes, small holes, corners, and detached elements with the untouched source. In our test, the fine line retained its exact alpha.
- Check color ownership. Confirm that no intended highlight, white detail, gradient, or glow has been recolored. A one-color repair is unsuitable if those belong to the mark.
- Use the saved copy as the tracing reference. Compare the source and any vector preview on both backdrops. If a new fringe appears only later, investigate that later result instead of repeatedly modifying a clean PNG.
If your actual requirement is to discard faint raster pixels in an SVG, see the separate SVG alpha-threshold guide. That is an opacity decision; it does not restore contaminated RGB or prove that the resulting outline preserves the design.
Where PerfectVector fits after source repair
PerfectVector fits when the checked PNG needs reusable vector shapes. Start with the repaired PNG, then compare the vector preview with that exact saved source. Inspect the outer edge, small holes, fine strokes, and any pale shapes over a contrasting backdrop before using the SVG in your design.
Do not rely on tracing to infer an unknown matte or recover an unapproved color. If a usable vector master already exists, use it instead of reconstructing its appearance from contaminated pixels.
FAQ
Why does my transparent PNG have a white halo? Partially transparent edge pixels can contain whitish RGB even when the empty area has real transparency. Compare the original PNG over light and dark colors, and confirm whether the fringe is contamination or intended artwork before editing.
Can I fix the halo without deleting soft edges? For a confirmed single-color mark, replace the contaminated RGB with the approved ink while preserving alpha. Our saved repair kept the complete alpha buffer unchanged and matched the clean control on both tested backdrops. This does not establish a universal repair for multicolor or unknown artwork.
Will making low-opacity pixels transparent fix the edge color? It changes opacity rather than restoring color. It may hide some contaminated pixels while removing fine detail. Diagnose RGB contamination separately and preserve intentional soft edges when they belong to the design.
Sources
- W3C — PNG Specification, Third Edition — Defines PNG alpha and unassociated stored color values.
- W3C — Compositing and Blending Level 1 — Describes source-over compositing using source color, alpha, and backdrop color.
- ImageMagick — Command-line options — Documents colorize, fill, and channel selection for the tested flat-ink operation.
Have a checked PNG ready for vector artwork? Start free with your own image in PerfectVector. Compare the preview with the saved source on a contrasting backdrop, paying particular attention to the edge and fine details.
More from the blog

Remove a Logo's Drop Shadow Before Vectorizing
Remove a distinguishable shadow from a flattened logo on a copy. Test the mask, protect faint details, and recognize when an original or redraw is needed.

DTF Semi-Transparent Pixels: Check the Final PNG
Find partial alpha in a DTF PNG, distinguish soft edges from intentional fades, and recheck the final export against your transfer supplier's requirements.