DTF Semi-Transparent Pixels: Check the Final PNG
Find partial alpha in a DTF PNG, distinguish soft edges from intentional fades, and recheck the final export against your transfer supplier's requirements.
On this page
If a DTF uploader flags semi-transparent pixels, inspect the alpha in the final PNG. Find out whether those pixels form a narrow smooth edge, an intentional fade, or unwanted residue. Then choose a correction that matches the design and the receiving supplier's requirements. An SVG master or a checkerboard preview cannot establish what is in the last raster export.
This guide checks digital artwork before a direct-to-film transfer order. It does not predict the ink, adhesive, or garment result. A white halo on a finished transfer needs the supplier's production diagnosis as well as an artwork check.
Read the supplier's transparency rule first
Keep the editable master, the actual PNG you plan to upload, and the provider's current file instructions together. Confirm the intended print dimensions before exporting. For the broader choice between raster and vector delivery, see vector art for T-shirts.
Providers handle transparent effects differently. Matrix DTF's artwork rules prohibit drop shadows, glows, and semi-transparent fades. Limitless Transfers recommends removing such effects or using halftoning. Transfer Express describes an AI Assist workflow that includes halftoning transparent artwork and soft edges. These are different submission and preparation workflows, not a universal rule that every fade is unprintable.
If a fade is important to the design, ask how the chosen supplier wants it prepared before replacing it with flat color. A halftone represents tone with a pattern of marks and spaces. Its suitability still depends on the provider's process and the final size; a dot-pattern preview is not a garment proof.
Separate transparency from color
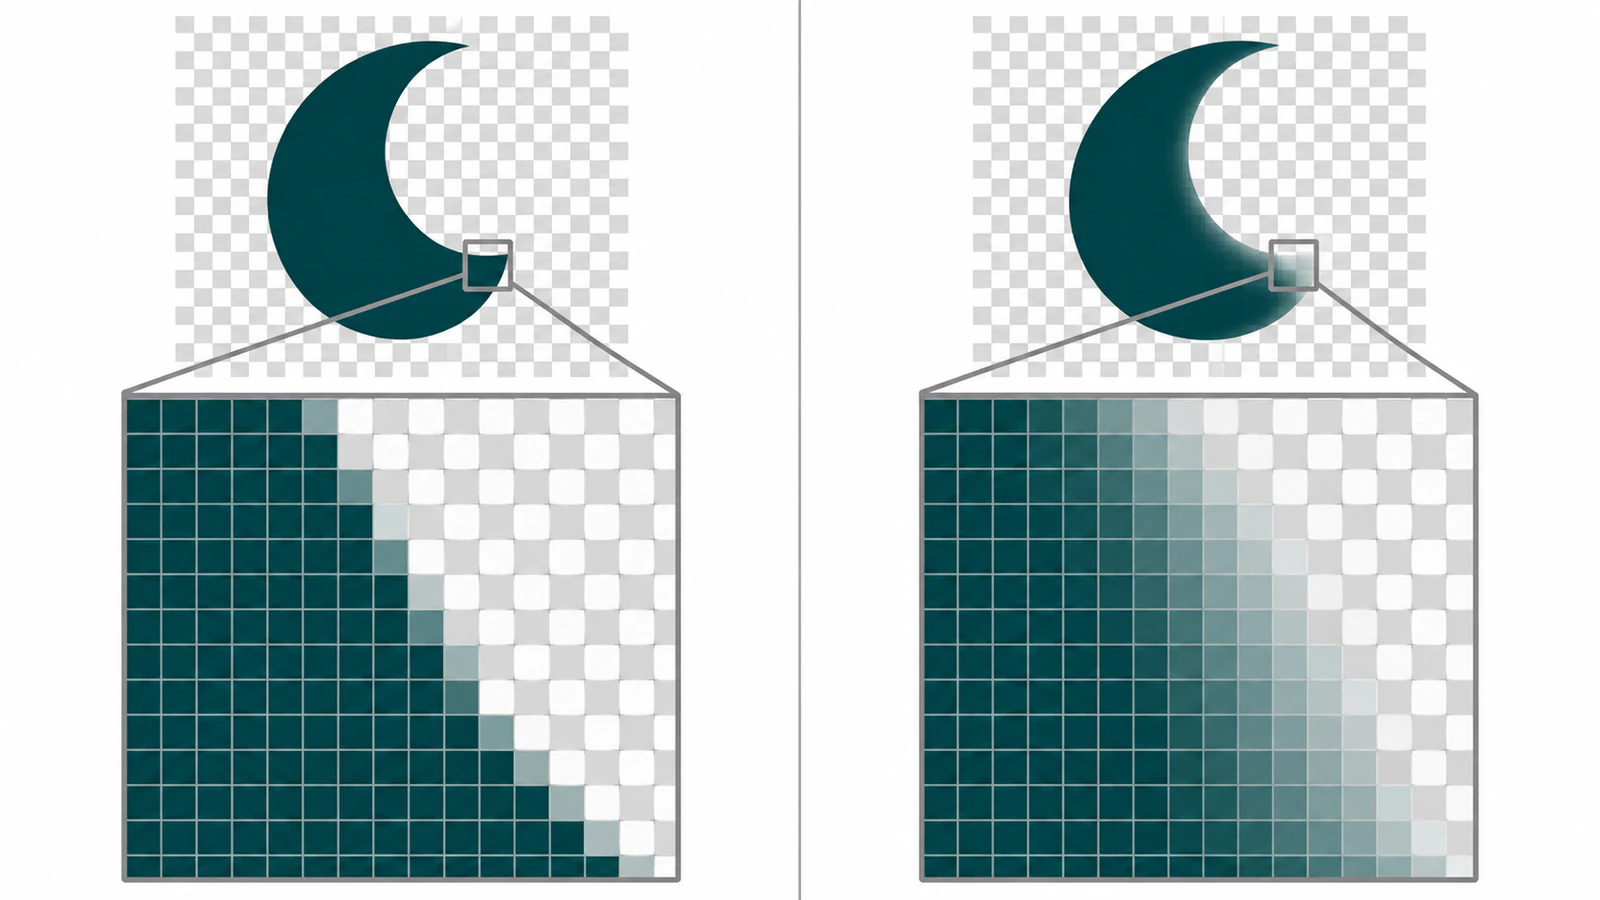
Alpha controls how a pixel contributes over a background. In an eight-bit alpha channel, 0 is fully transparent, 255 is fully opaque, and values 1 through 254 are partially transparent. The PNG specification defines these endpoints and intermediate values.
A blue-to-orange color gradient can remain fully opaque throughout the motif. A blue-to-transparent fade changes alpha. Pale color alone therefore does not establish semi-transparency, and a transparent background does not require the visible artwork to be translucent.
Inspect where partial alpha occurs:
| What you find | Likely design role | Next check |
|---|---|---|
| A narrow fringe around a curve | Antialiasing that smooths a raster edge | Ask how the supplier handles edge pixels; inspect the last export |
| A broad band through a shadow, glow, or fading motif | Intentional soft transparency | Preserve the master and agree on a supported treatment |
| Isolated flecks away from the subject | Possible leftover cleanup pixels | Compare with the original before removing them |
| An unwanted background with fully opaque pixels | Baked-in background color | Fix the background, not the alpha threshold |
Antialiasing uses intermediate edge coverage to make a pixel-rendered curve look smoother. Its spatial pattern differs from a broad fade, even though both can contain partial alpha. The count alone does not tell you which pixels are accidental.
Inspect the delivery copy before changing it
- Open the actual PNG and confirm its pixel dimensions. View it over both light and dark backgrounds to notice edge residue or an unwanted box. These are viewing aids, not a simulation of printed white ink.
- If your editor provides an alpha-channel view or pixel-opacity readout, use it to distinguish transparency from pale color. Locate the transition and compare it with the original motif. The script below provides another way to locate partial alpha.
- Decide whether the transition belongs to the design before changing it. A narrow fringe, a broad fade, and isolated residue need different judgments.
- After any correction, resizing, or new export, run the check on that new PNG. Keep the master separate.
Optional: count and locate partial alpha with a script
For numerical counts and a separate location map, use Python 3 with Pillow installed in your Python environment. Save the code below as alpha-check.py. It reads a PNG, converts the decoded image to eight-bit RGBA, counts its alpha values, and writes a separate diagnostic mask. It does not save over the artwork and refuses an existing diagnostic filename.
Use this example for a single-image PNG and an eight-bit inspection. It is not a lossless audit of sixteen-bit alpha or an animated PNG. Pillow's image documentation describes the conversion, channel extraction, histogram, and point-mapping operations used here.
from pathlib import Path
import json
import sys
from PIL import Image

source = Path(sys.argv[1])
diagnostic = Path(sys.argv[2])
if diagnostic.exists():
    raise SystemExit("Diagnostic path already exists; choose a new filename.")
with Image.open(source) as image:
    if image.format != "PNG":
        raise SystemExit("Input must be a PNG file.")
    rgba = image.convert("RGBA")
alpha = rgba.getchannel("A")
histogram = alpha.histogram()
partial = sum(histogram[1:255])
mask = alpha.point(lambda value: 255 if 0 < value < 255 else 0)
with diagnostic.open("xb") as output:
    mask.save(output, format="PNG")
print(json.dumps({
    "width": rgba.width, "height": rgba.height,
    "transparent": histogram[0], "partial": partial,
    "opaque": histogram[255], "diagnostic": str(diagnostic)
}, indent=2))
Run it on the final delivery copy, choosing a new mask filename each time:
python3 alpha-check.py final.png final-partial-mask.pngWhite pixels in the diagnostic mask mark partial-alpha locations. Black means either fully transparent or fully opaque, so use the printed counts and the original image alongside the mask. This mask is an inspection aid, not replacement artwork or an ink separation.
Confirm the reported dimensions, then compare the mask with the original at pixel level and at the intended display size. If you use an editor's inspection tools instead, apply the same distinction between a narrow edge transition and a broad fade.
What four controlled files showed
We made four original 256 × 256 PNG fixtures and ran the exact checker above. The ordinary curved edge was rendered from an opaque SVG circle with librsvg. The other controls explicitly separated binary alpha, a broad alpha fade, and a color gradient inside an opaque motif.
| Authored fixture | Transparent pixels | Partial-alpha pixels | Opaque pixels |
|---|---|---|---|
| Hard-edged opaque circle | 45,428 | 0 | 20,108 |
| Opaque SVG circle rasterized with a smooth edge | 45,159 | 599 | 19,778 |
| Circle with a broad alpha fade | 45,476 | 15,972 | 4,088 |
| Opaque teal-to-orange circle | 45,428 | 0 | 20,108 |
Every row totals 65,536 pixels. The smooth-edge mask showed a narrow boundary; the fade mask covered a much wider region. The opaque color gradient had no partial alpha. That distinguishes color change from transparency without judging either design's suitability for a printer.
The SVG circle had no translucent fill, yet its PNG contained 599 partial-alpha edge pixels. Rasterization can introduce these pixels when a curve meets a transparent background. Vectorizing an image is therefore not a guarantee that a later PNG will contain only fully opaque or fully transparent pixels.
We also checked an indexed PNG with palette transparency and confirmed that the RGBA conversion retained its transparent, partial, and opaque categories. These observations came from Python 3.12, Pillow 12.3, and librsvg 2.62.1. They establish the inspector's behavior on these fixtures, not a safe partial-pixel percentage, supplier acceptance, or a physical transfer result.
Choose the correction by design intent
The flat motif contains an unwanted soft effect. Remove or revise the shadow, glow, or low-opacity object in the source. Export again at the supplier's intended dimensions, then inspect the PNG. Keep legitimate thin detail and openings visible when comparing the new file with the master.
The fade is intentional. Preserve the source and use the supplier's supported preparation route. Ask whether the shop wants the original fade for its own processing or a prepared halftone. Do not invent a universal dot size or treat a generated texture as production-ready screening.
Only the smooth edge contains partial alpha. Confirm the receiving workflow's treatment of antialiasing. Blindly deleting every partial pixel can change the silhouette; making them all opaque can also change it. If a hard edge is required, adjust and inspect a delivery copy rather than replacing the only master. The SVG alpha-threshold guide explains what a cutoff changes, but its browser-filter example is not a DTF production recipe.
The count is zero but a white box remains. The box may be fully opaque, so a partial-alpha test will not identify it as a transparency problem. Use the transparent-background guide to distinguish an unwanted background shape from background pixels baked into the source.
Recheck the file after vector recovery
If a flat raster motif needs editable shapes, convert the PNG to SVG with PerfectVector. Check the preview, then unlock the result for SVG editing and export. Compare the recovered silhouette, gaps, and small details with the source. Use an existing vector master directly when one is available.
Recovery is an editing step, not a DTF acceptance test. If the supplier needs PNG, export the edited artwork at the requested dimensions and repeat the alpha inspection on that exact file. Do the same after a gang-sheet tool resizes or re-exports it, when the resulting file is available.
The digital check is complete when you know where partial alpha remains, the intended effects and edge treatment match the supplier's instructions, and the final dimensions are correct. Confirm the actual print outcome through the supplier's proof or sample process for the intended garment. If recoverable flat shapes are the missing step, prepare an editable vector with PerfectVector, then check the final raster delivery again.
FAQ
Does a transparent PNG mean all visible pixels are fully opaque? No. A PNG can contain a fully transparent background and partially transparent edges, shadows, or fades. Inspect its alpha values and where they occur.
Will converting to SVG remove every semi-transparent pixel from a later PNG? No. Even an opaque vector curve can produce partial-alpha edge pixels when rasterized. Inspect the final PNG after export and resizing.
Does zero partial alpha mean my DTF artwork is ready to print? No. It does not check unwanted opaque backgrounds, dimensions, fine-detail requirements, color handling, adhesive behavior, or the result on a garment. Follow the receiving supplier's specification and proof process.
Sources
- Matrix DTF — Artwork requirements — Supplies the attributed restriction on semi-transparent fades and soft effects.
- Limitless Transfers — Gang-sheet artwork guidelines — Describes removal or halftoning as options for translucent effects in its workflow.
- Transfer Express — Meet AI Assist — Describes a supplier preparation workflow that includes halftoning transparent artwork.
- W3C — PNG alpha representation — Defines transparent, partial, and opaque alpha values and indexed transparency.
- Pillow — Image module — Documents the image operations used by the standalone diagnostic script.
More from the blog

Does Converting JPG to EPS Make It a Vector?
Changing a JPG to EPS does not automatically create vectors. Learn how EPS can hide pixels, how to verify real paths, and when to trace or redraw.
SVG or PNG for Sublimation? Choose the Right Format
Sublimation presses print raster images, so PNG wins the print side. Where SVG earns its keep: the scalable design master and the matching cut file.