SVG or PNG for Sublimation? Choose the Right Format
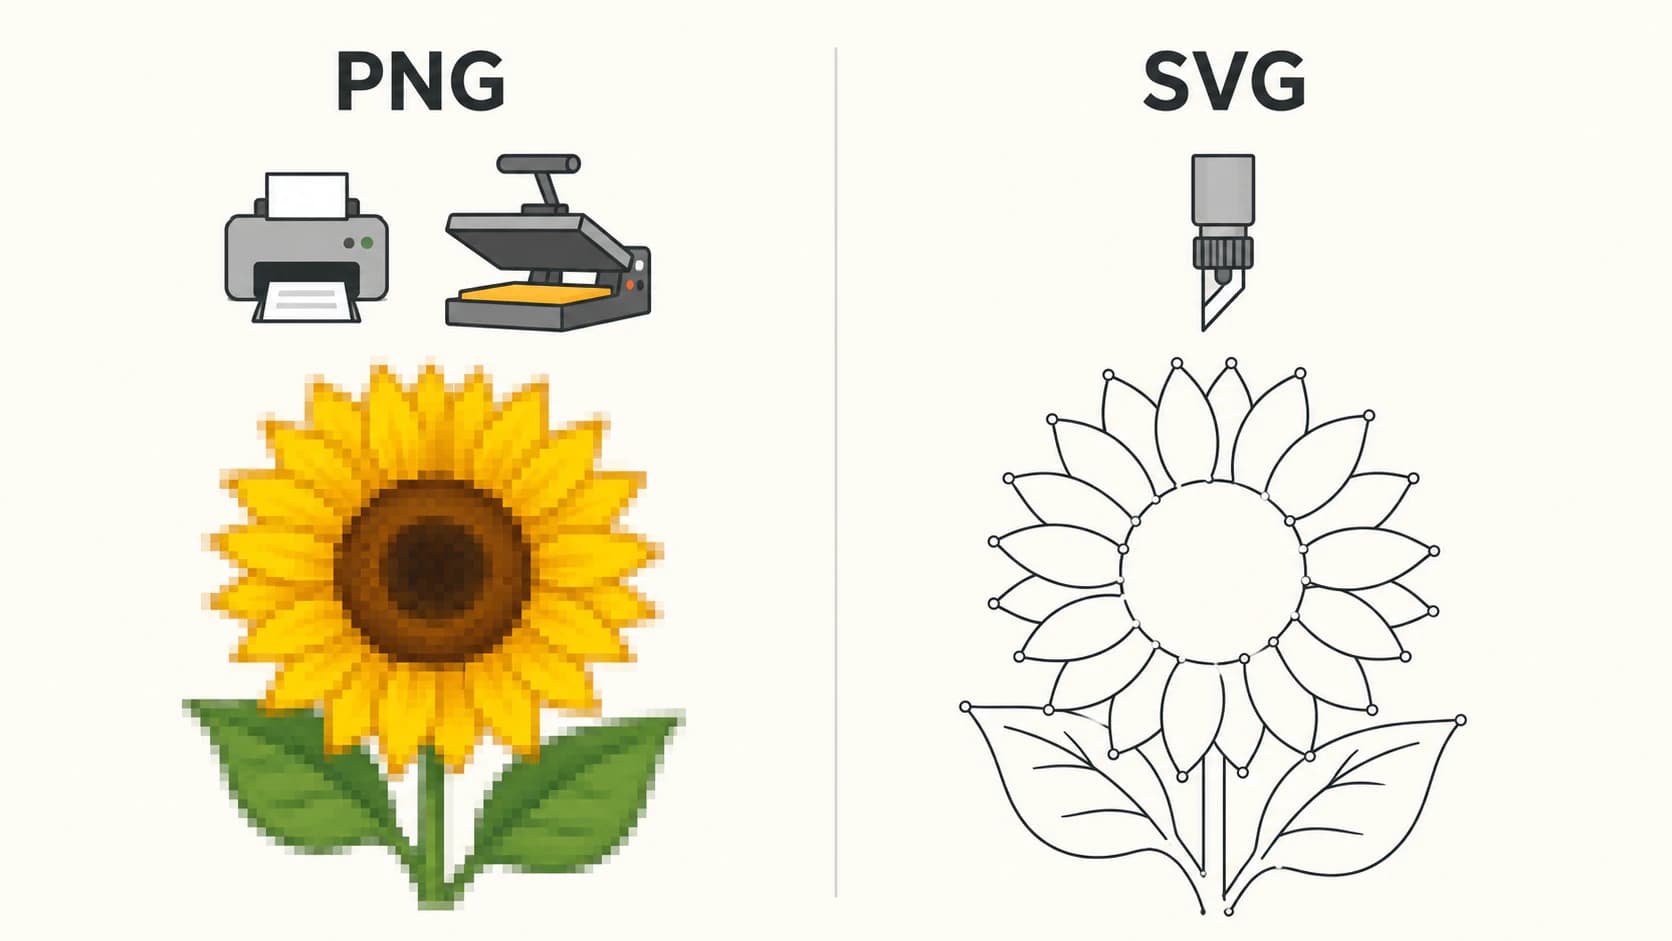
Sublimation presses print raster images, so PNG wins the print side. Where SVG earns its keep: the scalable design master and the matching cut file.
On this page
For the file you actually print and press, use a high-resolution raster export. PNG is the safer default when the design needs transparency; JPEG can also work when it does not. Sublimation is a printing process: the printer lays sublimation ink onto transfer paper, and heat transfers the design into a compatible blank. An SVG can be the scalable design master, but the print pipeline rasterizes the artwork before ink reaches paper.
That's the one-sentence answer, and it's also why the question gets so tangled: most sublimation crafters also own a cutting machine, and the two machines want different files. The useful mental model is two jobs, two formats. This guide walks where each one belongs, and the two places an SVG genuinely earns its keep in a sublimation workflow.
The quick version
- Press side: raster artwork. Use PNG when transparency matters; JPEG is valid for artwork with a deliberate solid background.
- Cut side: SVG. Blades follow vector paths; if a design also gets cut (stickers, vinyl companions), that file is an SVG.
- SVG's hidden superpower here: the design master. Keep one vector master, export a sharp PNG at any size for any blank.
- A Cricut doesn't sublimate. It cuts. Sublimation needs a sublimation printer plus a heat press.
- Watercolor and photo-style designs should stay raster. Vectorizing them destroys exactly what makes them sublimation-worthy.
Two machines, two file languages
The confusion in craft forums usually starts by comparing the words directly, "SVG vs sublimation," as if they were rivals. They're different layers: sublimation is a process (print, then heat-transfer into polyester or coated blanks), while SVG is a file format for vector shapes. A cutting machine reads the SVG's paths and drives a blade along them. A printer rasterizes whatever you give it into dots of ink. So the honest comparison isn't SVG versus sublimation; it's which file each machine in your craft room speaks.
Which file for which job
| The job | Use | Why |
|---|---|---|
| Print and press a design onto a blank | PNG or JPEG at final print size | PNG preserves transparency; JPEG works when transparency is unnecessary |
| Resize one design for mugs, totes, and hoodies | SVG master → export PNGs | Vectors scale losslessly; each export comes out sharp |
| Print-then-cut stickers or transfers | PNG artwork + a cut path | The print is raster; the cut line around it is vector |
| A vinyl companion version of the same design | SVG cut file | That's a blade job, like vinyl and HTV work |
| Photo, watercolor, or heavily blended art | High-resolution raster | Gradients and texture belong in raster artwork; vectorizing simplifies them |
Why choose PNG over JPG? Transparency. JPEG cannot store transparent pixels, while PNG can. That does not mean a sublimation printer lays down white ink: transparent or white areas normally reveal the blank underneath, and the result depends on using a compatible, usually light-colored or coated substrate. Choose PNG to preserve transparent edges in the design workflow; choose JPEG when a solid rectangular background is intentional. The transparent-background guide covers how to inspect the file.
Where SVG earns its keep: the design master
Here's the workflow the format debates skip. Sublimation shops press the same design at wildly different sizes: an 8cm mug wrap one day, a 30cm shirt panel the next. If your only copy of the design is a PNG sized for the mug, the shirt version comes out soft, and a blurry, upscaled design is the most common self-inflicted quality problem in printed crafts.
The fix is keeping the design's master as a vector wherever the artwork allows it: logos, lettering, flat illustrations, line-heavy designs. From one SVG master you export a clean PNG at exactly the size and resolution each blank needs. If your design only exists as a small raster, this is also the rescue path: vectorize it into clean paths, then export it as large as the job demands.
The same master quietly solves a second problem: when a customer wants the vinyl-decal version of the design you normally press, the SVG is the cut file. One master, two production lines. If your design lives as a flat PNG today, converting it once covers both.
When you should not vectorize
The honest boundary, because half the sublimation design market lives on the other side of it: watercolor florals, sublimation-style gradients, photo collages, and distressed textures should stay raster. Those designs are prized because of their soft blends, and a vectorizer's job is to flatten continuous tones into solid shapes; that trade removes exactly what you paid for. Keep those as high-resolution PNGs, buy them at the size you need, and reserve the SVG-master workflow for flat, shape-based designs.
Quick answers to the machine tangle
Because this question almost always arrives with a Cricut in the room: a cutting machine does not print sublimation ink. It cuts, draws, and, with Print Then Cut, trims around designs a printer produced. Cricut's sublimation-paper workflow lists a sublimation printer, sublimation ink, compatible blank, and heat press separately from the cutting machine. The workflows meet when you print a design and then cut around it: raster art plus a cut path. (Print Then Cut's own PNG-or-SVG decision gets a full guide.)
FAQ
Can I use an SVG for sublimation? Yes, if your design or print software accepts it, but the artwork is rasterized for printing. SVG is valuable as the design master because you can export it sharply at the required size; PNG is convenient when you need transparent raster artwork.
Which is better for sublimation, SVG or PNG? PNG is convenient for the print file when transparency matters. SVG is useful as a scalable master and for cut paths. A high-quality JPEG can also be a valid print file when the design needs no transparency, so the choice follows the artwork and software rather than one universal winner.
Can a Cricut do sublimation? No, a cutting machine cuts; it doesn't print or infuse ink. Sublimation needs a sublimation printer and a heat press. A Cricut joins the workflow for print-then-cut projects, where it trims around a design your printer produced.
What resolution should a sublimation PNG be? Export at the blank's real size and follow the printer and blank vendor's guidance. A 300 ppi export at print dimensions is a common target; Sawgrass, for example, recommends 300 DPI in its current mug workflow. Exporting from a vector master makes that target easy for shape-based art.
Where do sublimation designs come from? Marketplaces and free libraries sell ready-made PNG designs, and they're the right source for watercolor and blended styles. Designs you make yourself, logos, lettering, flat art, are worth keeping as vector masters so every export stays crisp.
How do I convert an SVG to PNG for sublimation? Open the SVG in any design tool (or a converter) and export as PNG at the exact pixel size the blank needs, with the background transparent. Avoid exporting small and enlarging later; export at final size from the vector so nothing blurs.
Sources
- Cricut: Sublimation Printer Paper — Documents the printer, ink, paper, blank, heat-press, mirroring, and optional cutting workflow.
- Cricut: Print Then Cut — Explains the combined print-and-cut workflow and printable artwork.
- Sawgrass: MySawgrass design tool — Lists supported design formats, including JPG, PNG, and SVG.
- Sawgrass: Sublimation mug guide — Gives the vendor's current 300-DPI and mirroring recommendations.
- Adobe: JPEG vs. PNG — Explains JPEG compression and PNG transparency support.
One rule carries the whole topic: pixels for the press, paths for the blade. Keep your flat designs as vector masters, convert the ones stuck as small PNGs, and export print files at real size so nothing you press ever comes out soft.
More from the blog
Make SVG Files to Sell on Etsy: A Production Guide
On Etsy, the file is what buyers review, and messy files are what get refunded. Here's how to make a clean, layered SVG cut file that's good enough to sell.
Sure Cuts A Lot Image Trace: Trace or Import SVG?
Choose Sure Cuts A Lot's native Image Trace or import a prepared SVG, then check layers, scale, doubled lines, path density, and the final cut preview.