Inkscape Trace Bitmap: How to Use It Well (and When to Skip It)
Inkscape's Trace Bitmap turns a raster image into vectors for free. Here's which settings matter, how to fix a messy trace, and when a one-click tool is better.
On this page
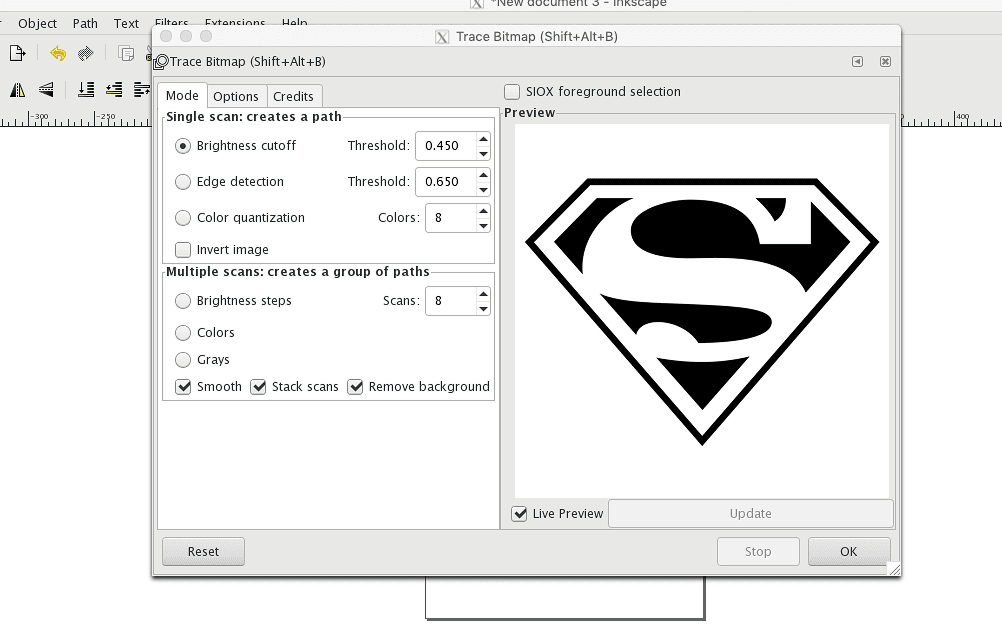
Trace Bitmap is Inkscape's free, built-in tool for turning a raster image (a PNG or JPG) into editable vector paths, a process called image vectorization. You open it with Path > Trace Bitmap (or Shift + Alt + B), pick a mode, tune a threshold, and click Apply. It works best on flat, high-contrast art: logos, silhouettes, and line drawings.
It's genuinely capable, and free is hard to beat. It's also fiddlier than the tutorials let on, and its output is usually heavier and messier than you'd expect, especially on color images. This guide covers the workflow, the settings that actually matter, how to fix the traces that come out wrong, and the cases where a one-click vectorizer saves you the trouble.
The short version
- Open it: select your image, then Path > Trace Bitmap (
Shift + Alt + B). - Single Scan makes one path (best for logos, silhouettes, line art). Multiple Scans keeps color but makes one stacked object per color, which gets hard to edit.
- Brightness Cutoff is the default workhorse; adjust the threshold and hit Update to preview before you Apply.
- Trace comes out messy? Most fixes are the threshold, the Speckles setting, or a higher-resolution source. Over-noded results need Path > Simplify.
- Don't want to tune any of this? A one-click AI vectorizer gives cleaner, lower-node output with no settings to fight.
How to trace a bitmap in Inkscape
The basic workflow is five steps:
- Import your image. File > Import (or drag it onto the canvas).
- Select it with the Selector tool (the arrow).
- Open the tool: Path > Trace Bitmap, or
Shift + Alt + B. A dialog opens with a live preview. - Pick a mode and adjust, then click Update to refresh the preview. When it looks right, click Apply.
- Separate and clean up. The new vector lands exactly on top of your original raster. Drag it aside with the Selector tool, then delete the original image.
Which scan mode to use
The dialog has two tabs, and the choice between them decides almost everything about your result.
Single Scan produces one path. It's what you want for flat, single-color art. The sub-modes:
- Brightness Cutoff is the everyday default. It makes a silhouette by splitting the image into black and white at the threshold you set. Best for logos, silhouettes, and solid shapes.
- Edge Detection traces only the outlines of shapes, not the fills.
- Color Quantization traces the borders between different colors.
- Centerline Tracing reduces a shape to a single open line. This is the one to use for handwriting, signatures, and thin line art, and it's the answer when you want an outline-only result.
Multiple Scans keeps color or grayscale, but with a catch: it creates a separate object for each scan. Ask for 10 colors and you get 10 stacked shapes piled on top of each other. Inkscape's own documentation is blunt that this leaves you "a pile of objects" that is hard to edit, especially for beginners. It's the right choice when you genuinely need color, but go in expecting to ungroup and untangle.
| Your image | Mode to use |
|---|---|
| Logo, silhouette, solid shape | Single Scan, Brightness Cutoff |
| Just the outline of a shape | Single Scan, Edge Detection |
| Handwriting or thin line art | Single Scan, Centerline |
| Full-color illustration | Multiple Scans, Colors (expect stacked objects) |
The settings that actually matter
Most of the dialog is noise until you know what moves the needle:
- Threshold (Brightness Cutoff). The single most important slider. It decides how much of the image becomes black versus white. Nudge it and watch the preview: too high swallows detail, too low picks up noise.
- Speckles. Suppresses tiny stray dots the tracer would otherwise keep. Turn this up if your result is peppered with little specks.
- Smooth corners and Optimize paths. These smooth the curves and reduce the number of nodes. Leave them on; they make the output easier to edit.
- Colors / Scans (Multiple Scans). Fewer is almost always better. Every extra color is another stacked object to manage later.
Start with Brightness Cutoff, tune the threshold until the preview looks clean, and only reach for Multiple Scans when you truly need color.
When Trace Bitmap goes wrong
The most-searched Trace Bitmap problems have simple causes:
- Nothing happens / the result is empty. You didn't select the image first, or the threshold is at an extreme. Click the image with the Selector tool, then bring the threshold back toward the middle.
- The output is all black or all white. That's the threshold again. Drag it the other way and Update.
- Stray speckles everywhere. Raise the Speckles setting, turn on Smooth corners, and start from a cleaner, higher-resolution source. A JPG full of compression noise traces that noise faithfully.
- Jagged, rough edges. Usually a low-resolution input. Trace a larger, sharper version of the image.
- The shapes aren't "perfect." Trace Bitmap follows pixels, not geometry, so a traced circle is a wobbly approximation of a circle. For clean geometric shapes, redraw them by hand with Inkscape's shape tools.
- Way too many nodes. This is the big one (see below). Run Path > Simplify (
Ctrl + L) to thin them out, though that softens detail too.
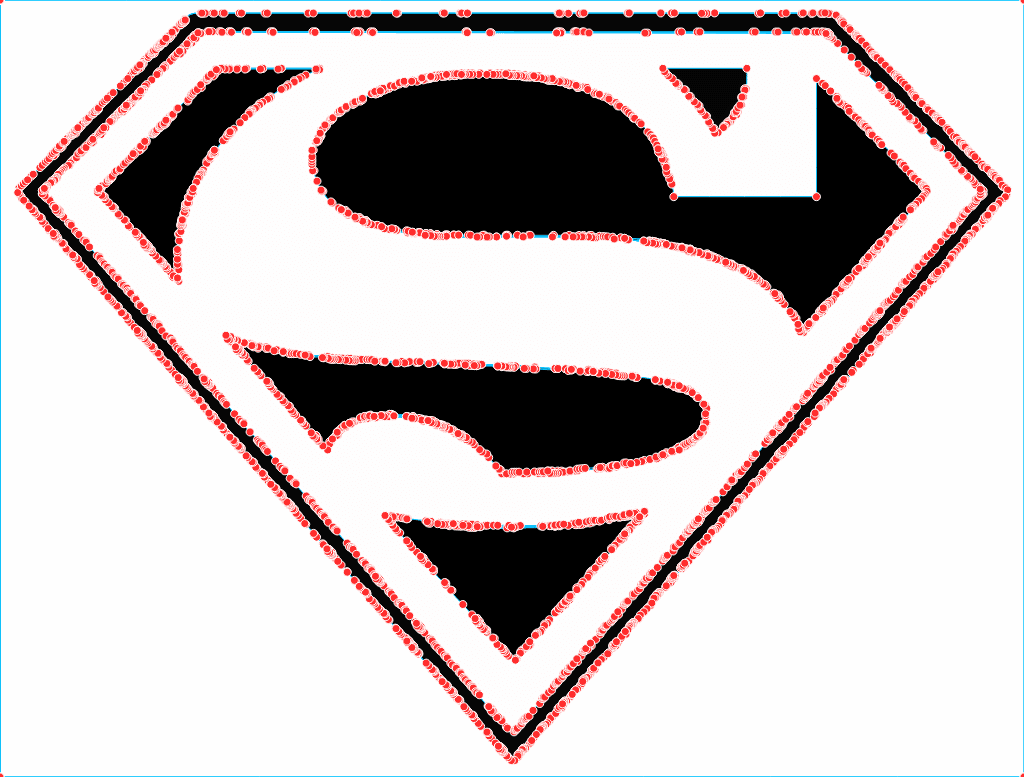
The honest part: the output is heavy
Here's what the tutorials skip. Trace Bitmap tends to produce a lot of nodes, and in color it produces stacked objects, one per color. That's not a settings mistake; it's how the tool works.
A bloated trace is slow to edit, slow to render, and a headache to cut on a Cricut or Silhouette, where every extra node and layer adds time. The color mode is worse: that pile of stacked shapes has to be ungrouped and untangled before you can recolor or weed it. If you plan to edit the result, it helps to know how to edit an SVG and why auto-traced files end up with too many nodes before you start.
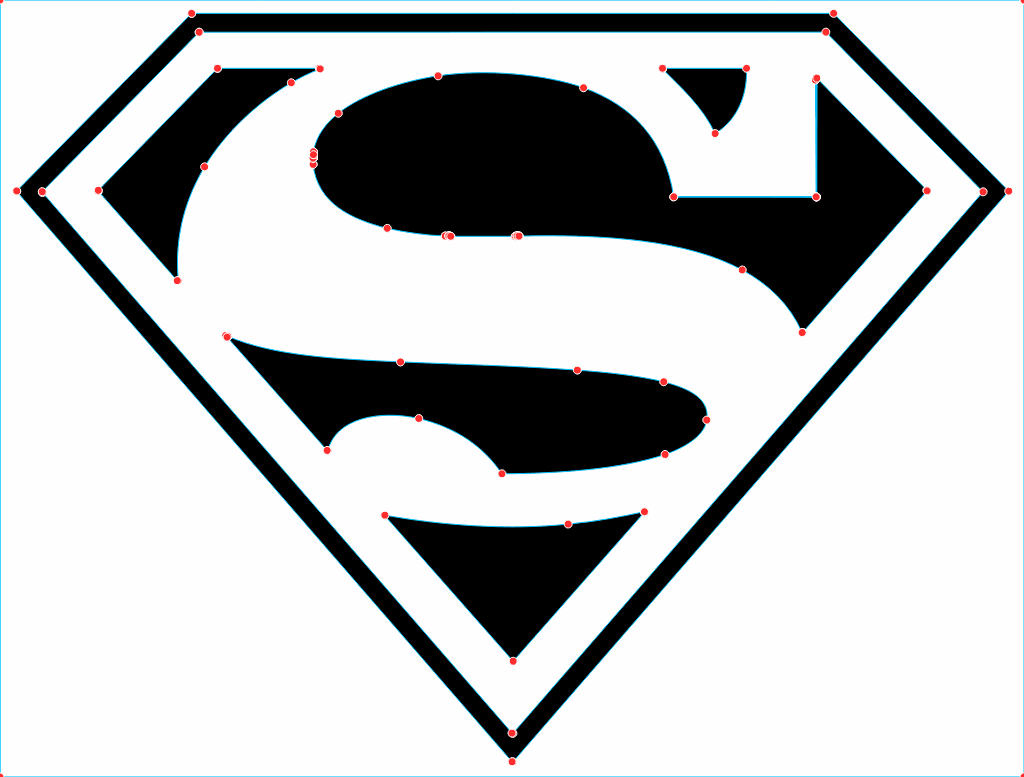
What this looks like with PerfectVector
If the settings dance and the cleanup are the part you'd rather skip, that's the gap a one-click tool fills. PerfectVector is an AI image-to-vector converter that outputs clean paths with a low node count and keeps each color as its own tidy shape instead of a stack you have to untangle, with no threshold to tune. You upload, you get an editable SVG, and you check the paths yourself. Convert your first images free, no credit card required.
This isn't Inkscape versus PerfectVector so much as manual control versus one-click cleanliness. Trace Bitmap is excellent when it's free, you want to drive every setting, and the job is a simple silhouette. A one-click vectorizer wins when clean output matters, the art has color, or you're converting more than the occasional file. (If you work in Illustrator rather than Inkscape, the same trade-off plays out in Image Trace versus an AI vectorizer.)
When to use which
- Reach for Trace Bitmap when it needs to be free, you want hands-on control of every setting, the image is a simple black-and-white silhouette or line drawing, and you only do it occasionally.
- Reach for a one-click vectorizer when clean, low-node output matters, the image has color, you're converting a lot of files, or you'd rather not tune thresholds at all.
Both produce real, editable SVGs. The difference is how much cleanup stands between you and a file you can actually use.
FAQ
What are the best Trace Bitmap settings in Inkscape? For most images, use Single Scan with Brightness Cutoff and adjust the threshold while watching the live preview. Turn on Smooth corners and Optimize paths to reduce nodes, and raise the Speckles setting if you see stray dots. Only use Multiple Scans with Colors when you genuinely need color, and keep the number of colors low.
Why is Inkscape Trace Bitmap not working? The usual cause is that no image is selected, so select it with the Selector tool first. If the preview is blank, all black, or all white, your threshold is at an extreme; drag it back toward the middle and click Update. Make sure you imported the image properly via File > Import.
How do I trace only the outline of an image in Inkscape? Use Single Scan with Edge Detection to trace the contours of shapes, or Centerline Tracing to reduce the image to a single open line. Centerline is best for handwriting, signatures, and thin line art where you want strokes rather than filled shapes.
Why does my Inkscape trace have so many nodes? Trace Bitmap follows the pixels closely, so it tends to create dense, irregular anchor points. Run Path > Simplify (Ctrl + L) to thin them, keep Optimize paths on, and start from a clean, high-resolution source. If you need consistently low node counts without the cleanup, a dedicated AI vectorizer produces them directly.
Can Inkscape trace a color image? Yes, with Multiple Scans set to Colors, but it creates one stacked object per color. The result is harder to edit and weed because you have to ungroup and separate the layers. Keep the color count as low as the design allows.
Is Inkscape Trace Bitmap free? Yes. Inkscape is free and open-source on Windows, Mac, and Linux, and Trace Bitmap is built in at no cost.
Trace Bitmap is a capable free tool once you know which mode and settings to reach for. If the tuning and the node cleanup aren't how you want to spend your time, convert your image to a clean SVG in one step and check the paths yourself.
More from the blog

How to Convert an Image to an SVG for CNC (Clean Paths Your CAM Will Cut)
A CNC follows vector paths, not pixels, so your design has to become a clean SVG or DXF first. Here's how to convert an image into CAM-ready, closed-path vectors.

How to Convert an Image to an SVG for 3D Printing (and What Extrudes Cleanly)
A 3D printer can't extrude pixels, so flat designs start as an SVG. Here's how to turn an image into a clean, closed-path SVG that imports and extrudes the first time.