Coloring Page Line Thickness: Check the Printed Size
Choose coloring-page line thickness at the final size. Compare stroke weights, preserve small coloring spaces, and check whether your SVG uses strokes or fills.
On this page
Choose coloring-page line thickness after setting the artwork's final physical size. Compare a few weights on the same drawing, then inspect the smallest white spaces as carefully as the black lines. A heavier contour can make a shape easier to distinguish while closing a narrow area the reader is supposed to color.
The choice depends on the drawing, its dimensions, coloring tools, and printer requirements. Use the repeatable SVG example below to check geometry, then a paper proof to check the actual print.
Make the decision at delivery size
Keep dimensions fixed while comparing weights. After resizing, recheck the lines and white gaps. Confirm whether the visible mark is a live stroke or a filled outline before adjusting it.
Set the page and artwork size first
Start with an editable master and the intended page size. Compare a flower intended for a 100 mm square at that size; a zoomed editor view can disguise a tiny channel.
An SVG's viewBox is its drawing-coordinate rectangle. Our square example pairs width="100mm", height="100mm", and viewBox="0 0 100 100", giving one millimeter per drawing unit. The same viewBox in a 50 mm square gives half a millimeter per unit. The SVG coordinate specification defines this mapping.
Ordinary strokes scale with this example's geometry: width 0.6 measures 0.6 mm in the larger file and 0.3 mm in the smaller. These files have no non-scaling stroke setting; recheck the width if your editor preserves strokes during resizing.
Compare the line and the space beside it
A live stroke paints around a path. For two straight, parallel paths with equal centered strokes, the clear gap is their centerline separation minus one stroke width. Curved intersections need separate inspection. The SVG painting specification distinguishes stroke paint from the filled interior of a shape.
Consider two stem boundaries one drawing unit apart. Increasing each stroke from 0.3 to 0.6 reduces the clear gap from 0.7 to 0.4 units. At 1.2, the strokes overlap and the channel closes.
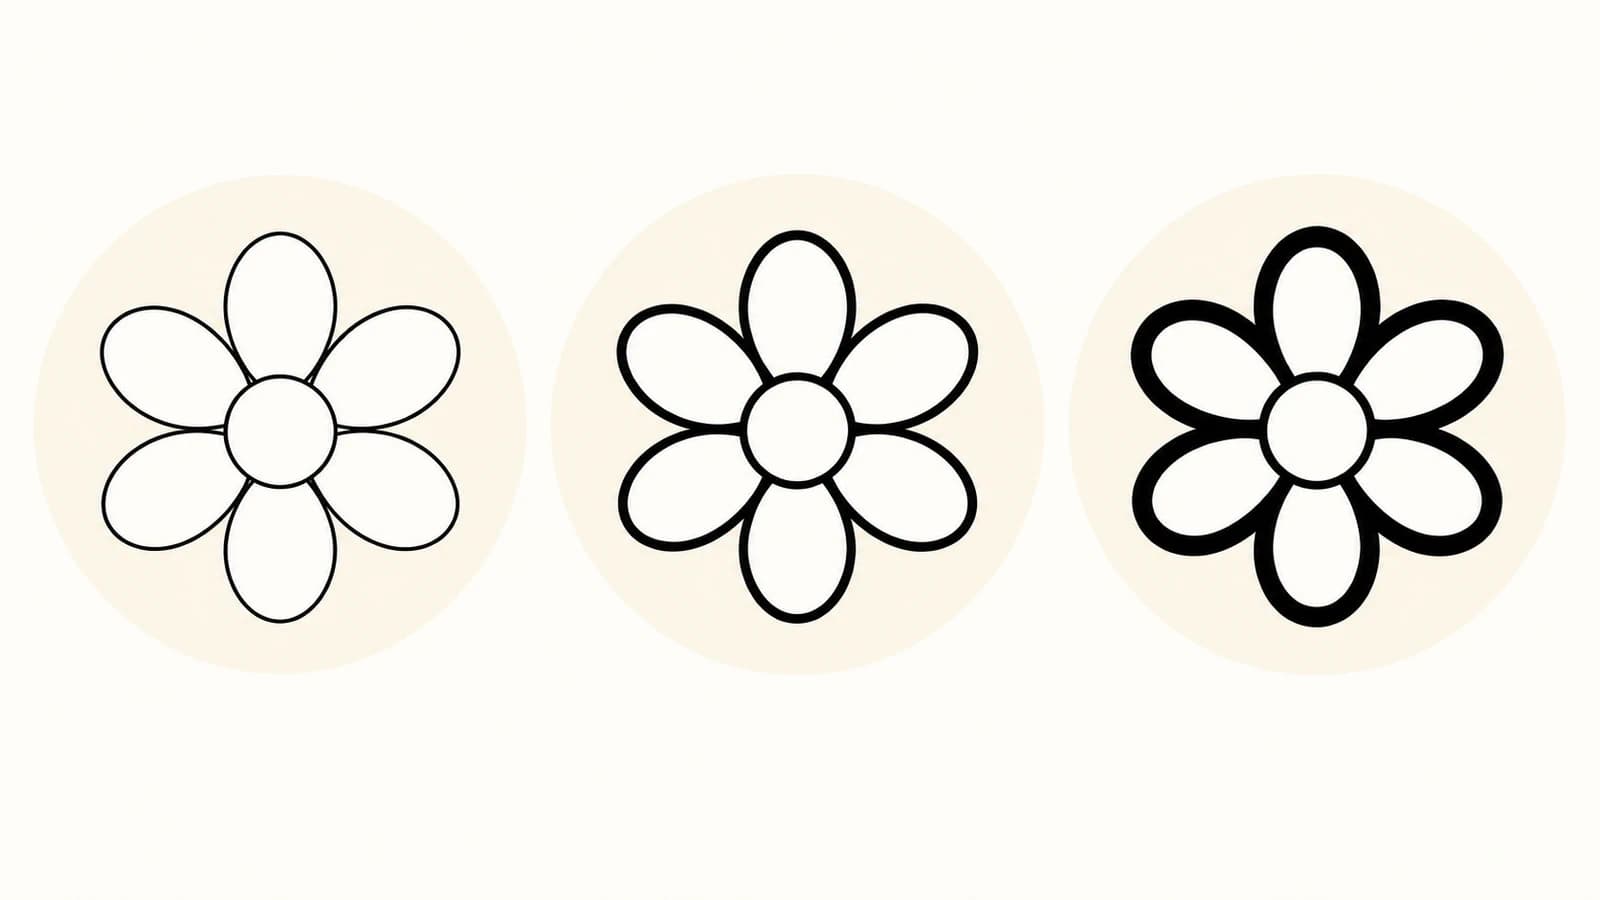
| Trial stroke width in the SVG | Line at 100 mm size | Clear stem gap at 100 mm | Line at 50 mm size | Clear stem gap at 50 mm |
|---|---|---|---|---|
| 0.3 units | 0.3 mm | 0.7 mm | 0.15 mm | 0.35 mm |
| 0.6 units | 0.6 mm | 0.4 mm | 0.3 mm | 0.2 mm |
| 1.2 units | 1.2 mm | Closed | 0.6 mm | Closed |
At the 100 mm size, these trial widths are approximately 0.85, 1.70, and 3.40 points. They are comparison values, not recommended minimums or age-based standards. The gap calculation describes the parallel stem section; inspect petal tips and curved joins separately.
Make a small comparison before changing a whole book
Save this original example as flower.svg. Change only stroke-width to compare the three rows above. Then change both outer dimensions to 50mm, keeping the viewBox unchanged, to make the smaller set.
<svg xmlns="http://www.w3.org/2000/svg"
     width="100mm" height="100mm" viewBox="0 0 100 100">
  <g fill="none" stroke="#000000" stroke-width="0.3"
     stroke-linecap="butt" stroke-linejoin="round">
    <ellipse cx="50" cy="20" rx="7" ry="10"/>
    <ellipse cx="50" cy="20" rx="7" ry="10" transform="rotate(60 50 35)"/>
    <ellipse cx="50" cy="20" rx="7" ry="10" transform="rotate(120 50 35)"/>
    <ellipse cx="50" cy="20" rx="7" ry="10" transform="rotate(180 50 35)"/>
    <ellipse cx="50" cy="20" rx="7" ry="10" transform="rotate(240 50 35)"/>
    <ellipse cx="50" cy="20" rx="7" ry="10" transform="rotate(300 50 35)"/>
    <circle cx="50" cy="35" r="5"/>
    <path d="M49.5 60V85 M50.5 60V85"/>
  </g>
</svg>
The two straight stem paths run from y=60 to y=85, one unit apart. Inspect their middle to compare the gap without the petals or line endings affecting it.
We exported all six variants to PDF with librsvg 2.62.1 and reopened them with Poppler 26.02.0. The PDF page sizes matched 100 mm and 50 mm within rounding. At 1,016 DPI, the sampled stem gaps were 28, 16, and 0 pixels for the larger set, then 14, 8, and 0 for the smaller set, matching the table at 40 pixels per millimeter. We inspected the rendered files; no physical print was made.
- Save an untouched master. Choose one representative motif containing both an open coloring area and a tight detail.
- Make three copies with identical geometry and physical dimensions. Change only the live stroke width.
- Check the tightest spaces at the intended size. If a gap closes, try a lighter weight or move the neighboring contours apart. Deleting an unnecessary interior mark may be clearer than making every line thinner.
- Export the intended delivery format, reopen it, and confirm its page dimensions. Compare the exported artwork with the master, including small holes, corners, and line endings.
- Repeat the check at the smallest size you plan to sell or print. Resizing a finished page can change the decision.
Use the same page and zoom for comparison. A weight that suits the outer flower may crowd its interior marks. If you use different outer and inner weights, inspect where they meet after export.
Check whether the SVG has strokes or filled outlines
A fill paints a shape's interior. A visible black line can therefore be a narrow filled shape or a stroked center path. Changing stroke-width affects the stroke, but it does not alter the existing fill when stroke="none". We also exported two identical filled-path controls that differed only in stroke width. Their rendered pixels were identical. Those controls were authored shapes, not traced product output.
Ordinary outline tracing follows the edges of an ink mark. Centerline tracing tries to recover a path through its middle. The Inkscape tracing guide describes both modes. Inspect the actual object instead of assuming every traced SVG has the same structure.
For a filled outline, adjust the original drawing if available. Otherwise, edit its geometry or redraw the affected center path. Adding a stroke around an outline does not recover the original pen path. Our Stroke to Path versus Object to Path guide explains that structural distinction, and the single-line SVG guide covers centerline work for plotting.
If your only source is a PNG or JPG coloring page, PerfectVector's coloring-page vectorization workflow can provide editable SVG shapes to inspect. Check the preview, then unlock the result for SVG editing and export. Vectorization does not choose the page's ideal line weight or guarantee a centerline stroke you can resize with one width control. For source preparation and tracing, follow the line-art-to-SVG guide.
Keep an existing vector master in your editor. A suitable raster page may already meet the printer's requirements; the image-vectorization explainer helps decide whether editable geometry is needed.
Separate a printer's minimum from your design choice
Follow the requirements of the service receiving your file. For example, KDP's paperback guidelines specify a minimum line weight of 0.75 point for graphic elements. That is a KDP submission requirement, not a recommended coloring-page style or a rule for every printer.
Recheck the delivered size against that requirement. A line that meets a minimum before reducing the artwork may fall below it afterward. Keep units consistent: the CSS absolute-length definition defines one point as 1/72 inch. Do not treat a rounded millimeter equivalent as an exact conversion.
For a paper proof, print at the intended scale, disable unwanted fit-to-page reduction, and measure a known dimension with a ruler. Use the intended paper and coloring tools where practical. Look for broken lines, closed gaps, and cramped details. The digital test above does not establish ink spread, paper behavior, or coloring comfort.
FAQ
What line thickness should a coloring page use? Choose it at the final physical size by comparing a few weights on representative artwork. Preserve the smallest spaces that should remain colorable and meet the receiving printer's requirements. There is no single value established here for every page or age group.
Why do the lines look thinner after I shrink the drawing? Ordinary geometry scaling can reduce stroke width along with the artwork. Check the exported file at its final size. An editor option or non-scaling stroke can preserve width, but the remaining gaps still need inspection.
Why does the stroke-width control not change my traced lines? The black marks may be filled outline shapes with no stroke. A stroke-width setting does not change their filled geometry. Edit the source or outlines, or deliberately rebuild center paths where that workflow is appropriate.
Sources
- W3C — SVG 2 coordinate systems — Explains the viewBox-to-viewport mapping used for the two physical sizes.
- W3C — SVG 2 painting — Distinguishes fill and stroke and defines stroke width.
- Inkscape — Tracing an Image — Distinguishes outline tracing from centerline tracing.
- Amazon KDP — Paperback Submission Guidelines — Supplies the service-specific minimum line-weight requirement.
- W3C — CSS Values and Units — Defines the relationship between points, inches, and other absolute length units.
If the source you need to edit is a PNG or JPG, try your own coloring page in PerfectVector. After unlocking and exporting the SVG, inspect the line geometry and smallest white spaces at the intended page size before preparing a paper proof.
More from the blog

Responsive SVG Logos: Switch the Lockup at Small Sizes
Choose a detailed or compact SVG logo with picture media conditions. Test the selected source at three viewport widths, and separate art direction from scaling.

SVG Edge Detection: A feConvolveMatrix Preview
Build an SVG feConvolveMatrix edge preview, diagnose alpha and border artifacts, compare a sharpening kernel, and check whether the source contains real paths.