Inkscape Object to Path vs Stroke to Path: What Changes?
Compare Inkscape Object to Path and Stroke to Path on the same circle. Learn which keeps a live stroke, which makes a filled band, and what to check next.
On this page
- Compare the commands on one stroked circle
- Object to Path changes the shape's representation
- Stroke to Path makes the painted band into geometry
- See the distinction in an authored SVG example
- Choose the representation your next step needs
- Neither command traces pixels into paths
- Check the selected object before converting it again
- FAQ
- Sources
Inkscape Object to Path converts a shape or text into path geometry. Stroke to Path converts the visible stroke into filled geometry. On a circle with no fill and a thick stroke, Object to Path keeps the stroke editable as a stroke; Stroke to Path makes the ring itself a filled shape.
Choose between them by deciding what you need to edit: the line that carries the stroke, or the boundaries of the painted band. A screenshot of the ring may look similar either way, so appearance alone is a poor check.
This comparison uses Inkscape's documented command behavior and a small authored SVG example. The code and render checks below demonstrate the two representations; they are not native Inkscape exports.
Compare the commands on one stroked circle
Start with a circle that has no fill, a teal stroke, and a stroke width of 24 units. Keep a master copy and make separate copies for each conversion so one command's result does not become the other's input.
A stroke paints a band along a shape's outline or a path. Its centerline is the geometric line around which that band is painted. A fill paints the region enclosed by geometry, according to its fill rule.
For this simple circle, the difference is:
| Question | Object to Path | Stroke to Path |
|---|---|---|
| What becomes path geometry? | The circle's geometric outline | The visible stroke band |
| Where does the color come from afterward? | A live stroke on the path | A fill in the converted band |
| Can the existing band still be widened with its live stroke-width control? | Yes | No; that band is now geometry |
| What do you edit with nodes? | The path carrying the stroke | The boundaries enclosing the filled band |
| Which original editing control is lost? | The circle's special shape handles | The band's original live stroke controls |
The table is deliberately about one undashed, no-fill circle. Text, filled-and-stroked selections, markers, effects, and transformed groups need their own inspection. Do not infer a fixed node count or object count from this example.
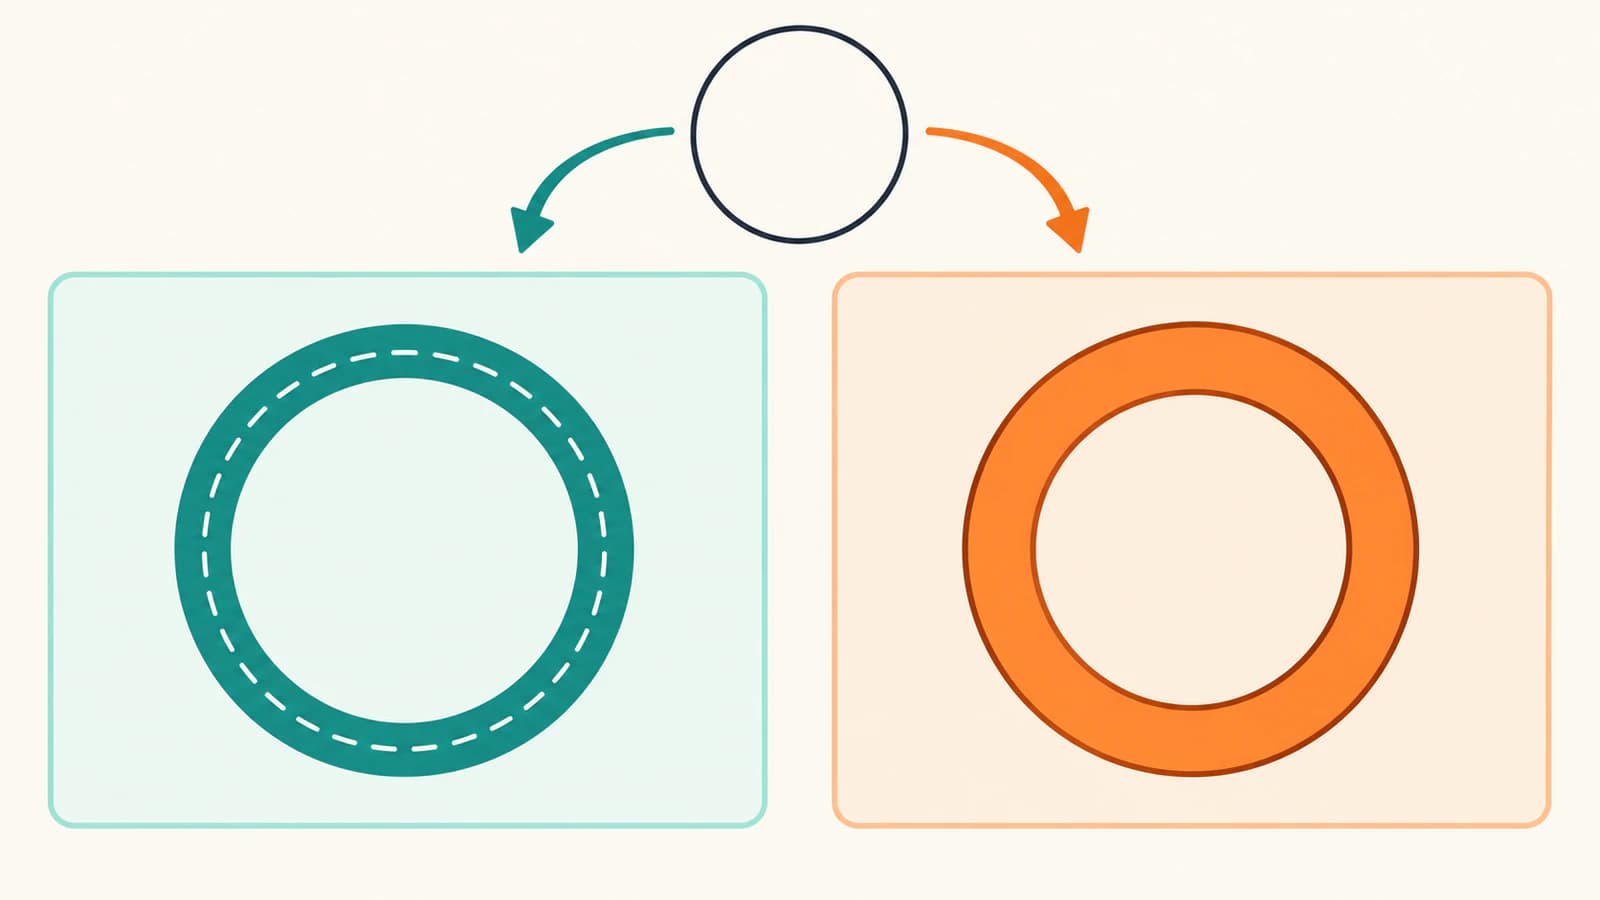
Object to Path changes the shape's representation
Inkscape's shape-to-path manual distinguishes a live geometric shape from a path edited with nodes. A circle starts with shape-specific controls. Use Path → Object to Path when you need to change its geometry through path nodes instead.
Converting the circle to a path does not, by itself, turn the stroke's thickness into filled geometry. The path can still carry a fill and a stroke. In our no-fill case, the teal band remains a live stroke on a circular path.
That makes Object to Path useful when you want to reshape part of a circle while retaining an adjustable stroke width. It is less useful if all you want is a larger circle or a different width; the original shape already has controls for those changes.
Conversion also trades away the original shape's special controls. Inkscape's Advanced tutorial describes preserving the appearance while losing the abilities tied to the original object type. Keep the circle master if you expect to adjust it as a circle later.
For text, the same tradeoff affects editing: converted letter geometry can be edited as paths, while the original editable text should remain in a separate master. Converting type is a different need from turning a stroke into an outline.
Stroke to Path makes the painted band into geometry
Use Path → Stroke to Path when you need the visible stroke area to become filled path geometry. Inkscape's Advanced tutorial explains this using a path with no fill and a stroke: the converted result has a fill and no stroke.
For the sample circle, think of two boundaries: the outside of the ring and the inside of its opening. Together they enclose the teal area that the live stroke previously painted.
An outlined stroke is a filled path representing the former stroke's visible area. After outlining, its original thickness is part of that geometry. Changing it means editing the boundaries or applying a suitable geometric operation, rather than adjusting the former live stroke width.
You can add a new stroke to the outlined result, because a path can still have a stroke. That adds paint around the new geometry; it does not restore the original circle's live stroke representation. This distinction matters when an outline gets unexpectedly thicker after another stroke is applied.
For open lines, the visible outline also depends on cap and join choices. The Inkscape stroke manual explains these as stroke settings. Inspect the actual result when your input uses those features instead of assuming it behaves exactly like an undashed circle.
See the distinction in an authored SVG example
The three files below describe the same intended ring in a 256 × 256 drawing area. They are original SVG illustrations written for this comparison, not XML copied from either Inkscape command.
Save each block as its named file. Open them in an SVG-capable viewer or editor and compare the source as well as the appearance.
1. The shape input, shape.svg:
<svg xmlns="http://www.w3.org/2000/svg"
     width="256" height="256" viewBox="0 0 256 256">
  <circle cx="128" cy="128" r="72"
          fill="none" stroke="#0d9488" stroke-width="24"/>
</svg>
2. A path carrying a live stroke, center-path.svg:
<svg xmlns="http://www.w3.org/2000/svg"
     width="256" height="256" viewBox="0 0 256 256">
  <path d="M 128 56 A 72 72 0 1 1 128 200
           A 72 72 0 1 1 128 56 Z"
        fill="none" stroke="#0d9488" stroke-width="24"/>
</svg>
The element changed from circle to path, but stroke and stroke-width remain. The path describes the centerline; the stroke paints its thickness.
3. A filled band, filled-band.svg:
<svg xmlns="http://www.w3.org/2000/svg"
     width="256" height="256" viewBox="0 0 256 256">
  <path d="M 128 44 A 84 84 0 1 1 128 212
           A 84 84 0 1 1 128 44 Z
           M 128 68 A 60 60 0 1 1 128 188
           A 60 60 0 1 1 128 68 Z"
        fill="#0d9488" fill-rule="evenodd"/>
</svg>
The band has outer and inner radii of 84 and 60 units, corresponding to the 72-unit radius plus or minus half of the 24-unit stroke width. The evenodd fill rule leaves the center unpainted. This file has a fill and no live stroke.
We saved and reopened these files, inspected their attributes, and rendered them with Sharp and librsvg. All three base renders had an empty center and teal paint at the same ring sample point. Their antialiased boundary pixels were not identical, so this is a representation demonstration rather than a pixel-for-pixel export comparison.
We then changed only stroke-width="24" to stroke-width="40" in a copy of the live-path file. The live band expanded: a previously empty point at 128,40 became painted. The unchanged filled-band file stayed empty there.
That is the useful check: identify what carries the width, then change that property deliberately. Native Inkscape commands were not executed for this example, and these renders do not establish a native editor's node count, grouping, or export behavior.
Choose the representation your next step needs
Use the goal of the next edit to choose the command:
| Your goal | Suitable choice | Check afterward |
|---|---|---|
| Reshape a circle through individual path nodes | Object to Path | The shape becomes a path and its intended live stroke remains |
| Keep adjusting line width, dashes, caps, or joins | Keep a live stroke | Those controls still govern the band you are changing |
| Make the visible band part of a filled silhouette | Stroke to Path | The former band is filled geometry, with the intended opening preserved |
| Retain a line for a process that follows a center path | Preserve the live path | The downstream application uses that path as intended |
A filled outline and a centerline are different inputs for cutting or plotting. A downstream program that follows path boundaries may interpret a filled ring's inner and outer contours differently from a single centerline. Outlining is therefore a geometry choice, not a guarantee that a machine will make one pass. Use the double-line cutting checks when the actual import produces extra passes.
Likewise, outlining may help when a receiving application handles strokes differently, but it does not diagnose every missing-line problem. Follow the SVG stroke export diagnosis when a line vanishes after export.
Neither command traces pixels into paths
A PNG or JPG is a raster image made of pixels. These two Path-menu commands concern existing vector shapes, text, paths, and their painted strokes. They are not image tracing workflows.
If the selected item is an image, decide whether you actually need vector geometry. For a local tracing route, use the separate Inkscape Trace Bitmap workflow. If an SVG still behaves like one selected object, first check groups, compound paths, and embedded images rather than repeatedly converting it.
When your only source is a simple raster logo and you need editable filled paths, PerfectVector's image-to-vector tool is another starting point. Inspect the protected raster preview, then unlock the result before actual SVG editing and export. Inspect the resulting paths in your editor before choosing a path command; a traced silhouette does not recover the original drawing's centerline.
Check the selected object before converting it again
Keep the editable master, work on a copy, and check three things in your own Inkscape document:
- Object type: is the selection a live shape, text, an ordinary path, a group, or an embedded image?
- Paint: does the visible band come from a stroke or from a fill?
- Editing goal: do you need to move the centerline, change its width, or alter the boundaries of a filled area?
Use the Node tool and Fill and Stroke controls together. Seeing nodes does not prove a stroke has been outlined: an ordinary path can still carry a live stroke. Seeing a filled band does not prove the file is ready for a cutter or printer.
For more problems beyond this command choice, browse the SVG troubleshooting guides.
FAQ
Does Object to Path also convert the stroke to an outline?
No. Object to Path converts a shape or text into path geometry. A resulting path can retain a live stroke. Use Stroke to Path when you need the painted stroke band to become filled geometry.
Can I change the width after Stroke to Path?
The former stroke width is now part of the filled outline's geometry. Edit its boundaries or use a suitable geometric operation. Adding a new stroke paints around that geometry; it does not restore the original live stroke.
Is a path still an object in Inkscape?
Yes. A path is one kind of object. Object to Path changes supported non-path objects into path geometry; it is not a command for making an object stop being an object.
Will either command convert a PNG into editable paths?
No. Raster-to-vector tracing is a separate workflow. First create or recover vector geometry, then inspect whether it contains shapes, live strokes, or filled paths before choosing a conversion command.
Sources
- Inkscape Advanced tutorial — explains paths, conversion from shapes and text, and conversion of a no-fill stroke into a filled outline.
- Editing Nodes on a Geometrical Shape, Inkscape manual — distinguishes shape-specific controls from path nodes and describes Object to Path.
- Strokes, Inkscape manual — describes live stroke width, caps, joins, dashes, and paint.
- SVG 2 painting specification — defines fill rules and stroke painting used by the authored SVG demonstration.
Only have a PNG or JPG and need vector geometry first? Convert the image with PerfectVector, inspect the protected preview, then unlock the result for SVG editing and export. If you already have editable vector artwork, keep working from that master and choose the command that matches the geometry you need.
More from the blog

SVG Stroke Animation: Prepare a Single Drawing Route
Make an SVG line draw on with dasharray and dashoffset. Compare an open path with a filled outline, check direction, and provide a static reduced-motion result.

SVG feComposite: Compare in, out and xor Artwork
Compare SVG filter inputs with in, out and xor, test operand order and partial alpha, and preserve source paths when a visual opening is not editable geometry.