AI Art for Laser Engraving: The Prompt Was the Easy Part
Generating the artwork is solved. Turning it into a file your laser will cut, score, or engrave correctly is where AI art gets difficult. Here is that half.
On this page
- First: what is the laser actually going to do?
- Raster engraving: the honest answer is you may not need us
- Cutting and scoring: where AI art fights back
- Every line becomes two
- Soft edges become blobs
- There is a box around your design
- Splitting one image into two layers
- What this looks like with PerfectVector
- When AI art will not work on a laser
- FAQ
- Sources
There is no shortage of advice on generating art for a laser. Prompt packs, tool round-ups, a whole genre of "25 prompts for laser designs." What almost nobody covers is the part where you have a beautiful PNG and a machine that wants to know exactly where to put the beam.
That gap is where the hours go. A normal outline trace can turn every drawn stroke into two vector edges, and separating one flattened image into cut and engraving operations can require substantial node cleanup. None of that is a prompting problem.
Short on time? The quick version
- Decide what the laser is doing first. Cutting, filling, scoring, and raster engraving need different files, and AI art suits them very differently.
- For raster engraving you often need no vector at all. The laser burns the greyscale image directly.
- For cutting and scoring you need paths, and that is where AI art fights back: doubled lines, soft edges that trace as blobs, and a background rectangle you did not ask for.
- Expect one image to become two layers, one to cut and one to engrave.
First: what is the laser actually going to do?
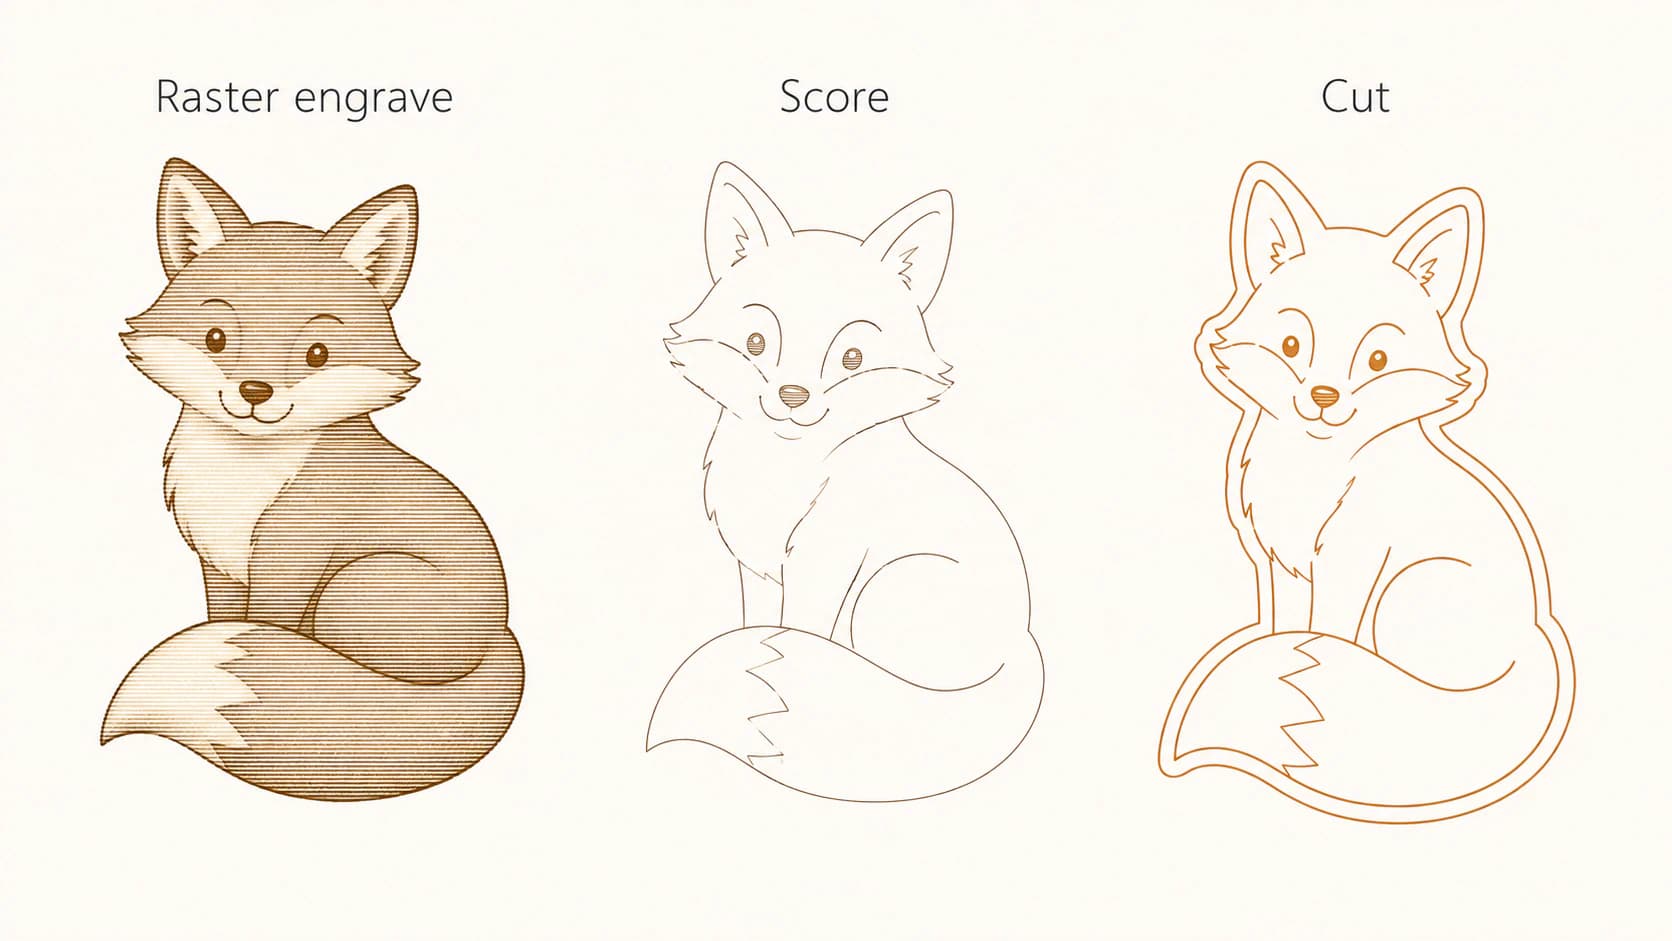
A laser has several common operation types, and the file it wants is different for each. LightBurn, for example, documents Line, Fill, and Image modes as distinct toolpaths.
| Job | What the machine follows | What it needs from you |
|---|---|---|
| Raster engrave | a greyscale image, burned line by line like a printer | a good raster. No vector needed. |
| Fill engrave | a closed vector shape, filled in with a sweep pattern | closed paths with no gaps |
| Score | a vector path, traced once at low power | clean single paths |
| Cut | a vector path, traced through the material | closed paths, no doubled lines |
Fill engraving is the one people forget, and it is why "engraving needs a centerline" is bad advice as a general rule. Filling a solid shape wants a closed outline, exactly like cutting does. Centerlines belong to the single-stroke jobs, scoring and line work.
Our guide to converting an image for laser work covers this decision in general, and it is worth reading first. What follows is only the part that changes when the source is AI-generated. If your machine is a cutting plotter instead, AI art for Cricut is the same crossing for that workflow.
Raster engraving: the honest answer is you may not need us
If your plan is to burn a portrait, a detailed illustration, or anything with shading onto wood or slate, stop before you convert anything.
Raster engraving takes the image as it is. The laser sweeps across the material and modulates power against the greyscale, so the gradients, texture, and soft edges that make AI art look good survive as tonal variation. Vectorizing that first would flatten it into a handful of solid shapes and throw away the detail you generated it for.
Convert the image to greyscale, adjust contrast so the darks do not blow out, size it, and engrave. That is the whole workflow, and no tracing belongs in it.
The same mistake happens in the other direction. Someone vectorizes a photoreal AI render because they read that lasers need vectors, gets a muddy set of flat color shapes, and concludes the trace failed. The source was never a good candidate for that tracing workflow.
Cutting and scoring: where AI art fights back
Now the harder case. You want an outline the laser follows, which means paths, which means tracing, and AI art brings three specific problems.
Every line becomes two
When you trace a drawn line, an outline tracer follows both edges of it and hands you a closed shape shaped like a long thin ribbon. Set that to cut or score and the laser follows both sides, burning two parallel lines with a sliver of material between them.
What you wanted is a centerline: one path down the middle of each stroke. LightBurn's documented Trace Image workflow creates vector outlines, while Inkscape documents a centerline-tracing mode. We cover why doubled cut lines happen in more detail.
So: line art you want scored needs a centerline trace. Shapes you want cut out or filled in are fine with a normal outline trace, because the outline is what the machine cuts around or fills.
Soft edges become blobs
AI images do not have hard boundaries. There is a gradient of pixels where one shape becomes another, plus generation noise and compression artifacts. A tracer has to decide where the edge is, and on a soft edge it either wanders or invents detail.
The practical effect on a laser is fuzzy, wobbly cut lines and a node count in the thousands. If you are curious what that costs you, too many nodes explains it.
Generate flat, high-contrast art when the plan is cutting. Bold shapes, no gradients, no drop shadows, no glow. That constraint at generation time saves everything downstream, and prompting for art that vectorizes covers how to ask for it.
There is a box around your design
AI generators return a rectangle. The subject sits on a background, and a tracer with no instructions will happily vectorize that background as its own shape, which the laser then cuts as a frame around your work.
Remove the background before tracing, or delete the resulting rectangle after. LightBurn's Trace Image tool can trace an image's transparency channel to isolate a subject with a transparent background.
Splitting one image into two layers
Most interesting laser projects are not one operation. A coaster is an engraved illustration inside a cut circle. A sign is scored line work on a cut blank.
AI hands you a single flat image with none of that separation, so you have to build it. The reliable order:
- Convert the parts you need as paths. Trace the outline you will cut, and the line work you will score.
- Convert the parts you will engrave separately, or keep them as a raster image if they are tonal.
- Put each on its own layer in your laser software and assign the operation, so cut, fill, score, and engrave stay independent.
- Preview before you burn. Every laser app will show you the toolpath. Doubled lines and stray background shapes are obvious there and invisible on the artwork.
The two-hour version of this is doing step 1 by breaking nodes on a trace that came back as one tangled object. The five-minute version is starting from a clean conversion where the shapes are already separate.
What this looks like with PerfectVector
A trace turns into node surgery when it spends too many points following pixel noise instead of describing the intended shapes.
For flat artwork with clear boundaries, run the image through the laser SVG converter and inspect whether the paths, nodes, and separated shapes suit the operation you plan to assign. Use the general image-to-vector converter when the destination is not a laser. Either way, verify the file in the receiving software before running the job.
We will also say plainly what the tool does not do. It will not turn a photo-real AI render into a good cut file, because nothing will. That image wants to be engraved.
When AI art will not work on a laser
- Photo-real renders you intend to cut. Engrave them or regenerate as flat art. The same sorting applies off the laser too, and which AI art vectorizes well goes through it for print work.
- Anything with a glow, a soft shadow, or a gradient background that you want as an outline. The tracer cannot find an edge that the image does not contain.
- Very fine detail at small sizes. A laser has a kerf, a beam width that removes material. Detail narrower than the kerf disappears or falls out. Test on scrap before committing to hardwood.
- Text the generator produced. AI text is usually subtly wrong, and once it is engraved it is wrong permanently. Retype it in your laser software with a real font.
FAQ
Can you use AI-generated art for laser engraving? Yes, and the workflow depends on the operation. For raster engraving you can burn the image almost as it comes, in greyscale, with no vector conversion at all. For cutting or scoring you need to convert it to vector paths first, and flat high-contrast art converts far better than detailed or photo-real renders.
Do I need to vectorize AI art before engraving it? Usually not for raster engraving. The laser reads the greyscale image directly and the shading is the point, so tracing would flatten away the detail. Vectorize when the laser has to follow a path, which means cutting or scoring.
Why does my traced AI art cut two lines instead of one? Because a normal trace follows both edges of every stroke and returns a closed shape, so the laser burns both sides. Line work you intend to cut or score needs a centerline trace, which reduces each stroke to a single path. Some laser software does not offer centerline tracing at all, in which case do it in Inkscape before importing.
Which AI images work best for laser cutting? Flat, bold, high-contrast art with clear separated shapes and no gradients, glows, or drop shadows. Silhouettes, simple line drawings, and solid-colour illustrations convert cleanly. Photographic and painterly output is better engraved than cut.
How do I separate the cut lines from the engraved parts? Build them as separate objects and put each on its own layer in your laser software, then assign cut, score, or engrave per layer. Starting from a clean conversion where shapes are already separate is much faster than tracing everything as one object and breaking nodes apart afterwards.
Sources
- LightBurn: Your first project — Explains Line, Fill, and Image modes and previewing a laser job.
- LightBurn: Trace Image — Documents outline tracing, transparency tracing, optimization, and source-image limits.
- LightBurn: Fill Mode — Details how closed vector shapes are filled during engraving.
- Inkscape: Tracing tutorial — Documents bitmap tracing and centerline tracing for single-stroke work.
If the job needs closed vector paths, trace the flat source with PerfectVector, inspect the layers and nodes, and preview the toolpath in your laser software. If the job is raster engraving, keep the tonal image raster instead.
More from the blog
SignLab Vectorize Image: Trace or Import Clean SVG?
Compare SignLab's native vectorization with an imported SVG. Learn how to prepare the bitmap, inspect paths, preserve holes, and test a production-ready file.
RDWorks Image Trace: Import a Vector or Trace Bitmap?
Compare RDWorks bitmap tracing with a version-compatible vector handoff, then check scale, layers, nodes, doubled lines, and laser operations.