Washi Tape Artwork: Check the Repeat Before Printing
Prepare custom washi tape artwork with a supplier template, matching repeat edges, separate bleed and safe zones, and a reopened file check before handoff.
On this page
To prepare artwork for custom washi tape, build one strip at your chosen supplier's repeat length, make its left and right edges join, and check the exported file with three copies side by side. Then prepare the supplier's requested delivery format, bleed, and color settings. This guide covers artwork for supplier-printed rolls; you will need your artwork, the current product template, and an editor that can move a copy by an exact distance.
A pretty single strip can hide a broken repeat. The useful checkpoint is the join between copies: does a leaf continue, or does it suddenly drop halfway through?
1. Start with the template for the exact tape product
A repeat is the length of artwork before the same strip begins again. It is separate from the total roll length. Bleed extends artwork beyond a trim edge; a safe zone keeps important details inside that edge where the supplier asks you to place them.
For a concrete example, we inspected Alchemy Merch's current full-color CMYK washi tape product page and downloaded its linked vector template. Its 15 mm template uses these dimensions:
| Part of this template | Measurement | What to put there |
|---|---|---|
| Left-to-right repeat | 350 mm | One complete repeat unit |
| Finished tape width | 15 mm | The artwork that remains after trimming |
| Full artwork height | 18 mm | Finished width plus top and bottom bleed |
| Top and bottom bleed | 1.5 mm each | Background and details intended to run off the edge |
| Safe inset from each trim edge | 1.5 mm | Keep important lettering and complete motifs inside the green guides |
We checked the actual rectangles in the downloadable template bundle: black marks the outer boundary, red the finished width, and green the safe area. The 12 mm central safe area is smaller than the 15 mm finished strip.
These numbers belong to this product and template. Download the template for your selected width and finish before building the repeat. A foil product, another supplier, or a changed template may need a different period or margin.
The active product page prefers PDF, AI, or EPS vector files and lists PSD raster artwork at 300 dpi. Alchemy's older washi guide specifies 400 dpi for raster artwork. Use the current product instructions and resolve any conflicting requirements with the supplier before delivery.
2. Choose which motifs need vector paths
A motif is an individual design element, such as a flower, leaf, or logo, that you arrange within the repeat.
| Your starting artwork | Preparation choice |
|---|---|
| Original vector flowers or lettering | Edit those shapes directly; keep a separate master |
| Flat PNG or JPG motif you need to recolor | Try vectorization, then inspect the recovered paths |
| Watercolor with paper grain and soft washes | Keep a suitable raster when those textures are part of the design |
| Simple geometric dots or stripes | Drawing them directly may be quicker than tracing |
Vectorization turns a raster image's pixels into vector geometry. If a flat motif exists only as a PNG or JPG, PerfectVector's image-to-vector workflow can provide SVG paths to inspect and edit before arranging the strip. Check the outer shape, small openings, and unwanted background regions against the source. The next checkpoint is the recovered motif; the repeat still needs to be designed separately.
SVG means Scalable Vector Graphics. An SVG master is useful for retaining geometry, but it does not become the supplier's required AI or PDF file by changing its extension. Keep the original master and prepare a separate delivery copy. The print-shop AI handoff guide explains that format step.
For painted art, compare the tradeoffs in watercolor-to-vector preparation. Soft transitions also need a decision: tracing gradients can change how a motif looks. You do not need to trace an entire textured strip just to repeat it.
3. Wrap crossing motifs by the exact repeat length
Build the strip with the template's period, then place the motifs. Keep top and bottom template guides separate from artwork that will print.
When a motif crosses the right boundary, duplicate it and move the copy left by exactly one repeat length. Keep its vertical position, shape, scale, rotation, and color unchanged. For a crossing at the left edge, move the corresponding copy right by the same distance. SVG translation moves geometry in its current coordinate system; see the W3C coordinate specification.
Our original master uses width="350mm", height="18mm", and viewBox="0 0 350 18". Its leaf is centered at x = 346, y = 9 and extends across the right boundary at x = 350. The wrapped copy is centered at x = −4, y = 9. The horizontal difference is exactly −350; the vertical difference is zero.
The deliberately broken version keeps the same leaf shape and color but moves the wrapped copy to y = 11.5. That 2.5 mm vertical change makes the leaf jump at each join. Adding more top or bottom bleed does not repair it.
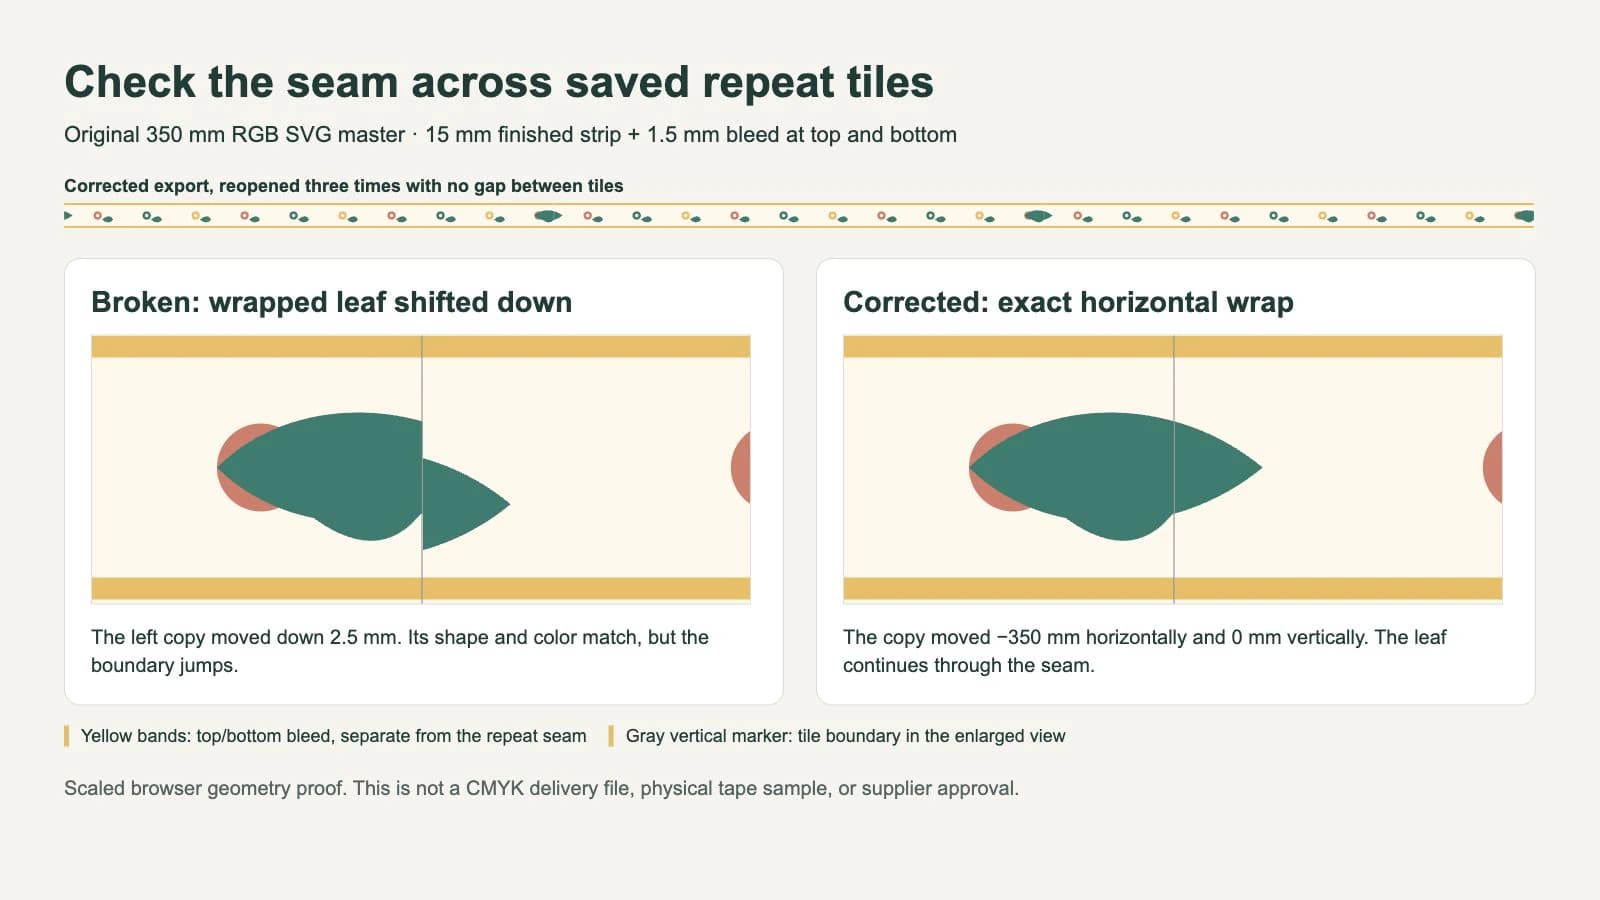
Method note: We authored both SVGs, reopened their saved geometry, checked the matching leaf paths and fills, and displayed the exports as adjoining tiles in a browser. The master contains vector shapes, with no embedded raster images. The figure is a scaled RGB geometry proof; we did not export through a native design app or manufacture tape.
RGB describes red, green, and blue screen color; CMYK describes cyan, magenta, yellow, and black process inks. This browser proof does not establish a CMYK production file or printed color. If you are troubleshooting the coordinates of a browser pattern fill, SVG pattern units covers that separate job.
4. Reopen the export and inspect three adjoining copies
Save one repeat unit, reopen that saved export, and place three copies side by side with no gap. Use the exported artwork, not a screenshot of the editor canvas. Three copies expose both joins around the middle tile and help you judge the spacing rhythm.
Check the joins at high zoom, then check the composition at its intended finished tape size in your design application. A browser's displayed millimeters or a zoomed screenshot should not be used as a ruler for the physical product.
| Symptom | First check | Repair and verify |
|---|---|---|
| A cut-off motif jumps at the seam | Wrapped copy's vertical position and transform | Restore an exact horizontal translation; reopen and check both joins |
| A blank stripe appears once per repeat | Export bounds, background coverage, and gaps between proof copies | Export the full repeat width and place copies without spacing |
| The ends match but the rhythm feels crowded | Distance between the last and first complete motifs | Move the interior motifs; inspect the full three-copy strip again |
| Lettering or a face sits near a trim edge | Supplier's safe guides | Move essential details inside the safe area without changing the repeat period |
| Texture looks soft in the delivery file | Raster dimensions at the intended print size | Return to the raster master and export at the supplier's required resolution |
A corrected seam passes when both joins continue without an unintended jump or blank stripe. Check the top and bottom separately: background reaches the outer bleed boundary, and essential details stay inside the supplier's safe guides.
5. Prepare the delivery copy and request a supplier proof
Keep your editable master. For delivery, use the chosen supplier's template and accepted format, confirm the document dimensions, and follow its color instructions. Reopen that delivery file in the intended application and check the same repeat boundaries again. A successful SVG browser preview does not prove that another application's export preserved the artwork.
Ask the supplier to show the repeat join in its proof and confirm how the guide layer should be handled. Check lettering, motif scale, the trim area, and any placed raster artwork. If you need a material or color decision, request the relevant sample rather than judging it from this screenshot. Adobe's print-color guidance explains why even a managed screen proof depends on the output profile and viewing conditions.
The handoff is ready for supplier review when the saved delivery file has the requested dimensions and format, its repeat joins pass, its bleed and safe zones match the template, and you have identified any remaining color or material questions. Vectorization alone cannot certify that handoff.
FAQ
Do the left and right edges need bleed? For the Alchemy template inspected here, the left and right ends are repeat boundaries; top and bottom are the trim edges with bleed. Match crossing motifs at the repeat boundaries and follow your own supplier's template for the required bleed.
Can I send the SVG master directly to the supplier? Only if the supplier explicitly accepts SVG for that product. Alchemy's current product page lists PDF, AI, and EPS as preferred vector files. Keep the SVG master and make a separate delivery copy in the requested format.
Will converting my PNG to vector make a seamless repeat? No. Vectorization can recover suitable motifs as paths, but you must arrange the strip, wrap crossing motifs by the exact repeat length, and inspect the saved export across adjoining copies.
Sources
- Alchemy Merch: Full-color CMYK washi tape — Current product repeat, preferred formats, raster resolution, and proof workflow.
- Alchemy Merch: Vector and raster template bundle — The actual 15 mm template inspected for outer, trim, and safe boundaries.
- Alchemy Merch: Washi Tape 101 — Older setup guidance whose raster-resolution figure differs from the active product page.
- W3C: SVG coordinate systems — The coordinate and translation basis for moving a wrapped motif.
- Adobe: Preparing images for print — The limits of screen previews and the role of output-specific color proofing.
Have a flat raster motif you need to recolor or rearrange? Turn the motif into SVG paths with PerfectVector, inspect its shape against the original, then build and reopen the repeat in your supplier's template. Keep textured artwork raster when that better preserves the design.
More from the blog
Acrylic Keychain Artwork: Print, Outline, and Hole
Prepare acrylic keychain artwork with separate print art, an outer outline, and an attachment opening. Check side alignment and follow your supplier's template.
Clear Sticker Artwork: Plan White Ink and Transparent Areas
Plan clear-sticker artwork with separate color and white regions. Compare full and selective white, preserve clear areas, and check your supplier's proof.