Convert Watercolor Art to Vector and Keep Its Feel
Learn when watercolor art should stay raster, when vectorizing helps, and how a real SVG trace changes soft washes into editable color shapes you can reuse.
On this page
- Raster, vector, or hybrid?
- What vectorization changes
- A practical watercolor-to-vector workflow
- 1. Capture a clean raster master
- 2. Decide what the SVG should preserve
- 3. Prepare a trace copy
- 4. Run the conversion
- 5. Inspect the SVG in a vector editor
- 6. Keep both masters
- When a hybrid works better
- Illustrator Image Trace as the manual alternative
- When to skip vectorization
- FAQ
- Sources
You can convert watercolor art to vector, but a clean traced SVG will be an interpretation of the painting rather than a faithful copy. SVG itself supports gradients, opacity, masks, and raster patterns, but an automatic shape trace does not preserve pigment blooms and paper grain one-for-one; it rebuilds the image from vector paint and geometry. The SVG painting specification describes those vector paint primitives.
That trade can be useful. Vectorize when you need a clean silhouette, editable color regions, or artwork that a cutter and other path-based tools can follow. Keep a high-resolution raster when the watercolor texture is the work. If you need both, use a hybrid: vector shapes for structure and the original scan for texture.
Choose the output before you trace
- Keep the raster for art prints, fine-art reproduction, and any job where the paper and pigment texture must survive.
- Vectorize for logos, simplified illustrations, cut shapes, recoloring, or layouts that need clean scalable edges.
- Use a hybrid when you want a clean vector silhouette with watercolor texture layered inside it.
- Save the original scan. A trace is a new production file, not a replacement for the painting master.
Raster, vector, or hybrid?
The destination decides the format. "Scalable" is not automatically better if scaling strips away the part you like.
| What you need | Best starting format | Why |
|---|---|---|
| Faithful art print or portfolio image | High-resolution PNG or TIFF | Keeps paper texture, transparent washes, and soft color transitions |
| Recolorable motif or simplified brand mark | SVG | Turns the subject into selectable color regions with clean edges |
| Cricut, laser, or another path-based workflow | SVG, usually simplified first | The machine needs paths, not painted texture |
| Large layout with a painted look | Hybrid | Vector paths control the silhouette while a raster layer keeps the wash |
| Sublimation print only | High-resolution PNG | Raster artwork is an accepted production route; follow the printer's resolution and template requirements |
If the final job is sublimation, read SVG or PNG for sublimation before tracing. For a photograph of a painting rather than a clean scan, the same continuous-tone limits described in our photo-to-SVG guide also apply.
What vectorization changes
A watercolor edge is built from irregular pigment deposits and partial transparency. A vector edge is a mathematical path with a fill. The tracer has to decide where one region ends and the next begins.
Three changes usually become visible:
- Soft transitions break into neighboring color shapes. More shapes can retain more tonal variation, but they also make the file more complex.
- Paper grain either disappears or becomes small traced regions. Keeping every speck rarely helps when the file needs to be edited or cut.
- Feathered edges become defined boundaries. The subject may scale cleanly, but it will look more graphic than the source.
We tested that trade with an original 1254 by 1254 watercolor-style flower generated for this article. We uploaded the PNG to PerfectVector and captured its signed-out compare view after the real conversion completed. The preview reported 95 colors. Because the SVG download stayed locked, this screenshot supports the visual comparison only. We did not inspect or report path counts.
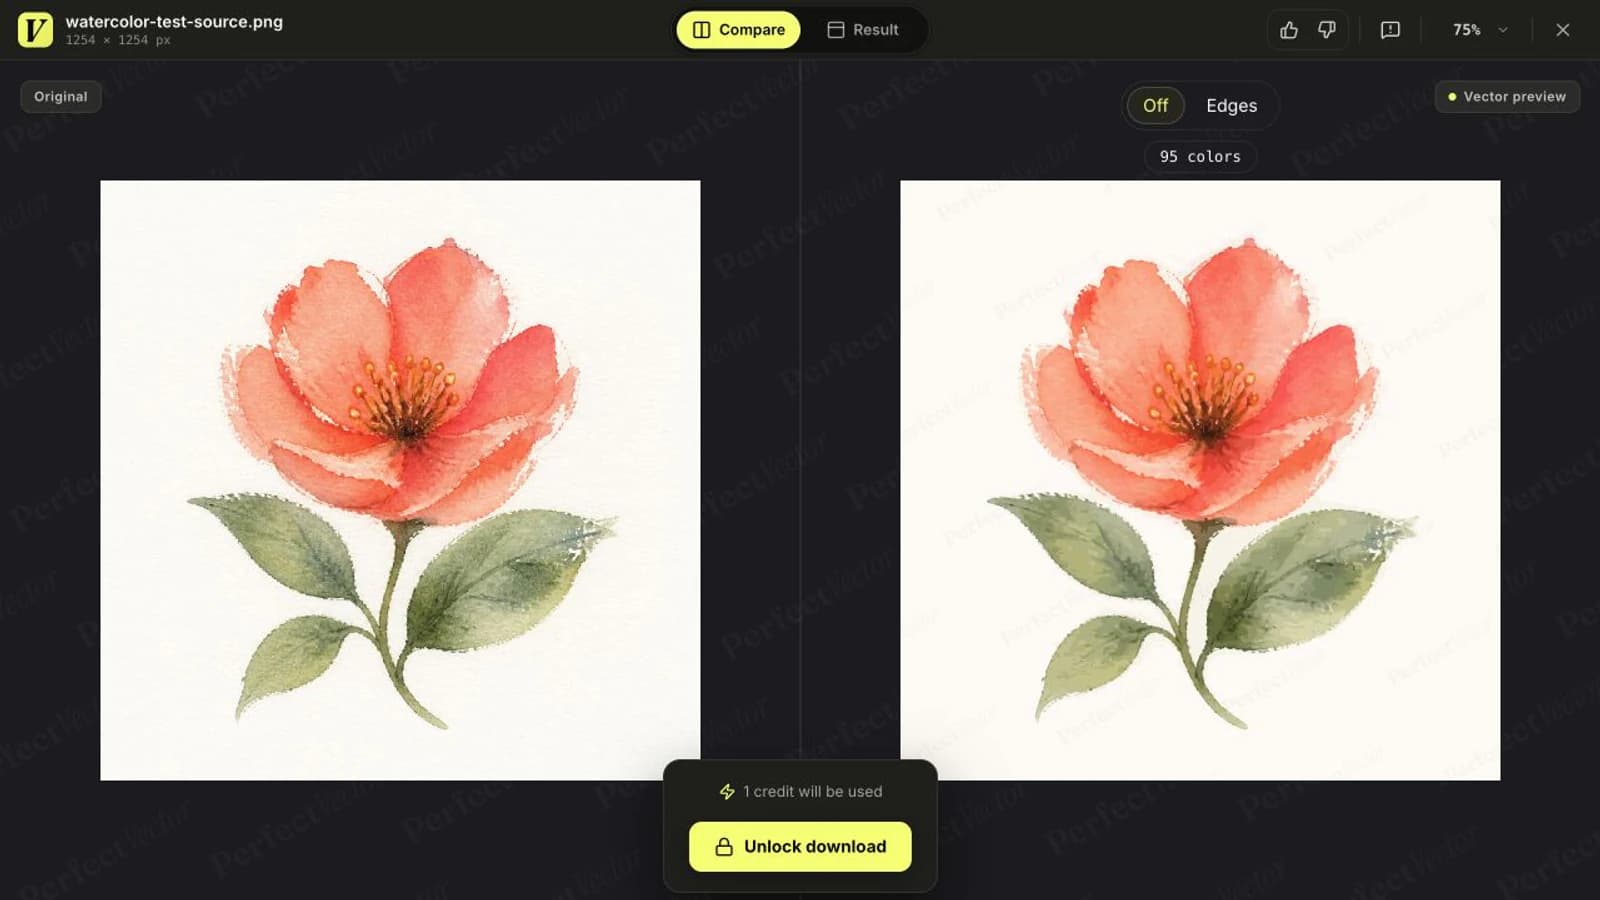
The result keeps the flower, palette, and much of the painted character. The right side is slightly cleaner around the leaves and background, while the bloom still needs many color regions to resemble watercolor. That is a reasonable result for an editable illustration, but it is not a substitute for the source if paper and pigment are the point.
A practical watercolor-to-vector workflow
1. Capture a clean raster master
Scan the painting when possible. If you photograph it, use even light, keep the camera parallel to the paper, and avoid a cast shadow from the phone. Export a lossless PNG or TIFF before making smaller web copies; archival digitization guidance likewise favors retaining a high-quality production master before derivatives.
Do not erase every bit of paper texture yet. Save an untouched master first, then work on a duplicate.
2. Decide what the SVG should preserve
Write down the job in one sentence. "I need the flower silhouette for a vinyl decal" calls for aggressive simplification. "I need editable colors for a packaging motif" allows more regions. "I need a gallery print that looks like the original" means you should stop and keep the raster.
This decision also tells you what to crop. A decorative wash around the subject may matter in a print but become stray shapes in a cut file.
3. Prepare a trace copy
Crop excess paper, correct uneven lighting, and remove marks that are not part of the artwork. Increase contrast only enough to separate the subject from the background. Heavy contrast can destroy pale washes before the tracer sees them.
If you need transparency, make the paper background visually distinct from the painted subject. Check the lightest petals and highlights after removal. They are the first parts to disappear when the threshold is too strong.
4. Run the conversion
PerfectVector is useful here when you want to test a shape-led version without treating the SVG as a replacement for the painting master. Upload the prepared copy, then judge the preview at both normal size and high zoom. Look for a stable outer silhouette, continuous stems, recognizable negative spaces, and color regions you could select without hunting through hundreds of tiny fragments.
If the file is meant for a cutter, simplify much harder than you would for print. A cutting machine cannot reproduce a transparent wash, and tiny islands turn into material you have to weed.
5. Inspect the SVG in a vector editor
Open the result in Illustrator, Figma, Inkscape, or another vector editor. Confirm that the artwork contains paths rather than one embedded bitmap. Select a few regions and recolor them. Zoom into the edges and inspect whether the number of nodes matches the shape's complexity.
If a simple leaf has a dense fringe of points, clean it up or try a simpler source. Too many nodes make later edits harder even when the preview looks fine.
6. Keep both masters
Save the untouched raster and the edited SVG as separate masters. Use the raster for faithful reproduction and the SVG for shape-led jobs. The two files solve different problems, so there is no reason to force one to replace the other.
When a hybrid works better
A hybrid file uses a vector path as a mask or clipping shape while retaining the original watercolor scan inside it. You get a clean outer edge for layout and scaling, but the interior still contains pixels.
This is useful for packaging, editorial layouts, and digital compositions where the painted texture matters but the motif needs a tidy boundary. It is not a true all-vector result, and a cutter still cannot follow the texture. That is fine as long as the production handoff says what the file contains. For a picture book that combines painted scenes with reusable motifs, see choosing raster or vector for children's book illustrations.
One simple workflow is to vectorize only the silhouette, place the high-resolution scan underneath it, then use the path as a clipping mask. Keep the linked or embedded raster at the resolution required by the final print size.
For wedding stationery, reuse selected motifs across layouts only when the editable shapes matter more than preserving every soft wash.
Illustrator Image Trace as the manual alternative
Illustrator's Image Trace gives you more control over how much detail becomes vector geometry. Its official documentation describes modes ranging from a limited color palette to Full Tone. Under Full Tone, higher Color-slider values create more paths from smaller areas of color, while lower values create fewer, larger fill areas. That is the central watercolor tradeoff: a closer-looking trace generally means more geometry to manage. See Adobe's current Image Trace panel options for the available controls.
Use Image Trace when you already work in Illustrator and want to tune color count, paths, corners, and noise by hand. A dedicated vectorizer is the shorter route when you want a first result without dialing in each setting. Either way, judge the output by the file you need, not by which preview retains the most texture.
When to skip vectorization
Keep the watercolor as a raster when:
- the paper surface and pigment granulation are part of the piece;
- transparent glazes and soft blooms need to reproduce faithfully;
- the job is a fine-art print, portfolio image, or archival record;
- the SVG becomes so detailed that nobody can edit it comfortably;
- the only reason to trace is the assumption that vector is always more professional.
A large, well-prepared raster can print beautifully. SVG earns its place when paths create a production advantage.
FAQ
Can watercolor be converted to SVG? Yes. A vectorizer can trace a watercolor scan into SVG paths, but the result is a shape-based interpretation. Soft washes, paper grain, and transparency become solid or partially transparent color regions, so the SVG will not be a faithful copy of the painting.
How do I vectorize watercolor without losing texture? You cannot preserve all watercolor texture in a clean, simple SVG. Keep a high-resolution raster master and either accept a more complex trace or use a hybrid file with the scan clipped inside a vector silhouette. The hybrid keeps the painted surface, but it still contains raster pixels.
Should I use PNG or SVG for watercolor art? Use PNG for faithful display and printing of the painting. Use SVG when you need clean scalable edges, editable color regions, or paths for a production tool. Keep both when the artwork will be used across print, cutting, and digital layouts.
What Image Trace settings work for watercolor? There is no single preset for every painting. Start in color mode, choose a palette that matches the level of simplification you need, and raise detail only while the file stays manageable. With Full Tone, higher Color-slider values create more paths from smaller areas of color, which may be too complex for editing or cutting.
Sources
- Adobe Illustrator — Image Trace panel options — color palettes, gradients, paths, noise, transparency, and trace-complexity controls.
- Adobe Illustrator — Convert images to vector graphics — converting raster artwork into editable paths.
- W3C — SVG Painting — fills, strokes, gradients, patterns, and opacity available to SVG artwork.
- National Archives — File formats for digitized photographic prints — lossless master formats including TIFF and PNG.
- Printful Help — 150 versus 300 DPI — current sublimation-resolution guidance and destination-specific caveats.
If the shape-led version fits your job, run the prepared image through PerfectVector, then compare the silhouette, pale washes, and color regions with the raster master before committing to the SVG.
More from the blog

Washi Tape Artwork: Check the Repeat Before Printing
Prepare custom washi tape artwork with a supplier template, matching repeat edges, separate bleed and safe zones, and a reopened file check before handoff.
SVG Grain Texture: Keep Noise Inside Your Artwork
Add SVG grain with feTurbulence, keep monochrome noise inside SourceAlpha, tune it at two sizes, and preserve a clean path master for other destinations.