Shadow Box SVGs: Design Connected Paper Layers
Design a layered shadow-box SVG with aligned frames, connected paper shapes, and a checked stacking order. See how a floating moon changes the saved geometry.
On this page
- Decide what belongs on each paper panel
- Build three layers with common outside bounds
- 1. Make one frame and duplicate it
- 2. Join the back scene to its frame
- 3. Connect the middle subject through its base
- 4. Keep the foreground low enough to reveal the subject
- Inspect material connections in the saved SVG
- Where PerfectVector fits when the motif is a raster image
- Check the destination file, then test the material
- FAQ
- Can I turn a picture into a shadow-box SVG automatically?
- Does each shadow-box panel need to be one SVG path?
- How wide should the bridges be?
- Is a shadow-box layer the same as a Cricut color layer?
- Sources
To create a layered SVG for a shadow box, design each depth layer as a connected panel: a frame, the artwork that belongs to that depth, and enough connecting geometry to keep the intended paper together. Give every panel the same outside dimensions, merge overlapping material shapes, then check what the front panels hide.
This guide uses a three-panel mountain scene to demonstrate SVG design and file preparation. We inspected the saved contours and rendered them in a browser. We did not import these files into Cricut Design Space or cut paper, so bridge strength, material settings, and physical assembly still need testing.
Decide what belongs on each paper panel
A depth layer is one panel positioned in front of or behind another. Its color can help you identify it on screen, but the panel's job comes from its position and shape. Splitting a PNG by color does not decide those relationships. For vinyl or flat color stacking, use the separate layered SVG for Cricut guide.
Positive material means the paper you intend to keep. A cutout is an opening you remove. A bridge is a strip of positive material connecting a detail to the rest of its panel. A floating island is retained material with no connection to that panel.
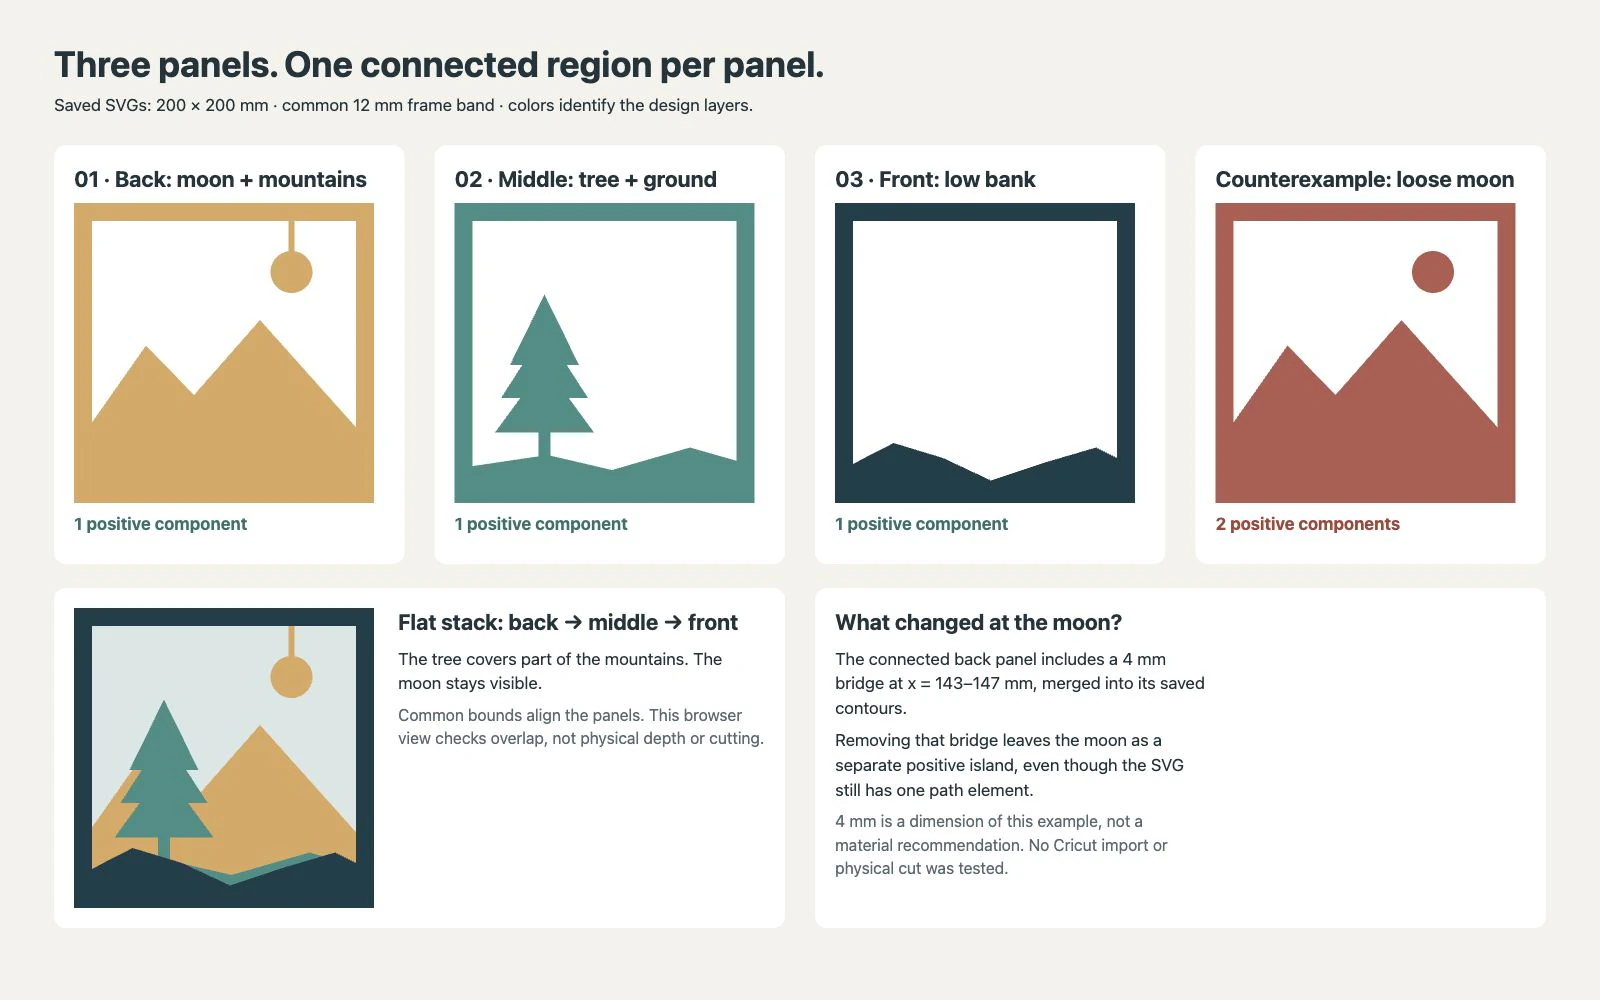
For the example below, the back panel holds the mountains and moon. The middle panel carries a tree and ground. The front panel adds a low bank. Each panel has an outer frame, and every retained detail connects to it.
Build three layers with common outside bounds
You need a vector editor with shape subtraction and union, a simple motif, and measurements from your intended frame. Keep an editable master before merging shapes. If you already have usable vector artwork, start from it. If your motif exists only as a PNG or JPG, recover its paths first, then design the paper connections separately.
1. Make one frame and duplicate it
Measure the space available for the panels inside your frame. Account for the space your backing and planned spacers will occupy before choosing the final project size.
Our files use a 200 × 200 mm outside square with a 12 mm frame band. The opening runs from x = 12 to 188 mm and y = 12 to 188 mm. These are example dimensions, not a recommended fit for every frame.
Draw the outside square and a centered smaller square. Subtract the smaller square to create the opening, then duplicate that frame for the three panels. Inkscape documents Difference as subtraction and Union as keeping the common outline of selected paths. The stacking order matters for Difference: the shape you subtract sits above the shape you keep. Inkscape Boolean Operations
Use the same page origin and outside square on every layer. Do not crop each export to its individual motif. The example files all declare width="200mm", height="200mm", and viewBox="0 0 200 200"; their saved geometry has the same 200 mm bounds. SVG's viewBox defines the coordinate rectangle mapped into its viewport. Confirm physical dimensions again in the destination app. W3C SVG coordinate systems
2. Join the back scene to its frame
Place a mountain silhouette so its base overlaps the lower frame band. Add the moon above it. A moon sitting alone inside the opening is a separate piece of retained paper, so it needs a deliberate connection if you want the back panel to remain one piece.
In our example, the moon is centered at x = 145, y = 46 mm, with a nominal radius of 14 mm. A vertical rectangle from x = 143 to 147 mm connects it to the top frame. That rectangle overlaps both the moon and the frame before union.
Union the frame, mountains, moon, and bridge. Inspect the resulting outline. The overlap boundaries between the original objects should disappear; they should not remain as extra internal cut contours.
The example bridge is 4 mm wide. That number describes the file we inspected. It does not establish a minimum width for your paper, span, machine, or finished size. Make a small test using the material and geometry you plan to use.
3. Connect the middle subject through its base
Keep the tree's crown, trunk, and ground connected. In this example, the trunk is 8 mm wide, from x = 56 to 64 mm. It overlaps the crown and ground, and the ground overlaps the lower frame band. Union those shapes into the middle panel.
An eye, star, or letter counter can change which areas remain attached. Review those details as positive material or cutouts before you simplify them. If an opening unexpectedly fills after export, follow the SVG holes and fill-rule diagnostic.
4. Keep the foreground low enough to reveal the subject
Add a low bank to the third frame and merge it into the bottom band. Align the three panels, with the mountains behind the tree and the bank in front.
Occlusion means one shape hides another from the viewing direction. In our flat stack, the tree covers part of the mountains, and the bank covers the tree's base. The moon remains visible. If the bank hides the tree's crown or another intended focal detail, lower the bank or move the subject before exporting.
A screen stack helps check visible shape relationships. Spacer thickness, viewing angle, lighting, and the depth available inside your frame require a physical mock-up.
Inspect material connections in the saved SVG
A single path element can contain several disconnected shapes. Counting paths is not a connectivity test. A compound path contains multiple contours in one path object; its fill rule determines which enclosed areas are filled. The SVG specification defines these fill rules, including evenodd, used in our files. W3C SVG filling and fill rules
We authored the example panels by unioning their positive regions, exported closed contours, and reconstructed the filled regions from the saved SVG data. This checked the actual exported geometry rather than a pile of overlapping colored shapes.
| Saved file | Connected positive regions | What the inspection establishes |
|---|---|---|
| Back: mountains, moon, bridge | 1 | The moon joins the frame through the bridge |
| Middle: tree and ground | 1 | Crown, trunk, ground, and frame form one region |
| Front: low bank | 1 | The bank joins the frame |
| Back with the bridge removed | 2 | The moon is a separate positive island |
All four files contain one path element. The connected panels each have two closed contours: the outside boundary and the opening boundary. The floating-moon version has a third contour for its separate moon. This is why a layer name, group, or path count alone cannot tell you whether the intended sheet stays connected.
For your own export:
- Reopen the saved SVG and view each panel alone with a plain fill.
- Trace a continuous route through retained material from every detail to the frame. Zoom in where shapes nearly meet; a point contact gives no measurable strip of paper.
- Inspect the contours around joined objects. Merge overlap seams that would divide material you mean to keep.
- Check openings as geometry. A white shape painted over another shape can look like a hole without removing the underlying contour.
- Reassemble a flat preview from the saved layers, using their common origin and dimensions.
If a detail remains isolated, add and union a bridge, move the detail onto connected material, make it a cutout, or plan it as a separately attached piece. Keep that choice explicit in the assembly plan.
Where PerfectVector fits when the motif is a raster image
PerfectVector can recover editable SVG paths from suitable PNG or JPG artwork. Its SVG for Cricut workflow supports previewing the shapes and refining their colors before preparing the destination file. Use that step for a raster motif you want to reuse; frame construction, bridges, and depth order remain separate design work.
Start with a bold silhouette or simple flat illustration. Inspect the recovered outline for stray fragments and missing openings before placing it in a panel. The line art to SVG guide explains the difference between an outlined trace and the line you originally drew.
A detailed photograph needs decisions about which objects sit at which depth and which shapes become paper. Simplify or redraw those forms before planning the panels. Automatic color separation does not supply that assembly plan.
Check the destination file, then test the material
Your SVG design check is complete when the outside bounds match, the intended retained regions connect, the overlap seams are removed, and the saved stack reveals the right details. Keep a numbered layer list with the master file so the assembly order is clear.
Before making the finished project, check these in your actual cutting application and frame:
- Imported panel dimensions match the intended size.
- The preview retains the openings and has no unwanted internal cuts.
- Each panel has the intended cutting operation and material assignment.
- A small sample of the longest bridge survives cutting, removal from the mat, and handling.
- Your chosen spacers fit on retained material and do not show through openings.
- The assembled stack fits the frame with its backing in place.
If an import changes an opening or outline, return to the saved geometry and repair that specific contour. If a bridge tears or bends, revise its width, length, attachment, or material and test again. Browser rendering alone cannot settle those physical questions. The general Cricut SVG preparation guide covers the broader file checks.
FAQ
Can I turn a picture into a shadow-box SVG automatically?
Vectorization can recover shapes from a picture, but you still need to choose the depth layers, frame connections, cutouts, and assembly order. A simple silhouette is a useful starting point. A complex photo may need manual simplification or redraw.
Does each shadow-box panel need to be one SVG path?
One path can contain disconnected positive islands. Check the retained regions and the actual contours instead of relying on the path count. In our example, both the connected back panel and the loose-moon counterexample contain one path element.
How wide should the bridges be?
Choose and test them for your material, span, final size, and cutting workflow. The demonstrated moon bridge is 4 mm wide, but we did not cut it or test its strength. It is an example dimension, not a universal minimum.
Is a shadow-box layer the same as a Cricut color layer?
A shadow-box layer is a panel in a depth arrangement. A color layer separates artwork by color or material. A depth panel can include several motifs joined to one frame; separating those motifs by color alone does not design their connections.
Sources
- Inkscape — Boolean Operations — Documents Union, Difference, Combine, and the role of stacking order.
- W3C — SVG Coordinate Systems, Transformations and Units — Defines the coordinate rectangle mapped through
viewBox. - W3C — SVG Painting — Defines fills, subpaths, and the
evenoddfill rule used in the example. - PerfectVector — SVG for Cricut — Describes raster artwork recovery, shape review, and checks before cutting.
If your motif starts as a PNG or JPG, prepare its SVG paths with PerfectVector, then inspect the outline and openings. Build the frame connections and depth layers in your editor, reopen the saved panels, and test a small material sample before making the finished shadow box.
More from the blog

Cricut Knockout Designs: Plan the Base and Name Layers
Plan a Cricut knockout design with a retained name and a clearance-subtracted base. Check the separate SVG parts, shared placement, and deliberate gap.

Why Your Cricut SVG Is Hard to Weed: Fix the File
Hard weeding is usually a mix of your blade, your vinyl, and your design. Here's how to tell which, and how to make the SVG file itself far easier to weed.