Cricut Knockout Designs: Plan the Base and Name Layers
Plan a Cricut knockout design with a retained name and a clearance-subtracted base. Check the separate SVG parts, shared placement, and deliberate gap.
On this page
- Choose stacked layers or a complementary knockout
- Give the base, name, and removal guide separate jobs
- Define the clearance before removing the base
- Build the remaining base and retain the name
- Construct a small original SVG example
- Check separate parts at their shared positions
- Verify the actual receiver and material
- FAQ
- Sources
A Cricut knockout design removes a planned region from a base while keeping the crossing name as a separate part. If you want a visible gap around the name, subtract a clearance shape from the base and retain the name itself. Subtracting the only copy of the name can leave you with an opening and no upper lettering to use.
The design decision has four parts: original base B, retained name N, removal-only clearance C, and knockout base K = B − C. The assembled result is K plus N at their original positions.
This guide constructs an original digital example and checks its saved SVG geometry. It does not report a Design Space import, native command run, cut, or physical assembly.
Choose stacked layers or a complementary knockout
A stacked design keeps the full base beneath the crossing name. A complementary design removes part of the base so the retained name occupies the opening.
| Layout | Base geometry | Name geometry | Intended relationship |
|---|---|---|---|
| Stacked B + N | Full base remains | Name stays separate | Name overlaps the base |
| Knockout K + N | Clearance C is removed from B | Name stays separate | Name sits in the planned opening |
| Knockout with a gap | C extends beyond the name's footprint | Name keeps its original size | Space remains around the name |
Neither layout is automatically better. Choose the appearance and material arrangement you want before changing the base.
For example, a name can cross a badge without cutting the badge at all. If you want the surface behind the lettering to show, construct the opening deliberately. If the name must remain a different color, keep it as its own geometry throughout the operation.
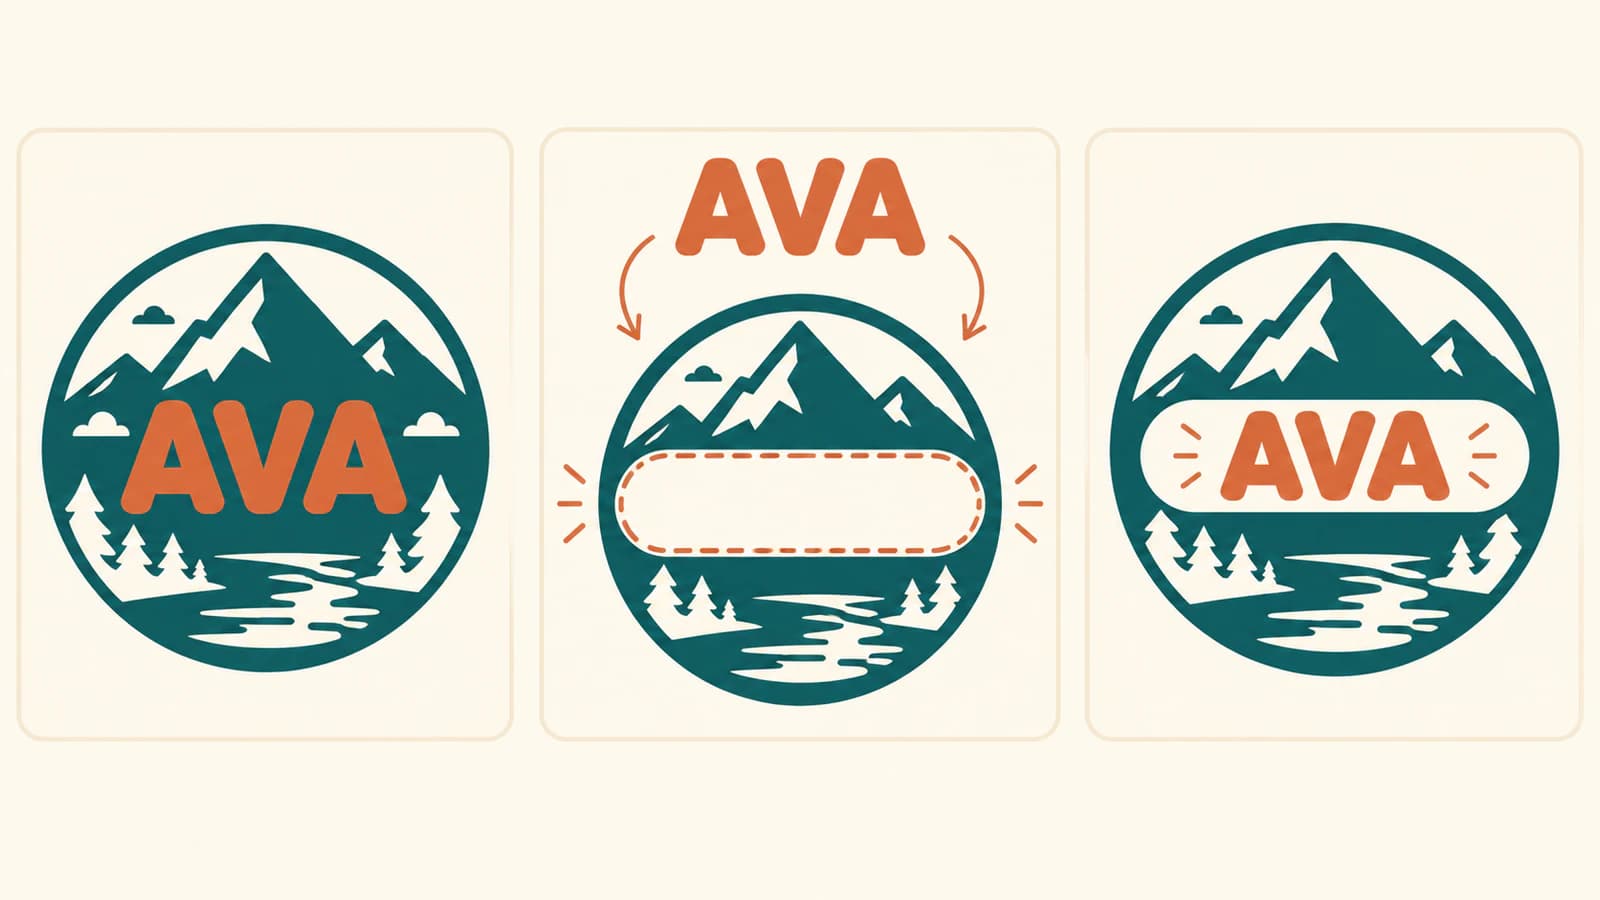
Give the base, name, and removal guide separate jobs
Start with an editable base shape and separate lettering. Preserve an untouched master with editable text if you have it, then use filled letter geometry in the delivery copy. Cricut's unsupported-upload guidance identifies editable text as an upload limitation.
Give each part a clear role:
- Base B: the original emblem, large word, or background shape.
- Name N: the lettering you intend to retain as a separate color or material part.
- Clearance C: the region used only to remove geometry from the base.
- Knockout K: the remaining base after subtraction.
A clearance region is the area removed from the base to make room for the retained name. It may match the name's footprint, surround its contours, or form a wider band. It is a design choice, not a third material layer.
Keep N outside the subtraction selection. If C begins as a duplicate of N, label the duplicate so you can distinguish the removal copy from the retained name. Changing C should not silently resize or distort N.
Grouping objects by color can help organize them, but it does not construct this relationship. The group-by-color versus Union comparison covers that separate organization decision.
Define the clearance before removing the base
Decide how the name should relate to the surrounding base.
For a close-fitting opening, a removal copy might follow the letter shapes. For a broad visual break, a single band can run across the emblem. The latter is easier to inspect in a small example, so that is the construction below.
Our original badge occupies part of a 400 × 300 drawing area. The name AVA spans y = 120 to 180. The clearance band spans y = 110 to 190, leaving a deliberate gap above and below the letters.
Those values describe this drawing's coordinates. They are not a recommended vinyl clearance, blade allowance, minimum lettering size, or weeding tolerance. A different name, finished size, material, and layout can require a different decision.
The band also extends beyond the left and right edges of the base. That is intentional: subtraction removes only the part of C that overlaps B. It must not create new material outside B.
Build the remaining base and retain the name
Cricut's current Combine, Slice, and Weld guide documents Combine → Subtract as removing selected upper geometry from the bottom layer.
For this design model, the documented native option is to put C above B, select those two operands, and use Subtract while retaining N separately. This is guidance based on Cricut's documentation; we did not execute that operation in Design Space.
The key relationship is:
Original arrangement: B + N
Removal operation:    K = B − C
Final arrangement:    K + N
Delivery parts:       K and N
Planning-only part:   C
Subtracting N directly can make an opening exactly where the name was. It does not preserve a separate name copy unless you keep one. Subtracting a larger C is what creates the deliberate space around the retained name.
Combine keeps its operands editable; Merge Layers commits a Combine result. Slice is another documented option, but it operates on two selected layers and produces pieces that need review. It is not a reason to keep every resulting fragment. Preserve the master before committing the construction.
Construct a small original SVG example
The example uses a simple octagonal badge and original AVA lettering drawn as filled paths. It is not an exported Cricut project or a font conversion.
Save this as stacked-master.svg. The hidden C group records the planning band without displaying it over the name.
<svg xmlns="http://www.w3.org/2000/svg"
     width="400" height="300" viewBox="0 0 400 300">
  <path id="base-B" fill="#0d9488"
        d="M 80 30 L 320 30 L 360 70 L 360 230
           L 320 270 L 80 270 L 40 230 L 40 70 Z"/>
  <path id="name-N" fill="#f97316" fill-rule="evenodd"
        d="M 95 180 L 120 120 L 145 180 L 132 180
           L 127 166 L 113 166 L 108 180 Z
           M 115 155 L 125 155 L 120 141 Z
           M 160 120 L 173 120 L 190 163 L 207 120
           L 220 120 L 198 180 L 182 180 Z
           M 245 180 L 270 120 L 295 180 L 282 180
           L 277 166 L 263 166 L 258 180 Z
           M 265 155 L 275 155 L 270 141 Z"/>
  <g display="none">
    <path id="clearance-C" fill="#9333ea"
          d="M 20 110 L 380 110 L 380 190 L 20 190 Z"/>
  </g>
</svg>
To reproduce the authored knockout copy:
- Duplicate the saved master as
knockout.svg. - Replace the entire
base-Bpath with theknockout-Kpath below. - Keep the
name-Npath unchanged. - Remove the hidden group containing
clearance-C. - Save and reopen the file.
<path id="knockout-K" fill="#0d9488"
      d="M 40 70 L 80 30 L 320 30 L 360 70
         L 360 110 L 40 110 Z
         M 40 190 L 360 190 L 360 230 L 320 270
         L 80 270 L 40 230 Z"/>
This explicit path describes the remaining upper and lower badge portions. It is a hand-authored construction of B minus the horizontal band, not native Subtract output.
Notice that K contains two disconnected base portions. That is deliberate in this sample. The name also contains separate letters, and each A has an enclosed opening, called a counter. Those parts must remain intentional when you adapt the design; a stencil or another project requiring one connected piece needs a different construction.
Check separate parts at their shared positions
An assembly view can conceal a wrong base. Check the parts individually before relying on the combined appearance.
Make a base-only copy of knockout.svg by removing name-N. Make a name-only copy by removing knockout-K. Keep the full SVG root, width, height, and viewBox in both files. The viewBox defines the drawing coordinate rectangle.
Do not crop each part to its own visible bounds and then assume the two files will preserve their relative placement. Keep the same coordinates for the digital comparison.
We saved and reopened the original base, name, clearance, knockout base, stacked arrangement, knockout arrangement, and master. We then rendered the files with Sharp and librsvg and checked:
- The final knockout contained K and N, with no C planning path.
- The name's path data stayed unchanged between the stacked and knockout arrangements.
- K matched B minus C at all 112,548 checked interior sample points, with no new paint outside B.
- The checks included 2,432 sample points where C lay outside B.
- The gap and both A counters were unpainted in the transparent assembly; the retained name remained painted.
The interior check excluded points within two drawing units of boundaries to avoid confusing antialiased edge pixels with filled interiors. It verifies this saved digital construction, not a cutter's interpretation.
We also inspected the assembled result on light and dark backgrounds at 400 × 300 and 120 × 90 pixels. The retained name and surrounding band remained visible in those previews. That scale check does not establish a physical minimum gap or letter size.
For your own file, use a concrete completion check:
| Check | Passing digital result | If it fails |
|---|---|---|
| Base-only view | The intended clearance contains no base geometry | Rebuild the subtraction from B and the correct C |
| Name-only view | Retained lettering is complete | Recover N from the master |
| Combined view | Name is in its intended place with the chosen gap | Restore shared coordinates; change C deliberately |
| Separate parts | Only intended base portions and letter parts remain | Review detached fragments before delivery |
| Saved source | Planning C is excluded from final parts | Remove the planning copy from the delivery file |
If an existing opening has filled unexpectedly, branch to the SVG hole diagnosis. That is a repair task; the construction here starts by deciding which base geometry you want to remove.
Verify the actual receiver and material
Digital SVG organization is one part of preparation. Reopen the delivery copy in the actual destination, inspect its layer and operation interpretation, and review placement before cutting. Use the layered SVG delivery guide for that broader handoff.
Keep the original editable master. Cricut's material-settings guide recommends a test cut on the actual material. The sample here does not establish cutting, weeding, transfer, adhesion, or assembled appearance for your project.
When your only base artwork is a suitable flat PNG or JPG, PerfectVector's SVG-for-Cricut workflow can recover starting vector geometry. Inspect the protected raster preview, then unlock the result before actual SVG editing and export. You still need to define B, preserve N, construct C, and inspect K; tracing does not assign those design roles or create the knockout.
FAQ
Should I subtract the name or a larger clearance shape?
Use the name's footprint when that is the opening you want, preserving a separate name copy if you intend to keep it. Use a deliberately larger clearance C when you want space around the retained name N. The appropriate gap depends on the design and actual material test.
Is the clearance shape another material layer?
No. In this construction C is a removal guide. The final design retains knockout base K and name N. Exclude the planning guide from the delivery parts.
Does Combine Subtract keep my upper name?
Subtract uses the selected upper geometry to remove part of the bottom layer. Preserve the actual name separately and use a removal copy or clearance region in the subtraction. Do not rely on the only name copy serving both jobs.
Can I use Slice instead of Subtract?
Cricut documents Slice for two selected layers, creating pieces that must be reviewed. Combine Subtract expresses the base-minus-clearance operation directly and keeps the combination editable until committed. Whichever route you choose, verify the retained name and final base separately.
Sources
- Cricut: Using Combine, Slice, and Weld — documents Subtract, editable Combine operations, Merge Layers, and the two-layer Slice workflow.
- Cricut: Image uploads, unsupported items — identifies editable text and other unsupported upload structures.
- Cricut: Choosing material settings — supports testing the actual material instead of inferring cut success from a digital preview.
- W3C: SVG paths — defines closed paths and multiple subpaths used in the authored base and name.
- W3C: SVG 2 coordinates — defines the shared drawing coordinate rectangle.
Starting from a flat raster emblem? Create starting SVG geometry with PerfectVector, inspect the protected preview, then unlock and check the paths before building the separate name and clearance plan. If you already have editable vectors, construct the complementary layers from that master.
More from the blog

Steel vs Glass Gobos: Choose for Your Artwork
Choose steel or glass gobos by checking bridges, enclosed shapes, tone, color, and fixture fit. Use the same letter O to decide what your artwork needs.

PNG to SVG for Bambu Studio: Clean Multicolor Imports
Convert a PNG to SVG for Bambu Studio, preserve useful color regions, check closed paths and holes, then verify size and extrusion before you slice the model.