How to Make a Layered SVG for Cricut
A layered SVG cuts each color as its own piece. The clean way is to color-separate your image into an SVG first, so it uploads to Cricut already layered.
On this page
- What makes a good layered SVG
- What you need first
- Step by step: from flat image to layered cut file
- 1. Start with a transparent, flat image
- 2. Color-separate it into an SVG
- 3. Upload the SVG to Cricut Design Space
- 4. Clean up layers only if you need to
- 5. Assign colors, cut, and weed
- 6. Layer and stack
- What this looks like with PerfectVector
- A quick pre-cut checklist
- FAQ
A layered SVG is one where each color is a separate cut layer, so your Cricut cuts each color from its own vinyl and you stack them into the finished design. The catch is that when you upload a flat image, a PNG or a JPG, Cricut Design Space sees a single flattened layer. You can split it up afterward with the Contour tool, but it's slow and fiddly. The cleaner approach is to color-separate the image into an SVG first, so each color arrives as its own layer, ready to assign and cut. This guide walks the whole workflow: getting a clean layered SVG, uploading it to Design Space, and cutting and stacking it, plus which images actually work and which ones won't.
The quick version
- A layered SVG means each color is its own cut layer, so you cut each color separately and stack them.
- Upload a flat PNG and Cricut flattens it to one layer. Splitting it with Contour afterward is the slow way.
- The clean way: color-separate your image into an SVG first, so it uploads already layered.
- Fewer colors, less work. Merge similar shades so you aren't weeding and stacking twenty layers.
- Flat art only. Logos and simple illustrations layer cleanly. Photos and gradients don't.
What makes a good layered SVG
Before the steps, here's what you're aiming for. A layered SVG that's actually pleasant to cut has:
- Each color as its own closed shape, so Design Space reads it as a separate layer.
- A sensible number of colors. Every color is another piece to weed, cut, and line up. Three to six is comfortable. Twenty is a project you'll abandon halfway through.
- Clean, low-node paths, so each layer cuts smoothly instead of jagged. It's the same reason too many nodes cause trouble on any cut file.
- A transparent background, so there's no extra rectangle layer to hunt down and delete. Here's more on keeping transparency through a conversion.
- Layers that line up when stacked, so the finished design registers cleanly.
What you need first
Two things, before you open Design Space:
- A flat, few-color image. A logo, a simple illustration, a wordmark. The colors should be distinct areas, not blends.
- A way to turn it into a color-separated SVG. This is the step that decides how much cleanup you do later.
One honest note on the image. If yours is a photograph, a watercolor, or anything with gradients and soft edges, stop here. Those don't separate into clean cut layers. You'd spend an hour in Contour and still end up with a mess. Flat, graphic art is what layers well. (If you just need general help prepping a file, how to prepare SVG files for Cricut covers the basics. This guide is specifically about multi-color layering.)
Step by step: from flat image to layered cut file
1. Start with a transparent, flat image
If your image has a background, a white box or a photo backdrop, remove it first so the background doesn't become its own layer. You want only the artwork, sitting on a transparent canvas.
2. Color-separate it into an SVG
This step saves you the most work later. Convert your image to an SVG where each color becomes its own vector path. A clean converter does this automatically and keeps the paths tidy. Turn your image into a cut-ready SVG, and if your converter lets you, merge similar colors so you finish with a handful of clean layers instead of dozens.
This is also where the free-converter route falls down. A rough trace hands you color layers full of stray specks and doubled edges, and you pay for it later, clicking through Contour to delete dozens of little bits on every single layer. Starting from a clean separation skips almost all of that.
3. Upload the SVG to Cricut Design Space
In Design Space: Upload, then Upload Image, select your SVG, and Add to Canvas. Because it's an SVG, it comes in with each color already on its own layer. Open the Layers panel and you'll see them listed out. A flat PNG, by contrast, would have landed as a single layer with no way to pull the colors apart.
4. Clean up layers only if you need to
If a layer has stray pieces you don't want to cut, select it, click Contour, and toggle off the bits you don't need. With a clean SVG you'll barely touch this. With a rough one, this is the slog crafters complain about. Either way, you're aiming for one clean shape per color. (If a layer still cuts jagged, here's why Cricut files won't cut cleanly.)
5. Assign colors, cut, and weed
Set each layer to the vinyl or HTV color you want. The on-screen color doesn't have to match your material, it's just a label. Click Make It, and Design Space puts each color on its own mat. Cut each color from its material, then weed away the excess.
6. Layer and stack
Now assemble the design. Use transfer tape to stack adhesive vinyl in order, or heat-press HTV layers one at a time. Line each layer up against the one below it. If the design needs precise alignment, a solid base or silhouette layer underneath gives the rest something to register against. For HTV on a shirt, press the layers one at a time rather than stacking them all at once, which helps avoid the lifting and shrinkage that heat can cause.
What this looks like with PerfectVector
The whole workflow gets easier when the SVG starts clean. PerfectVector converts your flat image into an SVG with each color as its own editable path, a low node count, and a transparent background, so it lands in Design Space already layered and ready to assign. Its color editor lets you merge similar shades down to the few you'll actually cut, which means fewer layers to weed and stack. You can convert your design and check the layers before you commit any vinyl. The first conversions are free, no credit card required.
Being straight about it: this works on flat, graphic art. A photo or a gradient-heavy image won't become a clean set of cut layers from any tool, PerfectVector included. For those, simplify the artwork into flat shapes first, or choose a different design.
A quick pre-cut checklist
Before you hit Make It, run through this:
- Background removed, so there's no stray rectangle layer.
- Each color is its own layer in the Layers panel.
- Colors merged down to the number you actually want to cut.
- No tiny stray pieces left on any layer.
- A vinyl or HTV color picked for each layer.
- A base or registration layer, if the design needs alignment.
FAQ
Can an SVG have layers? Yes. Every separate path or color in an SVG acts as its own layer, which is exactly what makes it cuttable color by color. When you upload an SVG to Cricut Design Space, those paths show up as individual layers you can assign, hide, or cut separately.
How do I turn an image into a layered SVG? Color-separate it into an SVG, so each color becomes its own vector path, then upload that to Design Space. The cleanest way is to convert the image to an SVG with a tool that keeps each color as a tidy separate shape, rather than uploading a flat PNG and trying to split it afterward.
Why does my image upload to Cricut as one layer? Because a PNG or JPG is a single flattened image with no separate color paths. Design Space can't pull the colors apart on its own. Convert the image to a color-separated SVG first, and it will import with each color already on its own layer.
How do I separate an image into layers in Cricut Design Space? The reliable way is to upload an SVG that's already color-separated, so the layers come in ready. You can also split a single layer manually with the Contour tool, but that means toggling pieces off one at a time, which gets tedious fast on a detailed design.
How many layers should a Cricut design have? As few as the design allows. Each layer is another piece to weed, cut, and stack, so merge similar colors wherever you can. Three to six layers is manageable for most projects; a dozen or more turns a quick craft into an afternoon.
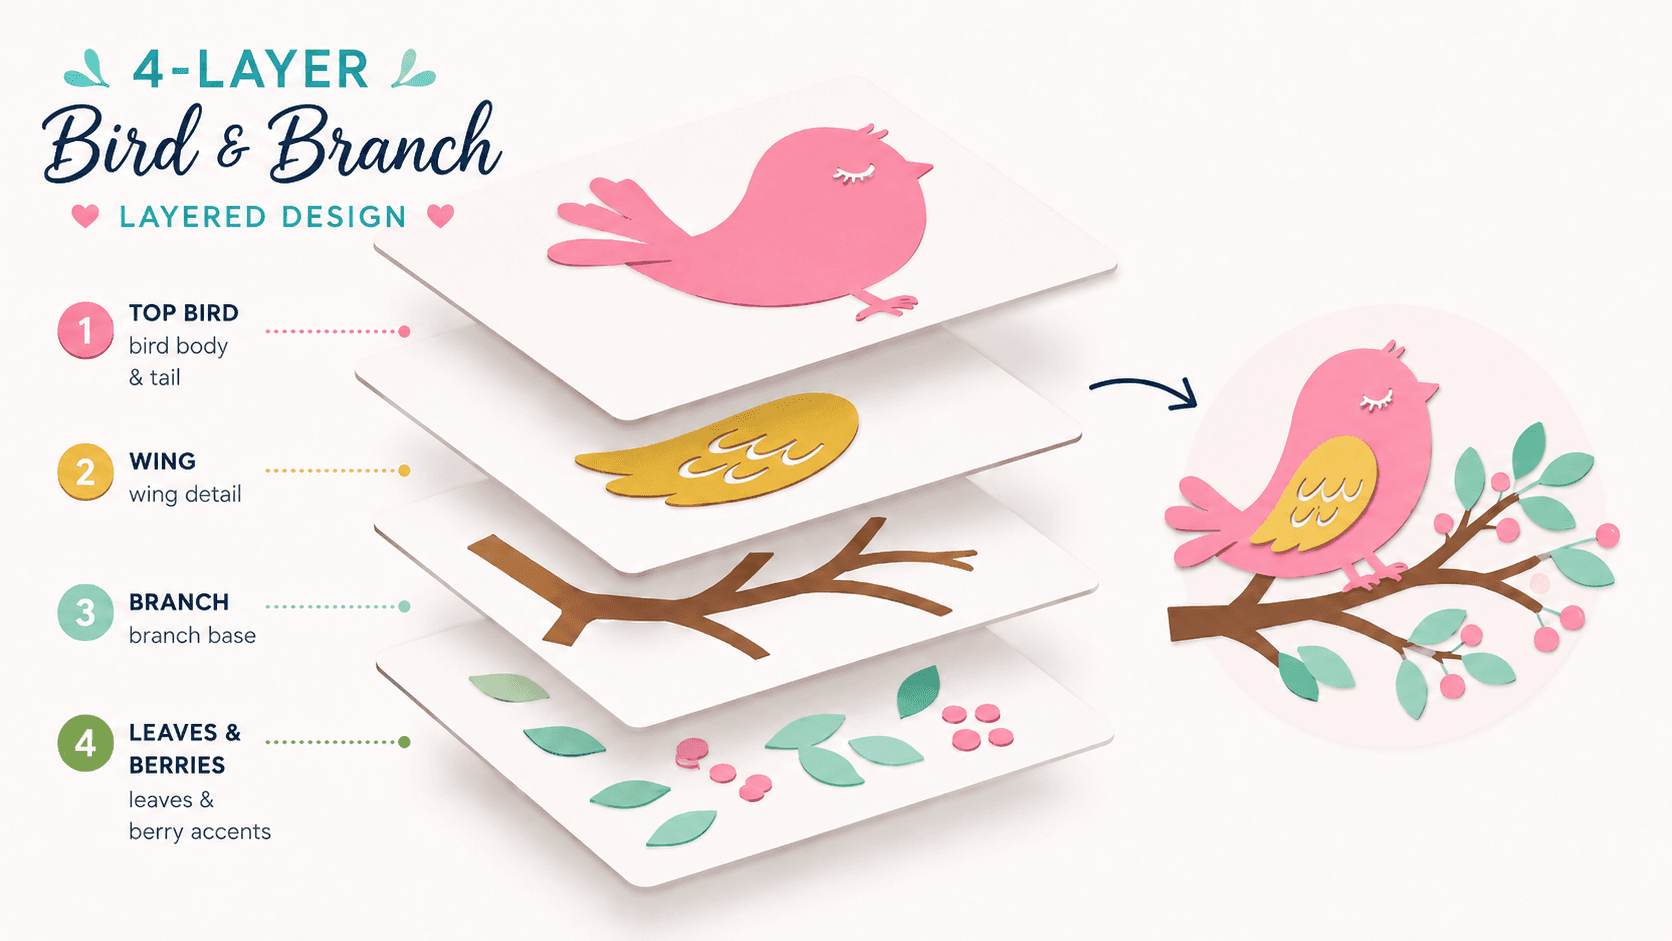
Is a layered SVG the same as a 3D SVG? No. A layered (color) SVG stacks flat color layers for multi-color vinyl or HTV. A 3D SVG stacks paper or cardstock layers to build depth, like a mandala or a shadow box. This guide is about the color-layer kind.
Got a colorful design you want to cut in vinyl? Turn it into a clean, layered SVG, check that each color sits on its own layer, and you're ready to weed and stack.
More from the blog

How to Convert an Image to an SVG for CNC (Clean Paths Your CAM Will Cut)
A CNC follows vector paths, not pixels, so your design has to become a clean SVG or DXF first. Here's how to convert an image into CAM-ready, closed-path vectors.

How to Convert an Image to an SVG for 3D Printing (and What Extrudes Cleanly)
A 3D printer can't extrude pixels, so flat designs start as an SVG. Here's how to turn an image into a clean, closed-path SVG that imports and extrudes the first time.