Make Clean SVG Files for Glowforge From Any Image
Make Glowforge-ready SVG files from your own images: what the app accepts, how strokes become cuts and fills become engraves, and a clean no-Illustrator path.
On this page
There are three ways to get an SVG onto a Glowforge: download someone else's design, generate new art with Glowforge's Magic SVG tool, or make your own file from an image you already have. This guide is about the third, and it's less about software than about one rule documented by Glowforge: stroked vector paths become cuts or scores, while filled shapes become engraves. Once your file expresses that rule cleanly, everything in the app falls into place.
You don't need Illustrator for any of it. The only ranking tutorial for this is an Illustrator design course, and the usual community advice is "trace it in Inkscape, then fix the double lines." There's a shorter path: start from the right image, convert it to clean single paths, and organize the colors so each operation is its own step.
The quick version
- Glowforge accepts JPG, PNG, SVG, and PDF (DXF with a Premium plan). Raster images can only be engraved; cutting needs vector paths, which is why SVG is the format the machine's cutting side actually runs on.
- The core rule: stroked paths become cut or score lines, filled shapes become engraves.
- Colors become steps. The app splits a vector file into operations by color, so plan your colors like a to-do list.
- Convert, don't redraw. A clean trace of your image gives you the paths; a converter does the tracing.
- Watch for double lines. An outline traced with thickness cuts twice; you want one path per intended cut.
What Glowforge accepts, and what each format can do
Per Glowforge's upload documentation, the app takes JPG, PNG, SVG, and PDF uploads, with DXF reserved for Premium members. The format decides what the machine can do with it:
| Format | Cut / score | Engrave | Notes |
|---|---|---|---|
| JPG / PNG | No | Yes | Pixels give the laser nothing to follow; photos live here |
| SVG | Yes | Yes | Paths cut and score, fills and embedded images engrave |
| Yes, if it contains vectors | Yes | A scanned PDF is just a picture in a wrapper | |
| DXF | Yes (Premium) | Yes | Mostly for CAD workflows |
So if your design only needs engraving, a good PNG is genuinely enough. The moment you want the laser to cut out a shape, you need a real vector file, and that's what the rest of this guide builds.
The rule that makes a file Glowforge-ready
Inside the app, your SVG becomes a list of operations, and the file itself decides what's on the list:
- A path with a stroke shows up as a line the laser can cut or score. You pick which, per step.
- A filled shape (and any embedded image) shows up as an engrave.
- Each color in the file becomes its own step, so two black shapes are one operation, and a black shape plus a red outline are two.
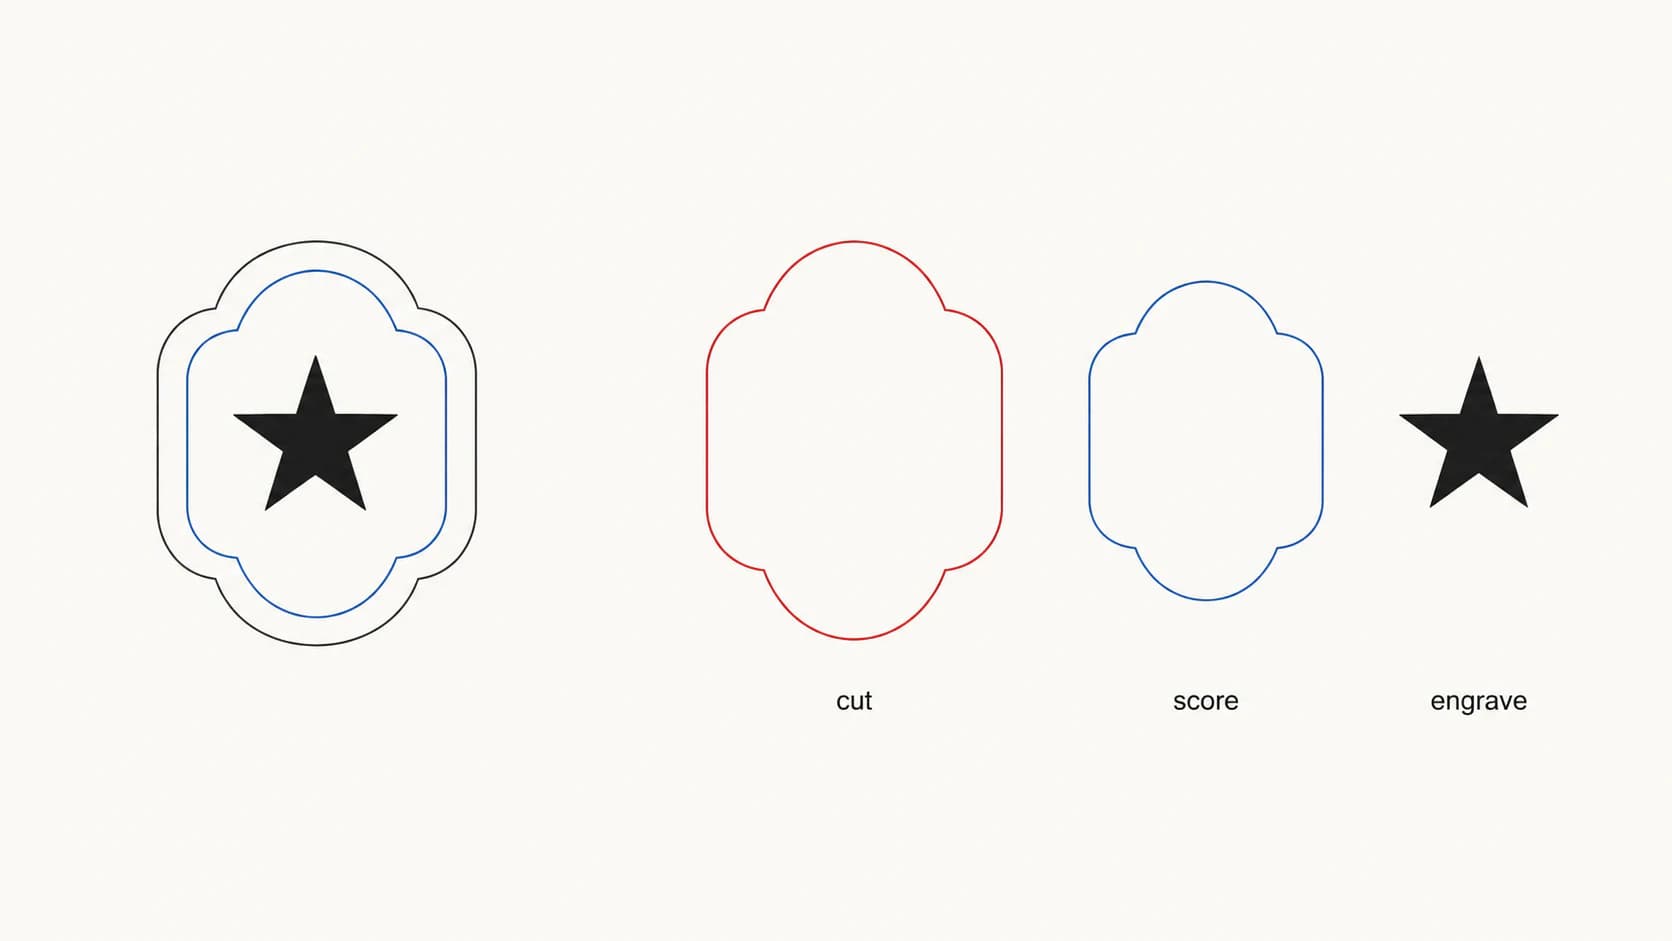
That color rule is the planning tool almost nobody mentions. Give your cut outline one color, your score lines a second, and your engrave fills a third, and the app presents your file as three tidy steps in exactly the order you'd want to run them. A messy file with fifteen accidental colors turns into fifteen confusing steps.
Two classic traps follow directly from the rule. Text needs to be converted to outlines before export, or the app may not see it the way your design tool did. And a trace that turned your outline into a thin filled ring rather than a single stroked path will either engrave when you wanted a cut, or worse, cut twice, once on each edge of the ring.
Three honest routes to a file
Ready-made files. The Glowforge community forum shares free designs, and Etsy and Creative Fabrica sell thousands. Right choice when you want a proven design, and nothing in this guide is needed.
Magic SVG. Glowforge's Magic SVG turns a text prompt into stylized SVG art. Glowforge currently provides Craft Coins for access and describes the tool as free, but coin grants and account terms can change. It makes new art rather than faithfully tracing your existing logo, drawing, or photo.
Your own image, converted. The path below, and the only route that gets your artwork onto the laser.
From image to Glowforge-ready SVG
- Start from the right image. Flat art, logos, lettering, and line drawings convert into clean cut files. Photographs don't become cut files at all; they're engrave material, and better served uploaded as a PNG. The laser-cutting conversion guide covers the cut-or-engrave decision in depth.
- Convert it to clean vector paths. Trace the image into an SVG and inspect what came back: closed shapes, smooth edges, a low node count. A choppy trace means jagged cuts and scorched detail.
- Assign your colors like operations. Decide what gets cut, what gets scored, what gets engraved, and give each group its own color. Merging stray colors matters here: five near-identical browns in the trace would otherwise become five engrave steps.
- Upload and assign steps in the app. Create a new design, upload the SVG, and set each colored step to cut, score, or engrave. Check the design's size in the app before you print; SVGs carry their own idea of units, and it's cheaper to catch a scale surprise on screen than on walnut.
- Run a draft pass. Cardboard or draft board first, hardwood second. Every experienced forum thread says the same thing, because it keeps being true.
What this looks like with PerfectVector
PerfectVector handles step 2 and sets up step 3: it converts your PNG, JPG, or WebP into an SVG built from clean, closed paths with a low node count, and it keeps each color as its own editable shape. The built-in color editor is where you do the operation planning: merge the trace's stray tones until each remaining color matches one intended Glowforge step, then download. Your first conversions are free, no credit card required.
To be clear about the boundaries: PerfectVector produces the SVG. Material choices, power, and speed live on the Glowforge side, in the app and its material presets, and cutting-side preparation is covered by the laser cutting page.
Honest limits
- Photos stay engraves. No converter turns a photograph into a good cut file; that's physics, not software.
- A trace gives you outlines to work with, not a designed file. Multi-part projects with tabs, joints, and kerf offsets are CAD territory; SVG vs DXF explains where that line sits.
- Settings aren't in the file. An SVG carries shapes, never power or speed. Trust Glowforge's material guidance over anything a blog tells you.
Before you print
- Every intended cut is one single path, with no doubled edges.
- Text converted to outlines.
- One color per intended operation, stray trace colors merged.
- Size confirmed in the app against real-world dimensions.
- Draft-material test pass done.
FAQ
What file types does Glowforge use? The Glowforge app accepts JPG, PNG, SVG, and PDF uploads, and DXF for Premium members, per Glowforge's documentation. Raster formats (JPG, PNG) can only be engraved; cutting and scoring require the vector paths in an SVG or vector PDF.
Can a Glowforge cut a PNG? No. A PNG is pixels, and the laser needs a path to follow. A PNG can be engraved as-is; to cut its shape, convert it to an SVG first so the outline exists as a real vector path.
How do I make a Glowforge file without Illustrator? Convert your image to SVG with an online converter, then organize colors so each operation (cut, score, engrave) has its own color, and assign the steps in the Glowforge app. Illustrator is one way to author files, and it's needed for designed-from-scratch projects, but conversion covers the your-own-image case.
What is Magic SVG, and is it free? Magic SVG is Glowforge's free text-to-SVG generator: type an idea, pick a style, and it produces stylized vector art. It generates new designs from prompts; it doesn't convert an existing image, logo, or photo into a file.
Why does my Glowforge cut everything twice? Your outline exists as a thin filled ring or as two parallel paths instead of one stroked path, so the machine faithfully cuts both edges. Re-trace or edit the file so each intended cut is a single path.
Where do free Glowforge SVG files come from? The Glowforge community forum's Free Laser Designs section shares member designs, and marketplaces like Etsy and Creative Fabrica sell ready-made files. Those are great for proven projects; this guide is for the design only you have, your own image.
Sources
- Glowforge: Upload your own design file — Documents supported upload formats and raster-versus-vector uses.
- Glowforge: Make a gift tag using Inkscape — Explains strokes, fills, colors, cuts, scores, engraves, and text conversion.
- Glowforge: Magic SVG — Current source for prompt generation, Craft Coins, saving, and usage terms.
- Glowforge: Simplify strokes — Documents node reduction and its trade-off with path fidelity.
The machine is only as good as the paths you feed it. Pick a cuttable image, convert it into clean single paths, give every operation its own color, and the Glowforge app will read your file back to you as the plan you meant.
More from the blog
SVG Kerf Compensation: Size Parts and Holes Correctly
Use an idealized SVG badge to understand inside and outside kerf offsets, separate cut width from path offset, and avoid applying compensation twice.
Image to SVG for WeCreat MakeIt: Import Clean Paths
Prepare and import a clean SVG into WeCreat MakeIt. Fix scale, layers, colors, holes, and duplicate paths before assigning cut or engraving operations.