Acrylic Keychain Artwork: Print, Outline, and Hole
Prepare acrylic keychain artwork with separate print art, an outer outline, and an attachment opening. Check side alignment and follow your supplier's template.
On this page
- Choose the acrylic product before setting up the file
- Separate the printed picture from the material outline
- Keep the attachment opening out of the printed image
- Check an original digital example
- Label final views before applying mirroring
- Keep acceptable raster art and follow the color instructions
- Reopen the package before requesting a proof
- FAQ
- Sources
To prepare artwork for acrylic keychains, choose the supplier's exact product and template, then keep the printed image separate from the outside acrylic outline and attachment-opening instructions. For a two-sided charm, label the desired front and back views before applying the supplier's mirroring rules.
This guide covers files for supplier-made printed acrylic charms. Start with your original artwork, the current product template, a desired finished size, and a decision about the sides. The original SVG example below demonstrates file organization and digital checks; a supplier must still confirm the production contour, opening, color preparation, and final proof.
Choose the acrylic product before setting up the file
Do not borrow a generic charm template and assume it fits every shop. Product choices can change the side count, clear border, white backing, and the way artwork is viewed through the acrylic.
Two current supplier examples show the difference:
| Product guidance | What it changes in your preparation |
|---|---|
| Zap! Creatives' double-layered clear acrylic guide | Uses separate artwork, white, cut-area, and hole/loop roles; gives different orientation instructions for Artwork A and B; permits edge-to-edge artwork with specified bleed |
| Sticker Mule's acrylic charms FAQ | Describes a one-sided, white-backed product with a clear acrylic border and no full-bleed printing |
Bleed is artwork extending beyond a planned edge so the print can reach that edge after production. Add it only where the selected product supports it and in the amount its guide requests. A product that requires a clear border needs a different layout.
Record the product name, template revision, finished dimensions, attachment choice, side count, and any transparent effects you want. Keep the supplier's required layer names intact when its template uses them.
Separate the printed picture from the material outline
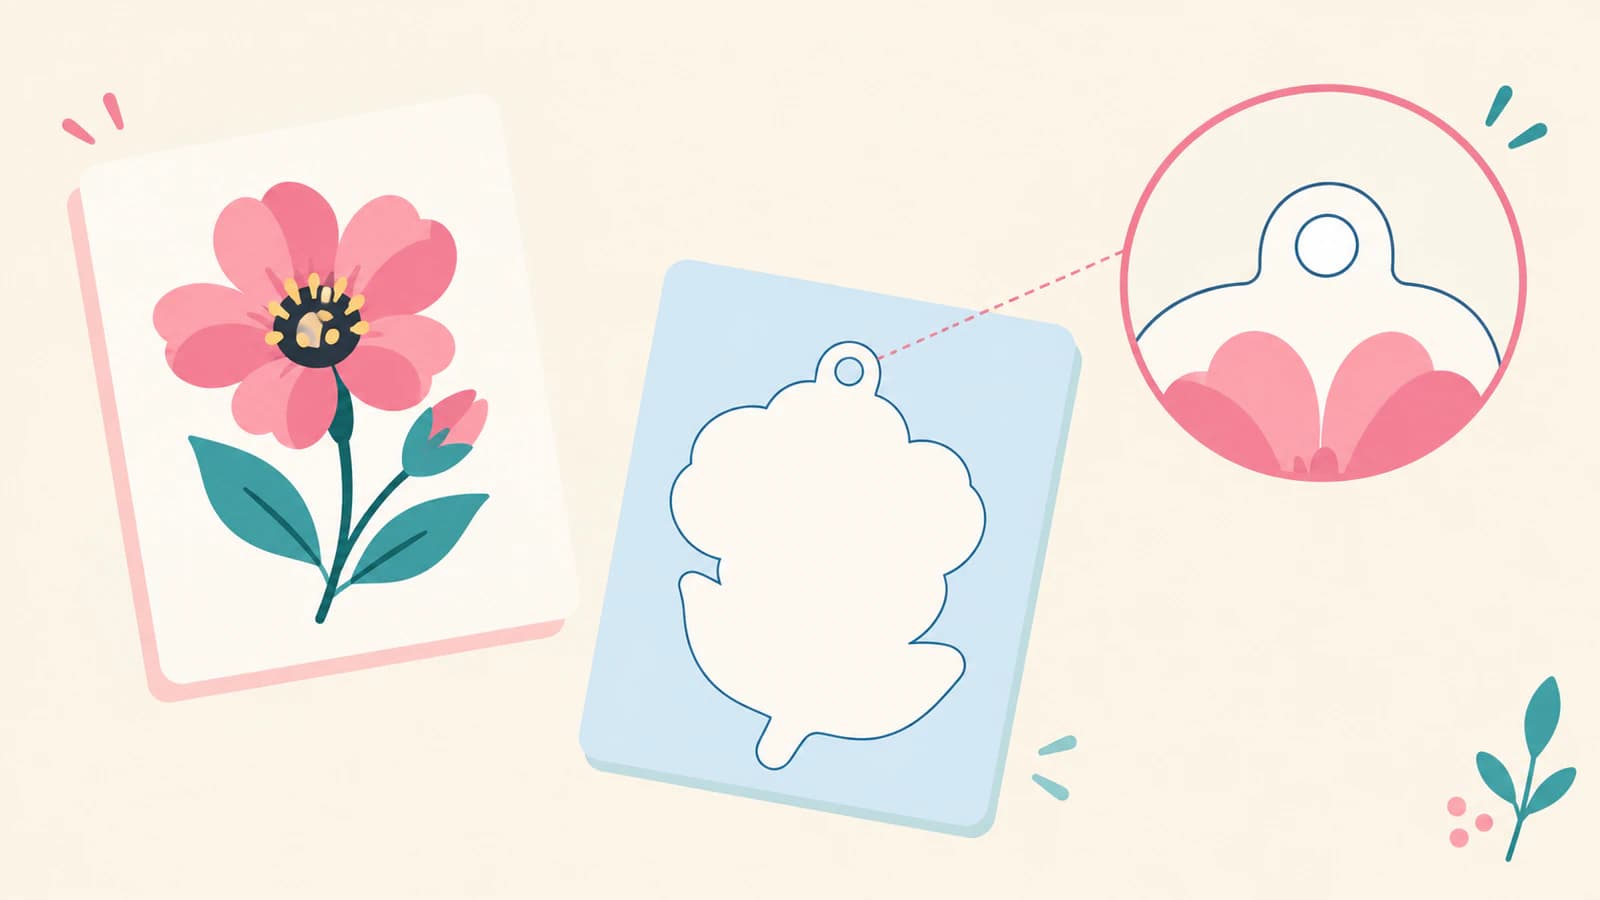
The print artwork is the image placed on the acrylic. The outer perimeter is the intended outside boundary of the acrylic piece. A dark line inside a flower illustration can be printed detail without being a request to cut the material there.
| Role | Contains | Keep out of the print-only export |
|---|---|---|
| Front or back artwork | Illustration, type, intentional printed outlines | Manufacturing guides |
| Outer perimeter plan | One intended outside shape, including an attachment tab if needed | The perimeter guide itself |
| Opening request | Proposed location of the attachment opening | Hole marks and planning circles |
| No-art zone | Area around the opening that should contain no print | The zone's visible guide |
Draw the perimeter deliberately. It may surround several leaves, petals, and small decorative marks together. Using every internal path as a cutting instruction would communicate a different object.
Zap's guide makes this distinction explicit: its black Cut Area silhouette guides the supplier, whose designers create the final cutting path. A customer planning outline therefore does not automatically become an approved machine path.
The printed-sticker versus cut-vinyl guide explains the related difference between a printed picture and geometry used for cutting. An acrylic charm adds its own substrate, opening, and supplier-template requirements.
Keep the attachment opening out of the printed image
Use the selected template's hole or loop guide to plan the attachment. Keep that guide separate from the artwork so it can be excluded from printing.
Acorn Press's file-setup FAQ requires artwork to avoid internal cuts and the surrounding area. Zap's template also separates its hole/loop information from print artwork. Follow the chosen product's actual clearance instructions; an empty circle in a drawing does not establish acrylic strength or drilling safety.
Check both sides around the opening. Move important type, an eye, or another identifying feature if the requested opening would remove it. Ask the supplier to confirm the opening position and attachment treatment in its proof.
Check an original digital example
The following SVG puts a flower in print-front and all manufacturing-plan marks in planning-guides. SVG is a vector graphics format; here, named groups make the roles easy to inspect. These are demonstration coordinates and colors, not a vendor template, physical dimensions, or white-ink designations.
Save this as front-master.svg and preserve it while making the separate copies below.
<svg xmlns="http://www.w3.org/2000/svg"
  width="400" height="480" viewBox="0 0 400 480">
  <g id="print-front">
    <path fill="#0f766e" d="M190 218 H210 V366 H190 Z M194 290 Q144 264 112 290 Q138 334 194 312 Z M206 322 Q254 282 290 306 Q258 354 206 342 Z"/>
    <circle fill="#f472b6" cx="200" cy="158" r="34"/>
    <circle fill="#f472b6" cx="158" cy="200" r="34"/>
    <circle fill="#f472b6" cx="242" cy="200" r="34"/>
    <circle fill="#f472b6" cx="200" cy="242" r="34"/>
    <circle fill="#facc15" cx="200" cy="200" r="24"/>
    <circle id="left-marker" fill="#f97316" cx="126" cy="330" r="8"/>
  </g>
  <g id="planning-guides" fill="none" stroke-width="3">
    <path id="outer-perimeter" stroke="#0ea5e9" d="M170 104 L170 64 C170 24 230 24 230 64 L230 104 C282 108 322 148 330 208 C340 282 308 394 244 420 C218 430 182 430 156 420 C92 394 60 282 70 208 C78 148 118 108 170 104 Z"/>
    <circle id="opening-request" stroke="#f97316" cx="200" cy="64" r="10"/>
    <circle id="no-art-zone" stroke="#e879f9" stroke-dasharray="6 4" cx="200" cy="64" r="30"/>
  </g>
</svg>- Open the master to see the flower, blue perimeter, orange opening request, and dashed pink no-art zone.
- Save
print-front.svgwith the completeplanning-guidesgroup removed. Keep the SVG root and its dimensions unchanged. - Save
outline-opening-plan.svgfrom the master with the completeprint-frontgroup removed. This copy should contain the plan without the flower. - Make a back master from the original: rename
print-fronttoprint-back, replace petal color#f472b6with#60a5fa, and center color#facc15with#fde68a. Keep the geometry, canvas, and orange left marker unchanged. - Remove
planning-guidesfrom that back copy to saveprint-back.svg. Label both print copies as desired final views, then reopen all files.
We reopened these authored files and rendered them at 400 × 480 pixels with Sharp and librsvg. The print-only copies contained no planning groups; the plan contained no flower artwork. Both sides retained the same width, height, and viewBox, which defines the SVG drawing coordinates.
The two print renders had identical alpha coverage, and the orange marker remained at the same left-hand position. We also checked every pixel within this sample's circular no-art zone: none contained printed artwork. These checks establish separation and alignment for this digital example. They do not establish vendor acceptance, mechanical clearance, printed color, or a finished charm.
For your real art, repeat the same role checks using the supplier's actual template and required files. Keep the editable master as well as the separated exports.
Label final views before applying mirroring
A final-view proof shows how you want the finished front or back to appear to a viewer. A print-orientation file follows the supplier's production instructions. Keep those descriptions distinct in filenames and proof labels.
For its double-layered clear acrylic product, Zap tells readers to mirror Artwork A for viewing through the acrylic, while Artwork B stays unmirrored. That is the rule for that template, not an instruction to flip both sides for every keychain.
Our pink-front and blue-back example contains no mirroring transform. The orange left marker makes an unintended flip easier to notice. Apply the chosen supplier's requested transformation once to the appropriate production copy, then compare its proof with the intended final views.
Do not trim each side to its own content bounds or recenter them independently. If the imported file changes scale, use the SVG size-diagnosis guide before preparing the submission.
Keep acceptable raster art and follow the color instructions
An acrylic print image does not always need tracing. Vograce's keychain file requirements list raster options, including transparent PNG and layered PSD, alongside other accepted formats. Preserve a painting or textured illustration when the chosen supplier accepts it at the required size and resolution.
Confirm the requested color profile, accepted container, white-ink representation, and transparency treatment together. Vograce specifies color preparation; Acorn can handle conversion to its printer profile. Do not assume an RGB SVG or ordinary PNG preview satisfies a requested CMYK workflow.
White backing is another separate instruction. Zap uses a template-specific representation for its White layer; Sticker Mule describes white backing for its charm artwork. Painting a shape white in the illustration does not reproduce another supplier's white-ink layer setup.
If a supplier asks for AI, the print-shop AI handoff guide explains the difference between editable geometry and a native production document. More artwork handoff topics are collected in the logo and artwork guides.
For a flat raster graphic that needs editable paths for revision, PerfectVector's image-to-vector tool can provide starting geometry. Inspect the protected raster preview, then unlock the result before actual SVG editing and export. You still need to create the deliberate perimeter and opening plan and place the artwork in the supplier's required template.
Reopen the package before requesting a proof
Use clear filenames with design, side, view direction, and revision, such as flower-front-final-view-r1.png. Keep quantity and accessory details wherever the supplier requests them.
Check the exported files independently:
- Print-only views show the artwork without visible contour, hole, or clearance guides.
- The plan identifies one intended outside perimeter and a separate opening request.
- Front and back keep the same canvas, scale, and agreed placement.
- Intended orientation, transparent effects, and white backing are explained.
- The supplier's required layer names, format, profile, resolution, and sizing are satisfied.
| Failed check | Repair before submission |
|---|---|
| Hole or perimeter marks appear in the print | Exclude the guide roles from the print export and reopen it |
| Sides move or change size when compared | Restore the common canvas and export settings; do not auto-trim each side |
| Backward text or an unexpected flip appears | Compare desired final views with the supplier's orientation rule and remove the extra flip |
| Important art overlaps the opening area | Move the artwork or request another opening position, then ask the supplier to confirm it |
Send the requested production file with labeled appearance proofs and dimensions. Review the supplier's contour, opening, side orientation, clear border or bleed, and white treatment before approving manufacture. Digital preparation is complete when the files communicate those decisions; production approval still depends on the supplier's proof.
FAQ
Do acrylic keychain designs have to be vector files?
No. Some printed-acrylic suppliers accept suitable raster artwork, including transparent PNG or layered PSD. Use the selected product's accepted format and resolution. A printed painting can remain raster while the supplier handles the material contour separately.
Is an outline drawn inside my artwork a cut line?
Not automatically. It may be printed detail. Keep the intended outside perimeter separate and identify it according to the supplier's template so internal illustration lines are not mistaken for material cuts.
Should I mirror both sides of an acrylic charm?
Follow the exact product guide. Zap's double-layered clear acrylic template mirrors Artwork A and leaves Artwork B unmirrored. First label the desired final views, then apply the required production orientation to the appropriate copy.
Does a digital hole prove the attachment will be strong enough?
No. The digital opening shows a requested position. The supplier must confirm its hole, edge clearance, attachment treatment, and production constraints for the chosen acrylic product.
Sources
- Zap! Creatives: Double-layered clear acrylic charms in Photoshop — Product-specific artwork, white, cut-area, opening, alignment, mirroring, and bleed instructions.
- Vograce: Acrylic keychain file requirements — Accepted artwork formats, color preparation, resolution, naming, and upload requirements.
- Acorn Press: FAQ — Template setup, artwork around internal cuts, color conversion, and white-ink instructions.
- Sticker Mule: Acrylic charms FAQ — One-sided printing, white backing, clear-border requirements, and the absence of full-bleed printing for this product.
Need editable shapes from a suitable flat PNG or JPG? Convert your artwork to SVG, unlock and inspect the result, then build the separate perimeter and opening plan in the supplier's template.
More from the blog
Clear Sticker Artwork: Plan White Ink and Transparent Areas
Plan clear-sticker artwork with separate color and white regions. Compare full and selective white, preserve clear areas, and check your supplier's proof.
How to Make a One-Color Logo Without Losing Its Design
Turn a multicolor logo into one solid color while keeping its essential details. Use negative space, test light and dark backgrounds, and check the small version.