Clear Sticker Artwork: Plan White Ink and Transparent Areas
Plan clear-sticker artwork with separate color and white regions. Compare full and selective white, preserve clear areas, and check your supplier's proof.
On this page
- Confirm that the chosen service prints white
- Assign four area roles before drawing the white plan
- Compare no white, full white, and selective white
- Build separate color and white shapes on one canvas
- Check the white plan separately from the composite
- Apply the supplier's white-channel instructions and review the proof
- FAQ
- Sources
To prepare white ink artwork for clear stickers, make a separate plan for where the supplier should print white. Include white beneath selected colored shapes and any white-only details. Leave areas intended to reveal the surface free of both color and white. Then translate that plan into your chosen supplier's file instructions and check its proof.
A transparent image background answers only whether the digital image paints there. It does not tell a printer which shapes need physical white ink. A white sparkle and an empty patch of clear film may look equally pale on a white screen, but they request different production behavior.
This guide builds an original SVG area plan and compares three white-coverage choices. The saved shapes and ordinary RGB renders were checked digitally. They are planning examples, not press separations, predictions of printed opacity, or supplier-approved files.
Confirm that the chosen service prints white
Start with your artwork, the intended finished size, the supplier's current template, and the surface where the sticker will be used. Confirm the viewing side if the design must be read through a window or transparent container. Ask the supplier which file format and white-ink instructions apply to that exact product.
Avery's white-underprint guide distinguishes full and selective white coverage and notes that most desktop printers lack white ink. Choosing clear sticker stock by itself therefore does not establish that your printer can produce white details.
Get answers to these questions before setting up production artwork:
- Does this product support white ink, including independent white-only artwork?
- Should you supply a separate white channel, mark selected areas, or describe the intent in order notes?
- What are the required white-layer name, color type, file order, and overprint settings?
- How will the proof identify requested white and areas left unprinted?
- What does the supplier require for the chosen viewing side, color preparation, edges, and registration?
Keep those answers with the editable master. A convention remembered from another printer is not a substitute for the recipient's instructions. For the broader distinction between artwork and a cutting outline, see how to make a sticker SVG.
Assign four area roles before drawing the white plan
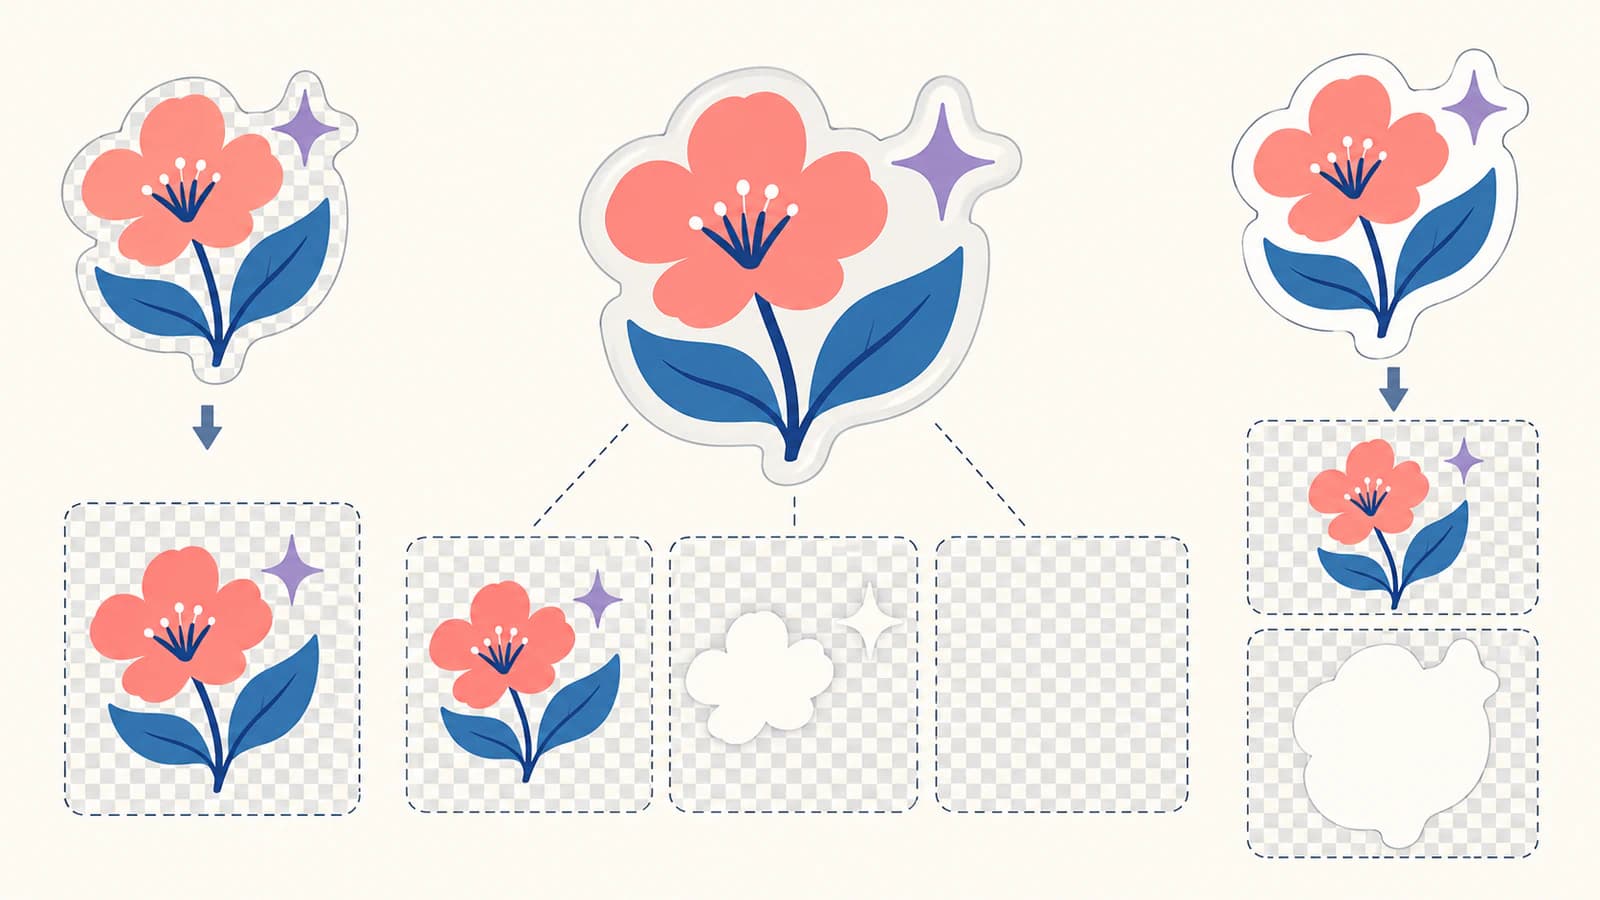
Color artwork C is the artwork intended for the color portion of the print. Requested-white artwork W is the separate set of areas where you want the supplier to print white. A white underprint is white ink placed beneath selected color artwork in the physical print; W may also include white-only details.
Treat each important region as one of four roles:
| Intended role | In color artwork C? | In requested-white artwork W? | Example in this guide |
|---|---|---|---|
| Color with white backing | Yes | Yes | Blue flower |
| Color without white backing | Yes | No | Coral leaf |
| White only | No | Yes | Small sparkle |
| Unprinted clear film | No | No | Empty region around the motif |
Unprinted clear film means an area intentionally assigned neither color artwork nor white ink. It still contains the physical sticker material; it is not a hole cut out of the film.
The table records intent, not a guaranteed appearance. Your supplier must establish how its color inks, white coverage, material, and underlying surface affect the result. In particular, a color-only area is not the same as an unprinted area.
Copying all colored shapes into W is a useful starting action when every colored shape needs backing. It misses the sparkle in this example because that detail has no colored counterpart. It also gives the leaf white backing that this design deliberately excludes.
Compare no white, full white, and selective white
Keep C unchanged while comparing coverage. This makes the white decision visible without quietly redesigning the colored motif.
| Plan | Requested-white area | Decision to review |
|---|---|---|
| No white | W is empty | The white-only sparkle is absent from the print plan |
| Full white within a defined boundary | W covers the chosen whole backing area | Previously clear gaps inside that boundary now request white |
| Selective white | W contains the flower footprint and the separate sparkle | The leaf remains color-only; surrounding regions remain unprinted |
Avery describes full and selective underprint, but the exact meaning of a product's full-white option must come from that supplier. In the authored example, “full” means a deliberately chosen rectangle. It does not mean that every printer uses a rectangle, the image bounds, or the cutting contour as its automatic white boundary.
For a label meant to reveal a bottle or window, inspect the gaps as deliberately as the colored artwork. Adding a broad white backing can change the design even when C stays identical. Selective white allows separate choices for the flower, leaf, sparkle, and empty film area; the printer's proof must confirm how those choices will be produced.
Build separate color and white shapes on one canvas
Preserve an editable master before adding a white plan. If an accepted high-resolution image already suits the supplier's workflow, you may be able to keep that color artwork: Sticker Ninja accepts raster artwork and offers white-ink assistance. Vector conversion is useful when you need editable geometry, rather than a requirement for every clear-sticker order.
When your only source is a suitable flat PNG or JPG and you need editable shapes, PerfectVector's image-to-vector workflow can recover starting geometry. Inspect the protected raster preview, then unlock the result before actual SVG editing and export. You still need to assign C and W yourself; conversion does not create a printer's spot-white channel or simulate ink opacity.
The following source is an original four-role planning example. Save the entire block as selective-white.svg. The flower appears in both groups, the leaf appears only in C, and the sparkle appears only in W. Nothing is drawn at the clear-area check point, x = 310, y = 240.
<svg xmlns="http://www.w3.org/2000/svg"
     width="400" height="300" viewBox="0 0 400 300">
  <g id="white-W" fill="#ffffff">
    <path id="white-under-flower"
      d="M160 95 C175 95 185 110 185 125
         C210 125 225 140 225 155 C225 170 210 185 185 185
         C185 210 170 225 155 225 C140 225 125 210 125 185
         C100 185 85 170 85 155 C85 140 100 125 125 125
         C125 110 140 95 160 95 Z"/>
    <path id="white-only-sparkle"
      d="M80 60 L88 72 L100 80 L88 88
         L80 100 L72 88 L60 80 L72 72 Z"/>
  </g>
  <g id="color-C">
    <path id="color-flower" fill="#377fa8"
      d="M160 95 C175 95 185 110 185 125
         C210 125 225 140 225 155 C225 170 210 185 185 185
         C185 210 170 225 155 225 C140 225 125 210 125 185
         C100 185 85 170 85 155 C85 140 100 125 125 125
         C125 110 140 95 160 95 Z"/>
    <path id="color-only-leaf" fill="#e58065"
      d="M240 180 Q245 130 300 120 Q305 170 240 180 Z"/>
  </g>
</svg>
Create the alternatives in this order:
- Save a color-only copy by removing the whole
white-Wgroup. Keep C unchanged. - Save a full-white copy by replacing the contents of
white-Wwith<rect x="40" y="40" width="320" height="220"/>. This deliberately requests white throughout that rectangle. - Keep the original selective-white copy with the flower and sparkle in W.
- Make separate C-only and W-only copies of the selective plan. Preserve the entire SVG root in both files.
- Reopen each copy and compare its assigned roles, alignment, and empty regions.
The viewBox defines the drawing coordinate rectangle. SVG's coordinate specification explains how it maps into the displayed viewport. Keep width, height, and viewBox identical in these planning copies so the flower and its white counterpart share the same coordinates. Avoid trimming or centering each separation independently.
The group names and white RGB fill are human-readable planning notation. They do not declare a press plate. W is drawn before C in this ordinary SVG so the colored shapes stay visible; that drawing order is not an instruction for the supplier's production-file stack.
Check the white plan separately from the composite
Hide C and inspect W alone. Temporarily display W in a contrasting color if white disappears against your editor's canvas. In this example, that view should show a flower and a separate sparkle, with no leaf and no broad background rectangle. Restore the recipient's required representation in the production copy.
The actual digital check reopened and rendered nine authored SVG sources on the same 400 × 300 canvas. C stayed unchanged in five alternative and assembly files. The selective plan passed these interior checks:
| Check point | C painted? | W painted? | Intended role |
|---|---|---|---|
| Flower, 160 / 155 | Yes | Yes | Color with white |
| Leaf, 270 / 155 | Yes | No | Color only |
| Sparkle, 80 / 80 | No | Yes | White only |
| Empty area, 310 / 240 | No | No | Unprinted film |
The full-white alternative painted the otherwise-empty point at 310 / 240. The no-white alternative omitted the sparkle. Those differences follow the chosen shape assignments, rather than a change to C.
We also inspected light and dark backdrop views. The blue flower and coral leaf kept identical RGB pixels on both backdrops because these are ordinary opaque SVG fills. That result cannot predict how color-only ink will look on clear film. Backdrop views help locate missing white details and accidentally painted empty areas; physical opacity requires the printer's process and an appropriate proof or sample.
If a check fails, correct the role before adjusting production settings:
| Problem | Inspect and repair |
|---|---|
| A white-only detail disappears | Add its own shape to W; duplicating C cannot create it |
| An intended clear gap requests white | Remove that area from W and check that C is also absent there |
| White backing shifts relative to color | Restore the common canvas and original coordinates |
| A color-only detail gains backing | Remove its duplicate from W while retaining the C shape |
| The composite looks right but W is wrong | Inspect W alone and annotate each intended area for the supplier |
For digital background removal itself, use the transparent SVG background guide. It solves a separate part of the artwork preparation; removing a background does not establish a white-ink instruction.
Apply the supplier's white-channel instructions and review the proof
A spot-white channel is a named production separation used to identify white ink. A plain white SVG fill does not establish one. Its required name and setup depend on the receiving workflow.
For one concrete example, StickerApp's white-layer guide specifies HPI-White. Its Illustrator instructions use a spot swatch marked with CMYK 25/25/25/25, place the white layer above the artwork, enable Overprint Fill, and retain the setup in PDF or AI. Those values mark its white separation; they are not a universal white-ink recipe or the final visible print color. Its guidance also allows variable white opacity for applicable materials. Follow the instructions for your selected product rather than imposing one solid-white rule everywhere.
Keep the area-role plan available while applying that setup. Ask the recipient to confirm white-only details, selective backing, deliberately unprinted areas, and any required edge adjustment. Use its requirements for layer ordering, spot names, overprint, color preparation, bleed, registration allowance, and viewing-side orientation. Do not infer a universal mirror setting from the fact that the stock is clear.
An SVG that renders correctly is not sufficient evidence that a PDF or AI contains the requested production separation. If a vector print-shop file is needed, see image artwork and AI delivery for a print shop, then verify the recipient's actual file requirements.
Request a proof that identifies the white regions separately from the color composite. Check the sparkle, the flower backing, the leaf without backing, and the intended clear gaps. Sticker Ninja requires proof approval before production; use the approval process required by your own supplier. If the proof does not show which regions receive white, ask for that information before approving it. For color and opacity decisions on the intended surface, ask what physical sample or production proof the supplier can provide.
FAQ
Does a transparent PNG automatically include white ink?
No. Transparent pixels describe the image's digital empty areas. They do not identify physical white ink. Follow the supplier's method for marking white-only artwork and white backing, even if it accepts PNG color artwork.
Can I make the white plan by duplicating all colored shapes?
You can start that way when all those shapes need backing. Then remove shapes intended to stay color-only and add independent white-only details. The separate sparkle in this example would be missed by copying only the color artwork.
Must clear-sticker artwork be vector artwork?
Follow the chosen service's requirements. Some suppliers accept raster artwork and help prepare white ink. Editable vectors are useful when you need to adjust shape boundaries or deliver a specified separation, but vectorization alone does not make a press-ready white channel.
Should every white area use the same opacity?
Use the supplier's instructions for the selected material and desired result. Some workflows allow variable white coverage. Neither a white RGB fill nor a light/dark SVG preview measures the opacity of printed white ink.
Sources
- Avery: What is white underprint? — full versus selective coverage and printing capability.
- StickerApp: How to create white layers — one supplier's white-channel setup and material-specific coverage guidance.
- Sticker Ninja: Clear stickers — accepted artwork, white-ink assistance, and proof approval.
- W3C: SVG viewBox coordinates — the common drawing rectangle used by the authored planning copies.
Need editable shapes from a flat raster motif? Create starting vector artwork with PerfectVector, inspect the protected preview, then unlock and check the actual paths before building your color and white plan. Keep usable editable artwork when you already have it, and let the supplier confirm the production separation.
More from the blog
Acrylic Keychain Artwork: Print, Outline, and Hole
Prepare acrylic keychain artwork with separate print art, an outer outline, and an attachment opening. Check side alignment and follow your supplier's template.

Prepare Vector Artwork for Embossing and Debossing
Prepare vector artwork for embossing or debossing with clean solid shapes, a separate spot-color finish plate, realistic detail, and a proof-ready handoff.