Overprint vs Knockout: Check How Your Logo Prints
Compare overprint and knockout with separate ink-mask diagrams, understand disappearing process-white artwork, and check the actual print delivery file.
On this page
- Read the ink regions, not only the composite
- An ordinary SVG overlap is screen paint
- Why process-white artwork can disappear
- Overprint and trapping answer different questions
- Check the exported production file with the recipient
- Recover missing logo geometry before production setup
- FAQ
- When should I use overprint instead of knockout?
- Why does my white logo disappear with overprint enabled?
- Is knockout the same as deleting the background path?
- Sources
Knockout removes the underlying ink in an overlapping object's area. Overprint allows underlying ink to remain where the upper object prints. For a logo on a colored field, that choice can change both the ink separations and the resulting appearance. Check the actual production file and the printer's proof before approving the job.
This guide uses one original arrow emblem to explain those two choices. Its diagrams show logical ink regions, with illustrative screen colors. They are not measured press colors, a separated production PDF, or evidence that an ordinary SVG creates overprint instructions.
Read the ink regions, not only the composite
A separation identifies where a particular printing ink is used. A composite combines the artwork into one view. A normal screen view can hide a separation mistake, especially when you expect an opaque logo over a background.
In the simple example below, Ink A supplies the background and Ink B supplies the arrow. They are different inks. At a point inside the arrow:
| Decision | Ink A under the arrow | Ink B in the arrow | What to inspect |
|---|---|---|---|
| Knockout | Absent | Present | The background separation has an arrow-shaped hole |
| Overprint | Present | Present | Both ink regions occupy that overlap |
Adobe's overprint guidance describes the knockout and overprint distinction and explains that the visible result depends on the inks, paper, and printing method. Do not infer a final brand color from the diagram's purple overlap.
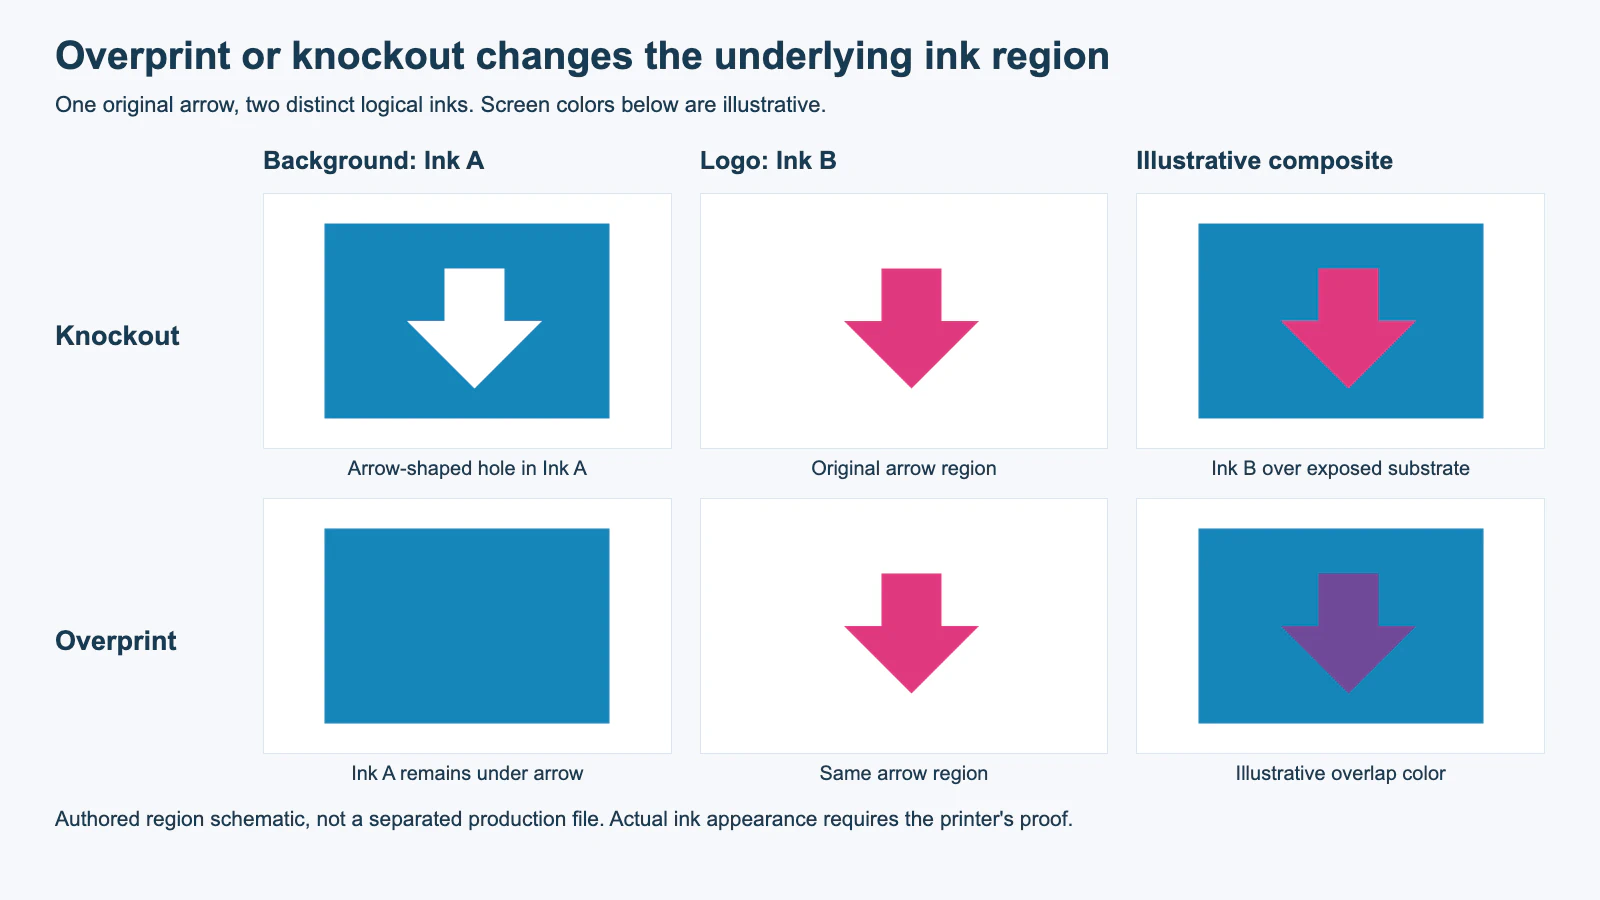
We checked the actual authored mask paths in the browser. At (115, 85), inside the arrow, the knockout background excluded the point, while the overprint background and both logo masks included it. At (30, 30), outside the arrow but within the field, both backgrounds included the point. That verifies the diagram's region assignments. No production separations, RIP behavior, ink opacity, or physical registration were measured.
If your job uses process mixtures or inks shared by the foreground and background, ask prepress how the actual objects and overprint mode affect those separations. The two-distinct-ink diagram is an explanation of the decision, not a formula for every CMYK combination.
An ordinary SVG overlap is screen paint
Here is the complete screen reference for the original emblem. Save it as arrow-reference.svg and open it in a browser:
<svg xmlns="http://www.w3.org/2000/svg"
     width="220" height="160" viewBox="0 0 220 160">
  <rect x="15" y="15" width="190" height="130" fill="#1686ba"/>
  <path fill="#df397f"
        d="M95 45H135V80H160L115 125L70 80H95Z"/>
</svg>
The arrow is painted after the rectangle, so its opaque RGB fill covers the background in the screen view. The SVG rendering model defines this successive painting behavior. The browser still has a full rectangle object underneath; that fact alone does not tell a print application which ink to retain or remove.
Changing opacity or using a blend mode can create a visual overlap effect. It does not, by itself, specify the printer's required separation and overprint setup. Keep this reference to communicate intended artwork, then prepare the recipient's actual delivery format. The SVG and CMYK handoff guide explains that format decision.
Why process-white artwork can disappear
In ordinary process printing, process white has zero cyan, magenta, yellow, and black ink. On white paper, a white logo usually becomes visible because the colored background is knocked out and the paper shows through.
If that no-ink white object is overprinted instead, the background can remain beneath it and the expected white shape disappears. Imagesource's printing guidance describes this white-overprint failure. A white object that looks correct in a normal screen composite therefore needs a check in the actual output workflow.
A separately specified white ink is a different case. It can add a physical white layer on clear or colored material, with coverage and opacity determined by the chosen process. Adobe's white-overprint documentation explicitly distinguishes spot-white objects from ordinary white objects in its output safeguard. A spot-white overprint may be intentional; do not remove it under a blanket rule that all white must knock out.
Ask the supplier whether a white area means exposed substrate, printed white ink, or white backing beneath another color. Then follow its required channel, ink name, layer arrangement, and proof procedure. The clear-sticker white-ink guide covers that separate area-role plan. An SVG fill="#ffffff" does not establish a named white-ink separation.
Overprint and trapping answer different questions
Overprint controls whether underlying ink remains in the overlap. Trapping adjusts adjacent ink boundaries to create a small overlap that can accommodate registration error. Adobe's trapping guide explains this boundary adjustment and directs the reader to the print shop for the appropriate setup.
Overprinting an entire logo and adding a narrow trap around an edge can produce different ink regions. Do not substitute one for the other or apply a universal trap width from an unrelated job. The printer needs to account for its process, material, artwork details, and desired appearance.
Small black text is one situation in which a printer may choose overprint to reduce registration gaps. That does not mean every black logo, large black field, rich-black mixture, or light-colored mark should share that setting. Keep the desired color and the actual ink build in the discussion.
Check the exported production file with the recipient
Keep an untouched editable master and make a delivery copy. Record which objects should knock out, which should overprint, and where any special white or finishing ink belongs. An explicit reference view helps the printer distinguish a deliberate overlap from an accident.
For a PDF workflow, Adobe's Output Preview documentation describes separation views and overprint simulation. Those are documented inspection features, not operations we performed on a production PDF for this article. Use the recipient's prepress tool or have the printer inspect the file when you cannot access one.
Review these points in the actual exported file:
- Hide the logo ink and inspect the background separation. Does it contain the expected hole or retained region?
- Inspect the logo separation alone. Are the silhouette, small gaps, and intended ink assignment correct?
- Check white artwork against its stated role. A process-white knockout and a separate white-ink layer require different evidence.
- Compare the overprint simulation with the intended reference, using the agreed output condition.
- Ask the printer to confirm trapping and any automatic output changes before approving its proof.
Adobe notes that monitor separation preview does not verify trapping, halftone screens, or every output setting. Use the supplier's appropriate proof or sample for those questions. If the logo disappears or changes unexpectedly, return to the delivery copy, correct the object or ink setup with prepress, export again, and recheck that new file.
A file extension and a clean browser preview cannot replace these checks. The print-shop AI handoff guide covers source inspection when a recipient asks for an editable design file. For foil or another finishing plate, follow the foil-artwork guide rather than treating the finish as an ordinary colored logo.
Recover missing logo geometry before production setup
PerfectVector can help recover editable shapes when the only usable logo source is a raster image. Compare the recovered silhouette with the reference and keep that geometry as a source for the printer-approved production document.
The logo vectorization workflow does not reconstruct original CMYK values, named spot inks, overprint instructions, or traps. Those decisions belong in the delivery copy and need the recipient's checks. If you already have the approved vector master, use it directly.
FAQ
When should I use overprint instead of knockout?
Use it when retaining the underlying ink is intentional and the printer confirms the resulting ink regions and appearance. Small black text, deliberate ink overlaps, and some special production layers can require it. Do not choose it solely because the objects overlap on screen.
Why does my white logo disappear with overprint enabled?
In an ordinary process-white case, the object adds no process ink. If it also leaves the background ink in place, the expected white paper opening disappears. A separately specified white ink is different; check the actual white role and output file with the printer.
Is knockout the same as deleting the background path?
A print knockout describes which underlying ink regions are removed in the overlap. You do not have to delete the entire background object from the editable master. Preserve the artwork and verify the production separations required for the job.
Sources
- Adobe — Overprint in Illustrator — Explains knockout, retained overlapping inks, and the dependence of the result on the printing process.
- W3C — SVG rendering model — Defines screen painting order, which is distinct from a production ink instruction.
- Imagesource — Knockout and Overprint — Describes the accidental white-overprint failure in ordinary commercial printing.
- Adobe — White Overprint — Distinguishes spot-white objects from ordinary white objects in Illustrator's output safeguard.
- Adobe — Trapping in Illustrator — Explains boundary overlaps and printer-specific trap decisions.
- Adobe — Color modes in Photoshop — Defines pure process white as zero coverage in all four CMYK ink channels.
- Adobe — Preview output in Acrobat Pro — Documents separation and overprint inspection plus the limits of monitor preview.
If your logo survives only as pixels, recover its vector shapes with PerfectVector. Check the silhouette against the original, retain the editable source, and let the printer verify ink assignments, overprint, and trapping in the actual delivery file before proof approval.
More from the blog
Prepare Vector Artwork for Embossing and Debossing
Prepare vector artwork for embossing or debossing with clean solid shapes, a separate spot-color finish plate, realistic detail, and a proof-ready handoff.

Washi Tape Artwork: Check the Repeat Before Printing
Prepare custom washi tape artwork with a supplier template, matching repeat edges, separate bleed and safe zones, and a reopened file check before handoff.