Woven Label Artwork: Keep a Logo Clear at Small Sizes
Prepare a logo for a woven clothing label: simplify detail at its intended size, separate folds and sewing space, and export the files your label maker requests.
On this page
- 1. Read your label maker's requirements
- 2. Separate the visible face from folds and sewing space
- 3. Make a small-size version without losing the master
- A measured example at one intended face size
- 4. Choose whether the source needs vectorization
- What this looks like with PerfectVector
- 5. Export a delivery copy and check the proof
- FAQ
- Sources
Prepare woven-label artwork by choosing the maker's size and fold template first, placing the logo inside the visible face, and checking the smallest lines and gaps at that intended size. Keep an editable master, then export the format that supplier requests. Some makers accept a suitable PNG; an SVG is useful for editing but is not a universal submission requirement.
This guide is for a small clothing brand with a logo to place on a label. The goal is a dimensioned artwork proof you can discuss with the maker. A woven label forms its design from interlocking threads. The maker still prepares the weaving pattern, so an artwork file alone does not establish how the finished fabric will look. Dutch Label Shop explains that translation from artwork to weaving.
Before you resize the logo
Have the selected maker's template, intended label placement, fold type, and accepted file format ready. Confirm whether its quoted size means the visible face or the full strip, and whether it adds sewing allowance during ordering.
1. Read your label maker's requirements
The useful question is which file your chosen maker needs at your chosen dimensions. Supplier instructions differ:
| Maker | Published artwork guidance | What to confirm for your order |
|---|---|---|
| Apliiq | Recommends PNG; also accepts JPG, GIF, BMP, and SVG. Recommends 300 dpi at the requested label size. | Its template, artwork detail limits, and sewing setback for the placement you choose. |
| Dutch Label Shop | Lists JPG, PNG, PDF, AI, and PSD. Interprets label designs at 300 dpi and asks for the intended dimensions. | Fold placement and whether to add its sewing allowance option or include that space in your artwork. |
| Wunderlabel | Describes taking raster or vector artwork and adjusting it to its weaving-machine specifications. | The accepted upload format and template for the specific product. |
For a raster image, pixel dimensions describe how much image data you have; dpi describes the intended pixels per inch in these supplier workflows. At 300 pixels per inch, a 2 × 1 inch image needs 600 × 300 pixels. Both Apliiq and Dutch Label Shop give dimension-based examples. Enlarging a small image to that pixel count does not restore missing logo detail.
Use supplier numbers within their stated scope. Apliiq publishes a 1 mm artwork-detail requirement and typically recommends at least a ⅛ inch sewing setback. Dutch Label Shop describes an optional ¼ inch sewing allowance. Those instructions are not interchangeable, and the illustrative measurements below are not a substitute for either maker's template. Follow the Apliiq artwork guide or Dutch Label Shop specifications for an order with that maker.
2. Separate the visible face from folds and sewing space
The finished face is the part of the label you intend to see after folding and attachment. The full strip includes the extra material needed for the chosen folds or seam. A sewing allowance is reserved space for attachment; its position depends on how you sew the label.
An end-fold label has ends that turn behind its face. A center-fold label has front and back panels. Custom Woven Labels' fold guide shows separate flat layouts and allowance formulas. Apliiq also provides folded and flat label templates. Use the template that matches your order rather than doubling every dimension or adding a border by habit.
- Write down the visible face width and height.
- Mark the fold lines and extra strip length from the selected template.
- Mark the attachment area separately. Keep essential artwork away from it.
- Place the logo inside the remaining visible area, then check its orientation after the planned fold.
Keep fold lines and measurement guides on a separate layer or proof copy. Ask the maker whether it wants those marks in the upload or only in an accompanying proof. A dotted guide that becomes part of the artwork can be mistaken for a design element.
3. Make a small-size version without losing the master
Duplicate the logo before removing anything. Your full brand master may need details that a clothing label cannot use. Preserve that version and give the label version a clear name, such as reed-label-master.
Start with the brand name and recognizable mark. Remove a decorative tagline if it crowds them, open tight spaces inside letters, and replace fine ornament with fewer deliberate shapes. Use flat color areas when the maker requests them: both Apliiq and Dutch Label Shop advise against gradients for their woven-label artwork. Follow the supplier's thread-color choices; a screen color swatch does not establish a woven color match.
If the art contains many similar shades, the guide to reducing an SVG palette by visual role explains how to decide which colors serve different parts of the design. For small lettering that must retain its exact shape, use the original type or ask a designer to rebuild it instead of relying on a rough trace.
A measured example at one intended face size
We authored two original REED logo SVGs for an illustrative 40 × 20 mm face. SVG means Scalable Vector Graphics; here, the files contain geometric paths and rectangles rather than a placed raster image. Each master declares width="40mm", height="20mm", and viewBox="0 0 40 20", so its coordinate dimensions map to the declared face size. The SVG coordinate specification describes that relationship.
The detailed version has a 0.30 mm rectangular stem and a selected 0.40 mm leaf opening. In the simplified version, both measure 1.20 mm, and we removed the row of tiny ornaments. These are dimensions measured from the saved SVG geometry, not minimum weaving specifications.
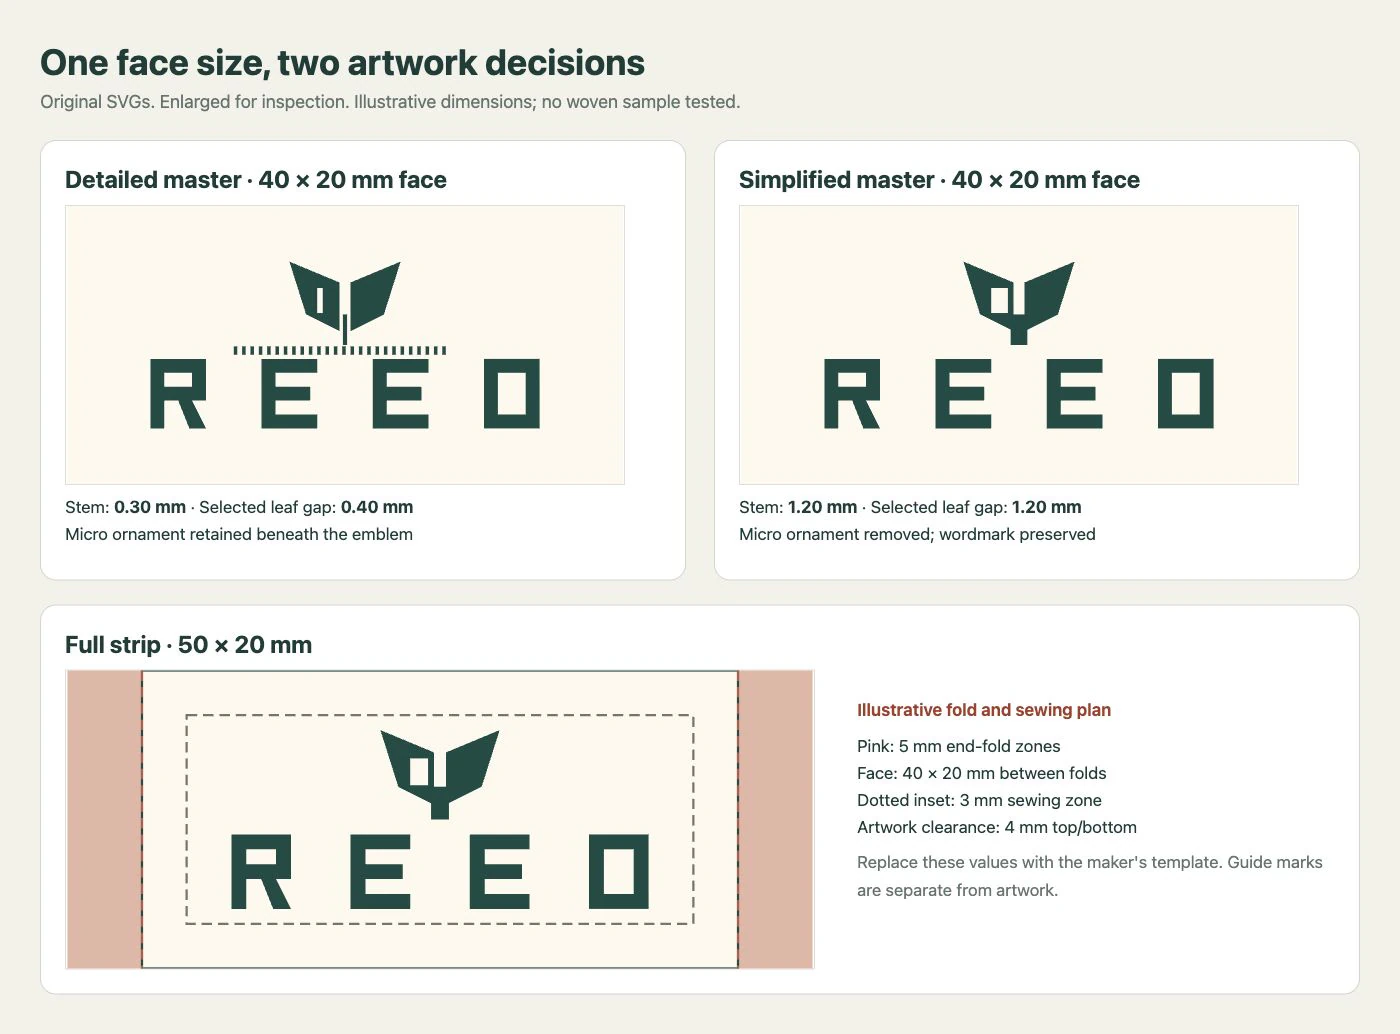
Our separate proof uses a 50 × 20 mm full strip: 5 mm end fold + 40 mm face + 5 mm end fold. The artwork keeps 4 mm above and below it within the face and 6 mm at each side. A 3 mm inset marks illustrative sewing space inside the face. All of those distances come from the saved file; none describes an approved supplier layout.
This comparison lets you inspect which details you have removed, how much space remains, and where the artwork sits. A scaled browser view does not prove legibility on paper at actual size, successful weaving, or thread-color matching. Print a dimensioned proof without automatic fit-to-page scaling, check its size with a ruler, and discuss a physical sample with the maker before committing to production.
4. Choose whether the source needs vectorization
A raster image stores pixels. Vectorization rebuilds those pixels as paths and shapes. That helps when you need to change a logo's shapes, separate its colors, or keep an editable master. It does not decide which details the label maker can weave.
- If you already have a usable vector master, simplify a copy of it.
- If the maker accepts your raster artwork and it has enough pixels at the requested size, prepare that delivery file directly.
- If only a sharp, flat PNG or JPG logo remains and you need to edit its shapes, vectorization can provide a starting point.
- If the source is blurry or the lettering is inaccurate, find the original or have a designer redraw it.
What this looks like with PerfectVector
If you only have a suitable raster logo, PerfectVector's logo vectorizer can help you recover SVG shapes to inspect and simplify. Compare the result with the source, check lettering and small openings, then place the cleaned artwork in the maker's dimensioned layout. PerfectVector does not turn that SVG into weaving-machine instructions.
The logo vectorization guide covers choosing between tracing and redraw. Keep the logo file-format guide nearby when you prepare delivery copies. Woven-label preparation has different constraints from the T-shirt printing workflow, and it is separate from digitizing embroidery into stitch instructions.
5. Export a delivery copy and check the proof
Keep the editable master and the dimensioned proof as separate files. Export the artwork in the selected maker's accepted format, using its canvas dimensions and raster resolution when applicable. The proof should identify the visible face, full strip, fold direction, sewing space, artwork position, and requested colors.
Open the exported file again. Compare its dimensions and visible content with the master, especially if you changed formats. Check that the brand name is present, guide marks are handled as agreed, and no part of the logo has been cropped. A PDF or SVG filename alone does not establish the file's contents or acceptance by a supplier.
Before sending, confirm:
- The file uses the maker's requested dimensions and accepted format.
- The visible face and total strip are clearly distinguished.
- Fold and attachment zones leave the intended artwork visible.
- Small lines, letter openings, and spacing have been checked against that maker's requirements.
- Colors are limited and identified as the maker requests.
- You retained the brand master, label master, and dimensioned proof.
If detail still crowds the face, remove secondary ornament or choose a larger label with the maker. If folding hides the brand name, revise its position using the selected template. If a raster export looks soft, return to the original master and export the required pixels rather than enlarging the soft copy. Ask the maker to flag any remaining production changes in its proof.
FAQ
Do woven labels require SVG files? No. The accepted file depends on the maker. Apliiq recommends PNG and also accepts SVG, while Dutch Label Shop lists JPG, PNG, PDF, AI, and PSD. Keep an editable master and deliver the format your selected maker requests.
What is the minimum line thickness for a woven label? Use the chosen maker's requirement for the specific label. Apliiq publishes a 1 mm artwork-detail requirement, but that is not a universal weaving limit. Ask the maker to review small strokes, openings, and letter spacing at the intended size.
Should the artwork size include the folds? Confirm what the maker's template means by size. The visible face and full strip can differ. Account for fold and sewing zones as instructed, and avoid adding allowance again if the ordering tool already adds it.
Does a clean vector logo guarantee a readable woven label? No. Vector geometry makes dimensions and edits inspectable, but the maker still adapts the artwork for threads and its loom. Check the supplier's proof and, where available, a physical sample before approving production.
Sources
- Apliiq — Prepare artwork for clothing tags and woven labels — Accepted formats, raster sizing, templates, detail guidance, and sewing setback.
- Dutch Label Shop — Woven label design best practices — Upload formats, dimensions, fold marks, sewing allowance, and artwork-to-weaving differences.
- Custom Woven Labels — Woven label design guide — Fold layouts and the distinction between visible size and total manufactured size.
- Wunderlabel — Production process of woven labels — Supplier adaptation of raster or vector artwork to weaving-machine specifications.
- W3C — SVG coordinate systems, transformations, and units — Physical dimensions, user coordinates, and viewBox mapping in the original example.
Only have a flat PNG or JPG logo? Try it in PerfectVector, then inspect the SVG lettering, openings, and placement at your intended face dimensions before exporting the format your label maker requests.
More from the blog
How to Make a One-Color Logo Without Losing Its Design
Turn a multicolor logo into one solid color while keeping its essential details. Use negative space, test light and dark backgrounds, and check the small version.
Prepare Vector Artwork for Pad Printing: A Vendor Handoff
Prepare vendor-ready vector artwork for pad printing: confirm scale and colors, outline fonts, separate the mark, send a proof, and avoid raster traps.