Logo Clear Space: Calculate and Preserve the Margin
Choose a clear-space unit for your logo, calculate the full exclusion zone, and preserve it in an SVG without confusing artwork size with the padded canvas.
On this page
- Choose a unit that belongs to this logo
- Measure the complete lockup, then add the margin
- Carry the rule in a padded SVG
- Resize the asset without shrinking its intended logo
- Where PerfectVector fits in logo delivery
- FAQ
- Is logo clear space always one-quarter of the logo height?
- Should I add a white rectangle to preserve clear space?
- Does a padded SVG automatically enforce the brand guideline?
- Sources
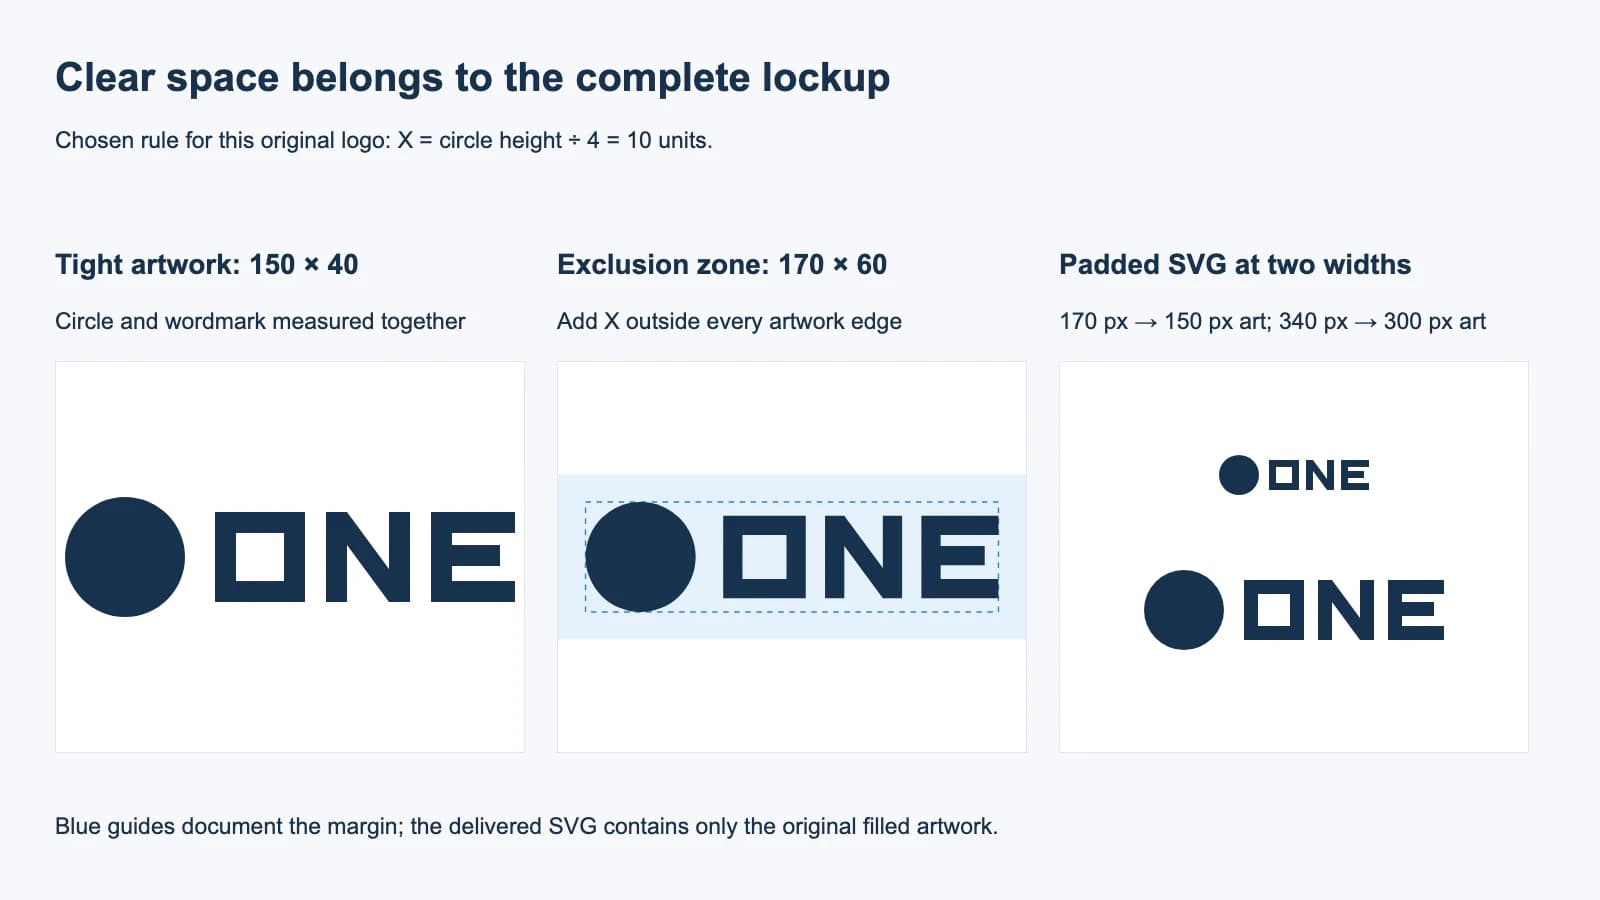
Calculate logo clear space from a defined unit in the approved artwork, then measure outward from the complete logo's visible bounds. If your chosen unit is 10 and the logo is 150 by 40, a one-unit exclusion zone on every side occupies 170 by 60. The logo itself remains 150 by 40.
Clear space is the area that other content must leave empty around a logo. File padding can help carry that space into a layout, but the blank canvas is only one delivery method. The brand guideline defines the rule. If you are preparing an existing brand's assets, use its approved rule before making a new one.
This guide follows one original lockup through calculation, SVG export, and resizing. If your only source is a raster image, recover the visible shapes first; an image vectorizer cannot infer the approved exclusion zone.
Choose a unit that belongs to this logo
Use a measurable feature that stays proportional when the approved logo scales: a symbol's height, a particular letter's dimension, or a specified fraction of the full artwork. Name exactly what you measured. Avoid a rule such as "leave some space" or an unexplained square marked X.
Official brand guides show why this is a design policy rather than a universal ratio. The University at Buffalo's clear-space guide uses the interlocking UB's height around its master brand lockup, with separate guidance for linework. Vevo's guide distinguishes marks above and below 30 px high and gives context-specific web and tablet spacing. Follow the rule for the actual mark and application.
For our original example, the round symbol is 40 units high. We choose X as one-quarter of that height: X = 10. The required margin is one X on each side. This is an invented rule for this example, not a recommendation that every brand should use 25% of its symbol height.
Write the rule in plain language: "For this horizontal lockup, X equals one-quarter of the circle's diameter. Leave at least one X outside every edge of the complete lockup." The wording carries the policy even when an application trims the blank canvas.
Measure the complete lockup, then add the margin
A lockup is the approved arrangement of the symbol and wordmark used together. Measure that complete arrangement. Using only the circle's bounds would leave the letters outside your exclusion-zone calculation.
Our circle and three drawn letters span x = 0 to 150 and y = 0 to 40. There are no strokes, shadows, or hidden objects in this example. The exclusion rectangle therefore runs from x = -10 to 160 and y = -10 to 50.
X = circle height / 4 = 40 / 4 = 10
zone width = artwork width + 2X = 150 + 20 = 170
zone height = artwork height + 2X = 40 + 20 = 60
If your artwork has visible strokes or effects, include their visible extent in the review. A geometry-only measurement can differ from the painted result. The SVG bounding-box guide explains that measurement distinction; here we deliberately use plain filled geometry.
Carry the rule in a padded SVG
The SVG viewBox maps an internal coordinate rectangle to the displayed viewport. In this example, viewBox="-10 -10 170 60" includes the calculated margin without moving or enlarging the artwork.
Save this complete example as logo-padded.svg. The wordmark letters are drawn shapes, so it has no font dependency. The circle-and-letters design is original example artwork, not another brand's approved asset.
<svg xmlns="http://www.w3.org/2000/svg"
     width="170" height="60" viewBox="-10 -10 170 60">
  <g fill="#17324d" fill-rule="evenodd">
    <circle cx="20" cy="20" r="20"/>
    <path d="M50 5H80V35H50Z M57 12V28H73V12Z"/>
    <path d="M87 35V5H94L108 24V5H115V35H108L94 16V35Z"/>
    <path d="M122 5H150V12H129V16H145V23H129V28H150V35H122Z"/>
  </g>
</svg>
To make a tight companion asset, use width="150", height="40", and viewBox="0 0 150 40" while retaining the same circle and paths. Name the files so the recipient can tell which includes the margin. Keep measurement guides in the brand document or a separate review layer, not in the artwork they will place.
Blank canvas still needs a placement check
A padded SVG reserves space inside its viewport. It cannot prevent another layout object from overlapping that viewport or guarantee that an importer preserves its bounds. Check the actual placement against the written rule.
Resize the asset without shrinking its intended logo
Decide whether a width refers to the visible artwork or the entire padded file. At 170 px file width, the example artwork is 150 px wide and the margin is 10 px. At 340 px file width, the artwork is 300 px wide and the margin is 20 px. The proportional rule survives uniform resizing.
If the brief asks for a 300 px visible logo, set this padded file to 340 px wide. Setting the padded file to 300 px would give only about 264.7 px of visible artwork, because 300 × 150 / 170 is approximately 264.7.
| What you specify | Padded viewport width | Visible artwork width | Side margin |
|---|---|---|---|
| Base example | 170 px | 150 px | 10 px |
| Double the example | 340 px | 300 px | 20 px |
| Set the whole file to 300 px | 300 px | About 264.7 px | About 17.6 px |
Method note: We rendered the complete tight and padded SVGs in Chromium. The artwork's geometric bounds were 150 by 40 units. At 170 px and 340 px padded widths, the measured horizontal artwork widths were 150 px and 300 px, with 10 px and 20 px margins. This verifies the authored browser example; it does not establish every editor's import behavior.
When the logo looks too small, check the file's canvas before enlarging random objects. When space vanishes after import, inspect the destination's imported bounds and restore the margin from the written X rule. For a wide logo inside a different frame, use SVG aspect-ratio fitting to understand additional empty space introduced by the placement.
Where PerfectVector fits in logo delivery
PerfectVector can recover vector shapes when a brand only has a raster copy of its logo. Once you have those shapes, compare the complete mark with the approved reference, clean up unintended background pieces, and apply the brand's documented clear-space rule separately. The logo vectorization workflow addresses the shape-recovery step.
Ask for the original vector master and brand guidelines first. Those files preserve the intended artwork and spacing decisions better than a new trace. A JPG's blank border might be accidental export padding; it is not proof of a brand policy. The logo file-format guide helps choose the files to deliver, and the logo vectorization guide covers source preparation and inspection.
Finish by checking the complete artwork, the written X definition, the padded file's dimensions, and the actual surrounding layout. Keep a tight master as well as the intended placement asset. Further delivery checks are in the blog workflow library.
FAQ
Is logo clear space always one-quarter of the logo height?
No. One-quarter of the circle's height is the rule chosen for this original example. Existing brands can define other units, ratios, and exceptions for particular applications.
Should I add a white rectangle to preserve clear space?
You can reserve blank space with the SVG viewBox without adding a painted rectangle. A white rectangle changes the artwork on a colored background. Test the transparent padded file in its intended placement.
Does a padded SVG automatically enforce the brand guideline?
No. It carries blank space inside its viewport, but an importer can trim bounds and layout objects can overlap it. The written rule and a final placement check remain necessary.
Sources
- University at Buffalo — Clear space — Provides an official example of a mark-based unit and application-specific exceptions.
- Vevo — Logo clearspace — Shows how clear-space guidance can change with mark size and digital context.
- MDN — SVG viewBox — Explains the coordinate rectangle used to carry the example's blank margin.
If the original vector is missing, recover your raster logo with PerfectVector. Inspect the complete lockup against the reference, then apply its approved clear-space rule and check the visible logo size in the final placement.
More from the blog

Optically Center a Logo and Keep Its Master Intact
Start with geometric logo bounds, compare an optical offset at the intended size, and record the placement separately so the original vector master stays intact.

Woven Label Artwork: Keep a Logo Clear at Small Sizes
Prepare a logo for a woven clothing label: simplify detail at its intended size, separate folds and sewing space, and export the files your label maker requests.