SVG Lighting Filters: Shade an Emblem and Keep Its Opening
Build diffuse and specular SVG lighting from a hollow emblem's alpha, contain the result within its silhouette, and keep a separate flat vector master.
On this page
For an embossed-looking SVG logo, soften SourceAlpha, feed that alpha into feDiffuseLighting or feSpecularLighting, combine the light with the source color, and finish with an in composite against the original SourceAlpha. That last step keeps the treatment inside the emblem and preserves its opening. Save an unfiltered copy of the path as your flat master.
The effect changes the rendered appearance. It does not create a raised solid, a new contour, or a manufacturing file. This walkthrough uses one original diamond-ring emblem, authored directly as SVG, to compare the lighting stages and their alpha.
Use alpha as the lighting surface
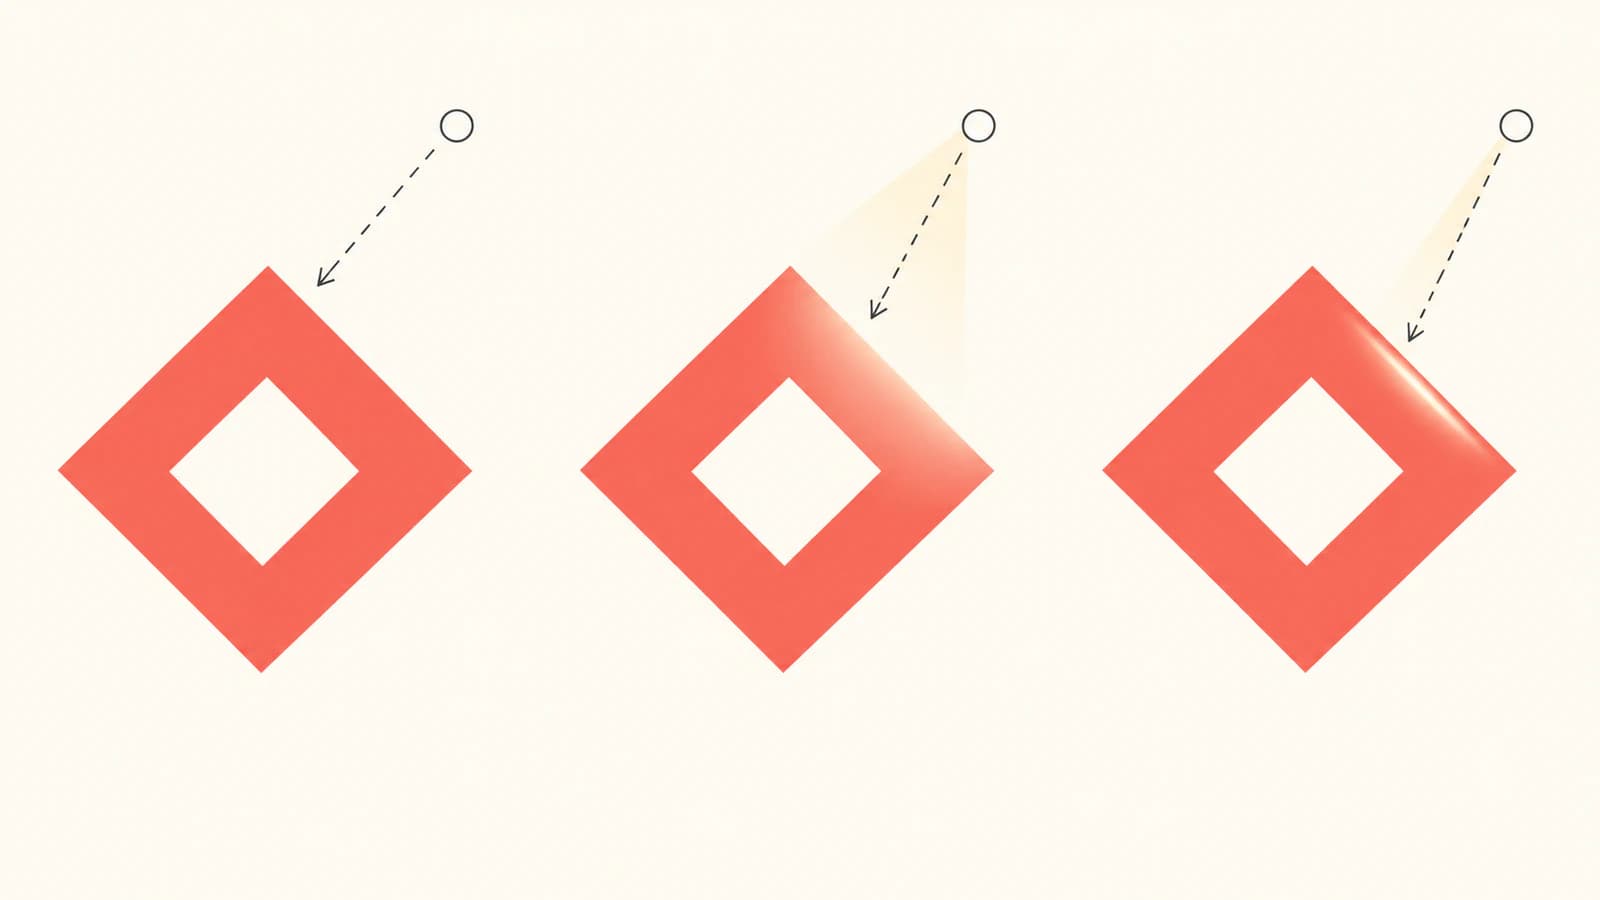
feDiffuseLighting uses input alpha as a bump map and produces an opaque light map. Its appearance depends on the light and the input surface. MDN's diffuse-lighting reference explains that behavior. In this example, opaque parts of the ring provide the high area and its opening provides the low area.
We blur only SourceAlpha, leaving the original colored path available as SourceGraphic. The softened alpha gives the lighting calculation a gradual transition at the inner and outer edges. feGaussianBlur controls that softening through stdDeviation; the starter uses 2.5 in an explicit user-space filter.
The raw diffuse map paints across its filter region, including places where the original path was transparent. That is useful for inspecting the light calculation, but it is the wrong final silhouette for our hollow emblem. Keep the original alpha available for the final containment step.
Copy the complete shaded-emblem starter
Save this as emblem-lighting.svg and open it in a browser. It has one compound path and no external image dependency.
<svg xmlns="http://www.w3.org/2000/svg" width="200" height="200" viewBox="0 0 200 200">
  <defs>
    <filter id="relief" filterUnits="userSpaceOnUse" primitiveUnits="userSpaceOnUse" x="0" y="0" width="200" height="200" color-interpolation-filters="linearRGB">
      <feGaussianBlur in="SourceAlpha" stdDeviation="2.5" result="bump"/>
      <feDiffuseLighting in="bump" surfaceScale="4" diffuseConstant="1" lighting-color="#ffffff" result="diffuse">
      <feDistantLight azimuth="225" elevation="45"/>
      </feDiffuseLighting>
      <feComposite in="SourceGraphic" in2="diffuse" operator="arithmetic" k1="1" k2="0" k3="0" k4="0" result="lit"/>
      <feSpecularLighting in="bump" surfaceScale="4" specularConstant=".7" specularExponent="18" lighting-color="#ffffff" result="shine">
      <feDistantLight azimuth="225" elevation="45"/>
      </feSpecularLighting>
      <feComposite in="lit" in2="shine" operator="arithmetic" k1="0" k2="1" k3="1" k4="0" result="paint"/>
      <feComposite in="paint" in2="SourceAlpha" operator="in"/>
    </filter>
  </defs>
  <path d="M100 20 L180 100 L100 180 L20 100 Z M100 58 L142 100 L100 142 L58 100 Z" fill="#dc795f" fill-rule="evenodd" filter="url(#relief)"/>
</svg>
The filter names each intermediate result so you can inspect its role:
| Stage | Input and result | Purpose |
|---|---|---|
| Blur | SourceAlpha → bump | Soften the height transition |
| Diffuse | bump → diffuse | Calculate broad illumination |
| Multiply | SourceGraphic × diffuse → lit | Shade the original color |
| Specular | bump → shine | Calculate the reflection component |
| Add | lit + shine → paint | Combine shade and highlight |
| Contain | paint in SourceAlpha | Restore the original silhouette and opening |
The arithmetic multiply uses k1="1" with the other coefficients zero. The addition uses k2="1" k3="1" with the others zero. feComposite defines these pixel operations and the in operator. Keep the final composite's second input as SourceAlpha, not the blurred bump, when you want the original boundary.
The filter explicitly uses color-interpolation-filters="linearRGB", which is the default for SVG filter operations. This is separate from ordinary paint interpolation. MDN's color-interpolation-filters reference documents the distinction. All measured lighting variants here use that same setting.
Compare diffuse shading with specular shine
Diffuse lighting darkens and brightens the original color according to the light map. The specular stage adds a reflection component. feSpecularLighting documents its light-dependent output and parameters. The starter uses a restrained .7 constant and exponent 18; tune them after establishing a usable diffuse treatment.
To inspect diffuse alone, keep the blur, diffuse, and multiply stages, then change the final composite's first input from paint to lit. Remove the specular and addition stages.
To inspect specular alone over the flat color, keep the blur and specular stages. Change the addition's first input from lit to SourceGraphic, remove the diffuse and multiply stages, and retain the final paint in SourceAlpha composite. Both comparisons keep the same original path and light direction.
Our distant light uses azimuth="225" elevation="45". feDistantLight is a light-source element for either lighting primitive. These angles are degrees, not pixel positions. Change the direction on both lighting stages together when comparing a combined treatment.
What the original browser controls showed
We opened six authored SVG specimens in Chrome at 80 × 80 and 160 × 160 CSS pixels. The flat master, diffuse, specular, and combined treatments remained visibly distinct. The higher diffuse surfaceScale made the edge contrast stronger in this fixture. The raw diffuse control showed a gray rectangle with a filled opening instead of a transparent silhouette.
Separate pixel readbacks used the 200 × 200 source canvas size. The band sample was at (100, 38), the edge sample at (101, 22), the opening at (100, 100), and the outside sample at (10, 10).
| Specimen | Band RGB | Edge RGB | Opening / outside alpha |
|---|---|---|---|
| Flat master | 220, 121, 95 | 220, 121, 95 | 0 / 0 |
| Raw diffuse light map, scale 4 | 219, 219, 219 | 214, 214, 214 | 255 / 255 |
| Diffuse color, scale 4, contained | 189, 102, 81 | 185, 101, 79 | 0 / 0 |
| Diffuse color, scale 12, contained | 189, 102, 81 | 155, 83, 64 | 0 / 0 |
| Specular over flat color, scale 4, contained | 242, 162, 145 | 221, 122, 96 | 0 / 0 |
| Combined treatment, scale 4, contained | 214, 149, 137 | 185, 102, 81 | 0 / 0 |
Every file retained the same d value, one path, and zero image elements. The screen effect produced no additional source geometry. These are observations from this browser and source, rather than guarantees about another renderer or an editor's import behavior.
Tune the height field before changing the contour
surfaceScale sets the surface-height scale used by the lighting calculation. It does not expand the path. Our diffuse 4 and 12 controls changed only this value: the sampled flat band stayed the same color, while the edge sample became darker at 12.
Use a controlled sequence:
- Establish the original transparent silhouette and opening without a filter.
- Choose the alpha softening and light direction.
- Compare a small and larger
surfaceScalewith everything else fixed. - Add specular shine, then contain the paint with the original alpha as the final operation.
- Check the delivered artwork at its actual display size and on a contrasting background.
The current Filter Effects specification defines diffuse output alpha as one everywhere and specular output alpha from its color components. Neither output should be assumed to retain the original opening. It also defines the normal calculation from neighboring alpha samples. This starter leaves kernelUnitLength unset; our two-size inspection does not establish size-independent lighting samples.
If a lighting stage's intermediate buffer appears as the final result, check the named inputs and the last primitive. For this ring, returning the diffuse light map directly is how we reproduced the opaque gray rectangle. The final in SourceAlpha step is deliberate, even when an earlier multiplication already appears to preserve transparency.
If a blur or effect is cut off at an unexpected rectangle, inspect the filter region using the SVG clipping guide. Keep that region separate from the final source-alpha containment: one bounds the effect's working area, and the other restores our intended silhouette.
Deliver the screen treatment with a flat master
Remove the path's filter attribute to inspect the flat master. It retains the same outer contour, inner opening, and solid coral fill. Keep that copy alongside the shaded web version so later edits can start from the original geometry.
For a physical finish, use a separate preparation workflow such as vector artwork for embossing. A screen-lighting preset provides appearance rather than die geometry or a measured relief depth. The SVG morphology outline guide explains another filter-based boundary treatment without treating it as reconstructed paths.
If your logo exists only as a PNG or JPG, vectorize the logo with PerfectVector, inspect the recovered outer contour and opening, and retain a clean flat master before adding lighting in your SVG workflow. The service recovers vector geometry; this diffuse/specular pipeline is a separate authored display treatment. If you already have the vector master, apply and review the filter directly.
FAQ
Can SVG lighting filters make a logo look embossed? They can simulate shading and highlights from an alpha-based height field. The rendered treatment does not create physical relief, extra path contours, or a production die file.
Why does my SVG lighting effect fill the transparent opening? A raw diffuse light map is opaque across its filter region. Combine the light with the source color and finish with an in composite against the original SourceAlpha to contain the treatment in the original silhouette.
What is the difference between diffuse and specular SVG lighting? Diffuse lighting supplies broad illumination for shading the original color. Specular lighting supplies a reflection component to add as shine. Both use input alpha as a bump map and depend on the selected light and surface settings.
Does surfaceScale change my logo's path? No. It changes the height scale used in the lighting calculation. In our two diffuse controls, the path data stayed identical while the rendered edge contrast changed.
Sources
- MDN feDiffuseLighting — Alpha bump-map input and opaque diffuse light output.
- MDN feGaussianBlur — Softened input and filter-region considerations.
- MDN feComposite — Arithmetic multiply/add and source-alpha containment.
- MDN color-interpolation-filters — The linearRGB filter-operation default.
- MDN feSpecularLighting — The reflection component and its controls.
- MDN feDistantLight — A light source for both lighting primitives.
- MDN surfaceScale — Surface-height scale for the calculation.
- Filter Effects lighting specification — Lighting alpha, angle units, and neighboring-sample calculations.
More from the blog
SVG Displacement Maps: Distort Your Logo Preview
Use SVG feDisplacementMap to warp a logo preview, control channels and neutral gray in sRGB, inspect two sizes, and keep the original path master for delivery.

SVG Stroke Alignment: Place Outlines Inside or Outside
SVG strokes sit on a path by default. Use a clip for an inner outline or a mask for an outer one, then check the visible bounds and importer before delivery.