
SVG feMorphology: Add an Outline Without New Paths
Build an SVG outline from SourceAlpha with feMorphology. Compare dilation, erosion, holes and unequal radii while keeping the original path geometry intact.
On this page
To outline an entire multicolor SVG silhouette, dilate its SourceAlpha, remove the original alpha from that larger result, color the remaining ring, and merge the original artwork on top. The filter changes the rendered appearance while the original path data stays intact.
Use operator="erode" when you want a smaller alpha silhouette instead. Neither operation creates an editable offset path. Holes, narrow gaps and sharp corners need a visual check because morphology uses a rectangular neighborhood rather than a circular stroke offset.
Start with the silhouette, not the color channels
The W3C Filter Effects specification defines dilation as the component-wise maximum within a rectangular neighborhood and erosion as the minimum. With SourceAlpha, the input is the artwork's alpha channel. That lets us derive a silhouette without growing the teal and coral color channels separately.
This example applies the filter to the complete two-path artwork. Its transparent square hole is part of the alpha silhouette. The coral inset is already inside an opaque teal area, so it does not create a separate outside boundary.
We created the SVG by hand and opened five standalone variants in a browser. Every file retains the same two original path definitions. The comparison below is actual rendering of those files, with no traced artwork or generated effect preview.
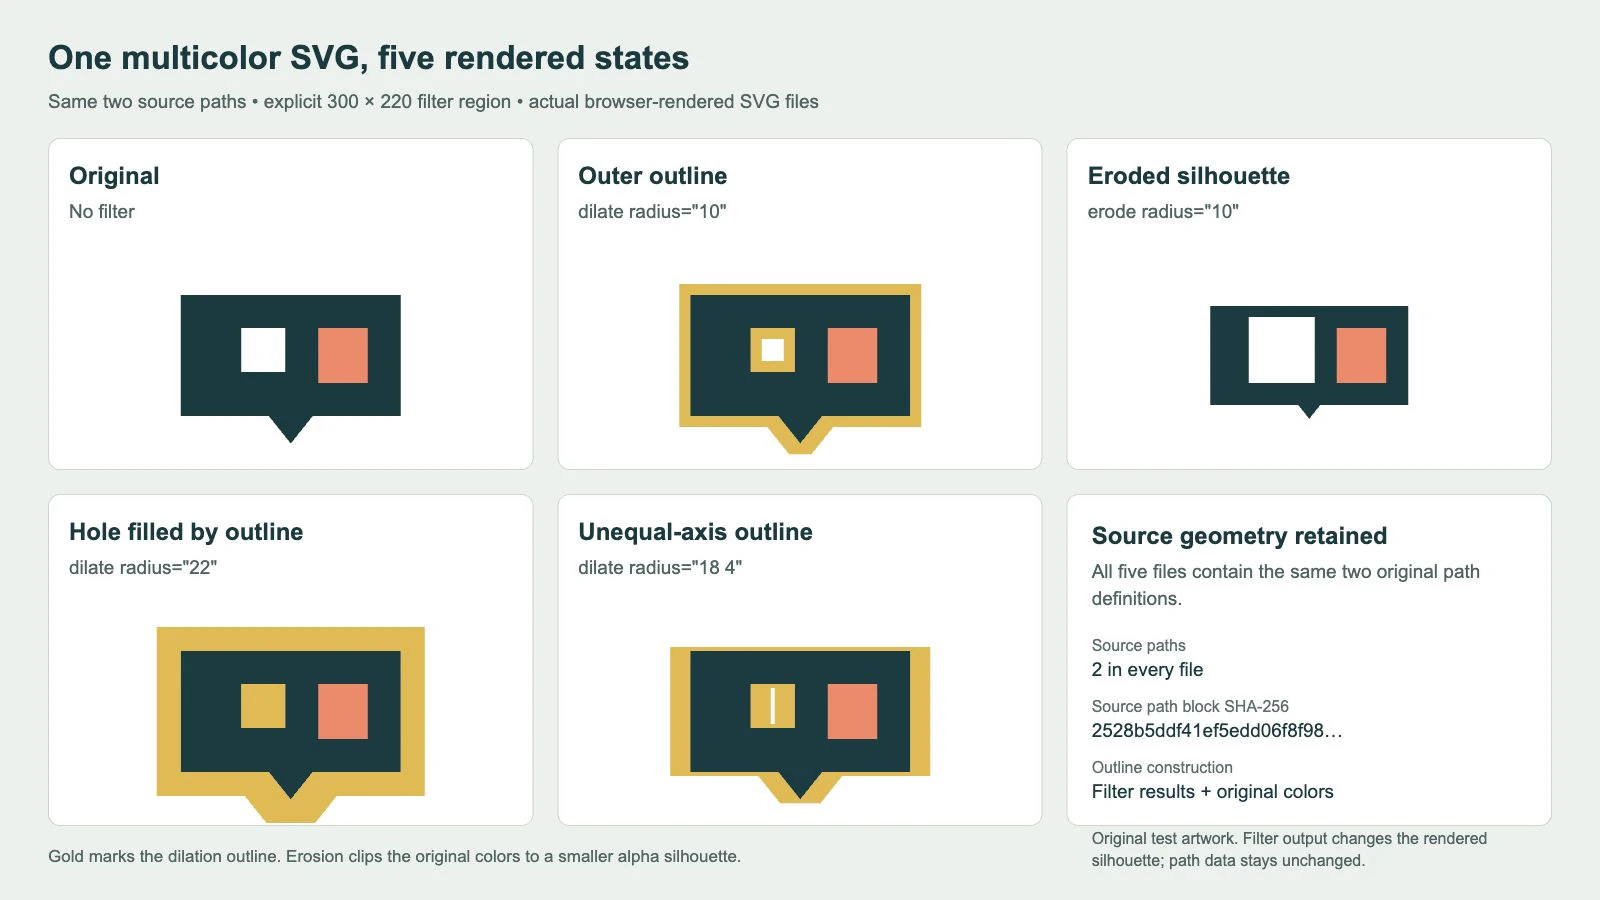
At radius 10, the outline grows outside the visible silhouette and into the hole. At 22, the gold fills this fixture's square opening. The 18 4 version grows farther horizontally than vertically. Erosion shrinks the opaque outer area and enlarges the transparent opening; the lower point also changes.
Those observations belong to this artwork and these settings. They are not a general safe-radius rule for other logos or icons.
Build the outer alpha ring
Save this complete example as outline.svg and open it in a browser. It is the exact radius-10 SVG used in the capture:
<svg xmlns="http://www.w3.org/2000/svg" width="300" height="220" viewBox="0 0 300 220">
<defs>
<g id="artwork">
  <path fill="#173b40" fill-rule="evenodd"
    d="M50 60H250V170H170L150 195L130 170H50Z M105 90H145V130H105Z"/>
  <path fill="#f28567" d="M175 90H220V140H175Z"/>
</g>
<filter id="outline" filterUnits="userSpaceOnUse"
  primitiveUnits="userSpaceOnUse" x="0" y="0" width="300" height="220">
  <feMorphology in="SourceAlpha" operator="dilate" radius="10" result="grown"/>
  <feComposite in="grown" in2="SourceAlpha" operator="out" result="ring"/>
  <feFlood flood-color="#e4b84c" result="paint"/>
  <feComposite in="paint" in2="ring" operator="in" result="coloredRing"/>
  <feMerge>
    <feMergeNode in="coloredRing"/>
    <feMergeNode in="SourceGraphic"/>
  </feMerge>
</filter>
</defs>
<use href="#artwork" filter="url(#outline)"/>
</svg>
The filter has four working steps:
feMorphologydilatesSourceAlphaintogrown.feCompositekeepsgrownoutside the original alpha, producingring.feFloodsupplies a gold color; another composite restricts that color to the ring.feMergeplaces the originalSourceGraphicabove the colored ring.
Input order matters in the subtraction. The specification's compositing section assigns in as the source and in2 as the destination. Here in="grown", in2="SourceAlpha" and operator="out" remove the original opaque area from the grown alpha. Reversing those inputs does not produce this outer ring.
The word outside means outside the opaque alpha region, including space inside a transparent hole. If an outline must avoid internal openings, this filter does not supply that distinction automatically. You need a separate silhouette or another construction that defines the intended exterior.
The source colors remain visible because we merge the unmodified SourceGraphic last. This is separate from an ordinary path stroke. For centered, clipped-inside or masked-outside strokes, see SVG stroke alignment; paint order explains the simpler stroke-and-fill layering case.
Erode the alpha and retain the surviving colors
Replace the outline filter with the following definition and change the final use to filter="url(#erode)":
<filter id="erode" filterUnits="userSpaceOnUse"
  primitiveUnits="userSpaceOnUse" x="0" y="0" width="300" height="220">
  <feMorphology in="SourceAlpha" operator="erode" radius="10" result="shrunken"/>
  <feComposite in="SourceGraphic" in2="shrunken" operator="in"/>
</filter>
This composite keeps the original artwork only where the eroded alpha remains. It does not merge the full original back on top, because that would hide the intended thinning. In this fixture the outer teal area becomes smaller, while the coral region survives inside it.
Specify the operator explicitly in working examples. The operator reference distinguishes erode and dilate on feMorphology from in and out on feComposite. The same attribute name performs different jobs on the two elements. Morphology's default operator is erode, so omitting it is an easy way to get the opposite effect from an intended dilation.
Separate radius units from the filter region
The radius reference accepts one or two numbers. One applies to both axes; with two, the first is the x radius and the second is the y radius. For the two additional outline states, change only radius="10" to radius="22" or radius="18 4" in the complete example.
These are radii in the coordinate system selected by primitiveUnits, not a promise of a fixed CSS-pixel border at every display size. We explicitly use primitiveUnits="userSpaceOnUse" with a 0 0 300 220 viewBox. Resizing the displayed SVG scales the appearance along with the artwork.
Two similarly named attributes control different things:
| Attribute | Controls | Setting in the example |
|---|---|---|
| primitiveUnits | Length values inside primitives, including morphology radius | userSpaceOnUse |
| filterUnits | The filter region's x, y, width and height | userSpaceOnUse |
| Root viewBox | The user-coordinate rectangle mapped to the SVG viewport | 0 0 300 220 |
MDN's primitiveUnits reference documents the primitive coordinate system. Its filterUnits reference separately documents the outer region. filterUnits defaults to objectBoundingBox; primitiveUnits defaults to userSpaceOnUse. Setting both explicitly makes the sample easier to inspect.
The source occupies x=50 through 250 and y=60 through 195. The largest tested equal-axis radius is 22, and the 300 by 220 filter region and viewport leave room for that result. Recheck both boundaries when changing the artwork or radius. The specification describes the filter region as a hard clip: a larger radius cannot paint past that region. The SVG filter and viewport clipping guide demonstrates those two separate limits.
If the filter seems inactive, also inspect radius. Its default is 0, and the reference states that a negative or zero value disables the primitive's effect. The examples above use explicit positive values on both axes.
Inspect holes and corners before delivery
Morphology's rectangular neighborhood makes its appearance different from a conventional rounded outline. Equal x and y radii do not turn that neighborhood into a circle. The stepped lower point in the comparison is a useful place to inspect the difference.
| Result | Check before using it |
|---|---|
| Larger outer outline | Openings and nearby shapes may become visually joined |
| Eroded silhouette | Thin features may vanish and holes may become larger |
| Unequal-axis radius | Horizontal and vertical growth deliberately differ |
| Correct browser preview | The receiving editor or exporter still needs its own test |
| Outline needed as editable geometry | A live filter result is not a new contour in the source |
We checked that all five files still contain two source paths with identical d attributes. Their filter definitions differ; their source geometry does not. Inspect the actual SVG objects when your destination needs paths you can edit, offset or send to production. Use an editor's geometry operation for that requirement, then inspect the resulting contours. Changing or removing this filter alone does not supply them.
Keep an unfiltered master and a separate delivery copy. Open the delivered file in its actual destination and compare the corners, internal openings, colors and bounds. This browser example does not establish support in a particular design app, exporter or cutter.
Prepare the source before adding the effect
PerfectVector can help when the starting artwork exists only as a PNG or JPG. Prepare an SVG candidate, then inspect the recovered source silhouette, small holes and color boundaries before applying the filter. A morphology outline will amplify problems in that silhouette rather than repair the intended geometry for you.
Use an available vector master directly. For a simple symbol, manual redraw may be easier to control. Tracing a flattened image with a baked-in outline does not recover the original filter settings or establish which part was the unfiltered shape. The image-vectorization overview explains that reconstruction boundary.
FAQ
Does feMorphology create an editable outline path? No. It changes the rendered filter result. This example retains the same two source paths, so a destination that needs a separate contour requires a geometry operation and an import check.
Why does the gold outline fill my SVG's hole? The ring grows outside opaque alpha, including into transparent openings. In this fixture, radius 22 fills the square hole. Other artwork requires its own gap and radius check.
Why use SourceAlpha instead of SourceGraphic? SourceAlpha lets the filter operate on the silhouette without dilating each original color channel. The example colors that alpha ring separately and merges SourceGraphic last to show the original colors.
Sources
- W3C — Filter Effects Level 1 — Defines morphology's rectangular neighborhood, compositing inputs and the filter-region clip.
- MDN — radius — Defines single-value and two-value radius syntax, units and disabled-effect values.
- MDN — operator — Distinguishes morphology operations from compositing operations.
- MDN — primitiveUnits — Establishes the coordinate system for morphology radius.
- MDN — filterUnits — Establishes the coordinate system for the outer filter region.
If your source is raster-only, prepare vector artwork with PerfectVector, verify the unfiltered silhouette and openings, then add the outline and compare the final file in its receiving viewer.
More from the blog

SVG Strokes Disappear After Export: Find the Cause
SVG strokes can vanish because of paint, scale, clipping, or unsupported effects. Diagnose the path first, then apply the smallest reliable fix.

Graphviz SVG Images: Keep Node Artwork Portable
Add SVG artwork to a Graphviz node, inspect its image reference, and test a complete asset bundle against a moved diagram and a self-contained delivery copy.