
SVG Stroke Alignment: Place Outlines Inside or Outside
SVG strokes sit on a path by default. Use a clip for an inner outline or a mask for an outer one, then check the visible bounds and importer before delivery.
On this page
An SVG stroke is centered on its path. To make a 12-unit outline sit entirely inside a closed shape, draw a 24-unit stroke and clip it to that shape. To put the same visible width outside, draw the 24-unit stroke through a mask that hides the shape's interior. Keep a copy of the original path: the clip and mask change what is visible, not the underlying geometry.
The proposed stroke-alignment property appears in an SVG Strokes editor's draft, but that draft says the SVG 2 stroke definition remains normative. For a file that must work across browsers and editors, build and test the visible result rather than relying on the proposed property.
Pick the smallest construction that fits the job
- Centered: one ordinary stroke, when the extra width on both sides is acceptable.
- Inside: a double-width stroke clipped to its own closed silhouette, when outer dimensions must stay fixed.
- Outside: a double-width stroke masked to remove its inner half, when the fill must retain its original area.
See where the painted outline lands
This original closed badge uses one path in all three panels. Its teal fill, nominal 12-unit visible outline, and surrounding document space stay the same. The coral dashed line is the center path. In the middle panel it coincides with the outer edge of the blue band; on the right it coincides with the inner edge.
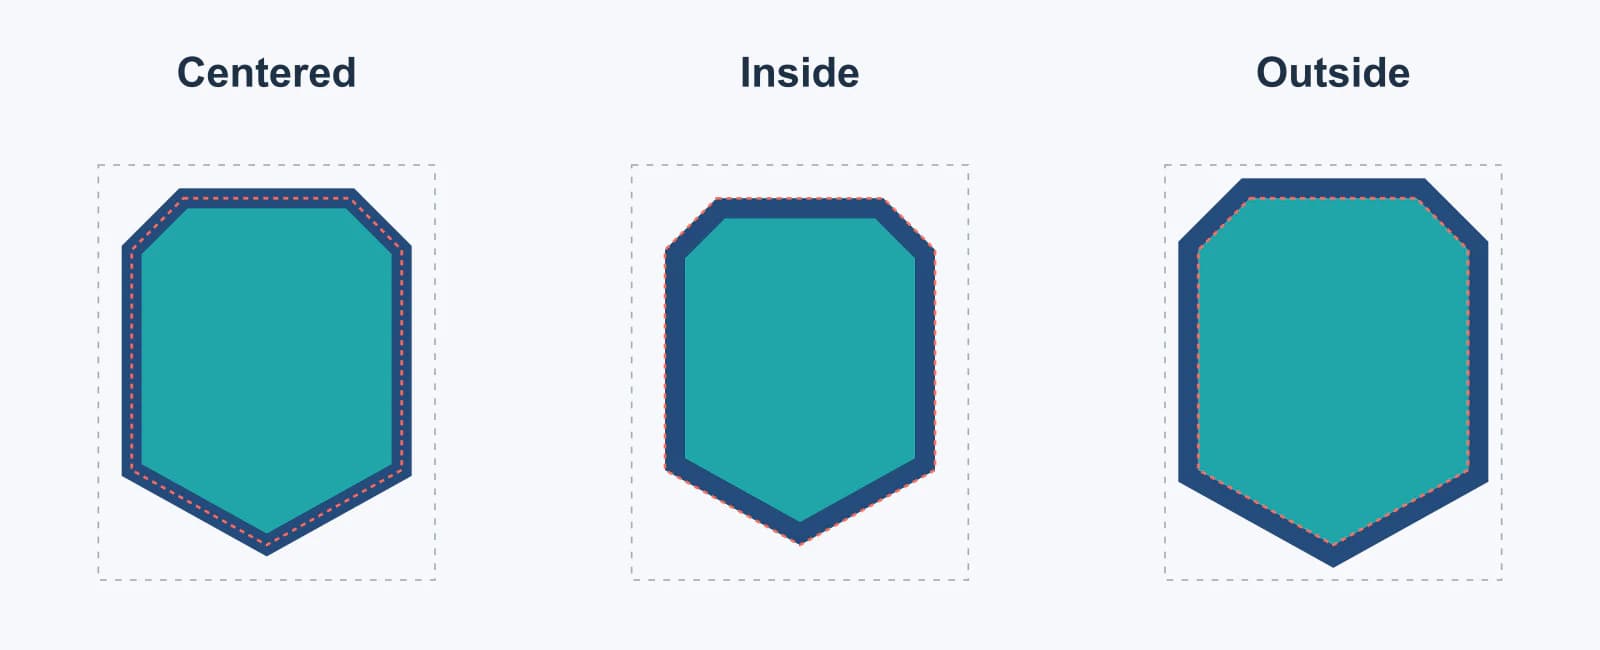
The center panel keeps the badge's outer painted boundary at its original path. The outer panel grows the painted footprint by 12 units around the path. If the badge nearly touches the viewBox edge, that added paint can be cut off. MDN's fills and strokes guide describes ordinary strokes as centered on the path; the comparison above renders the three constructions at one size.
Make an inside outline with a clip
Place the closed path in <defs>. Reuse it once as the fill and once as a clip. Paint a second copy with twice the desired stroke width, then restrict that stroke to the path's interior. A clip makes everything outside its shape invisible; it does not delete the hidden half of the stroke. See the MDN clipPath reference and our clipPath coordinate guide if an imported clip shifts away from its artwork.
<svg xmlns="http://www.w3.org/2000/svg" viewBox="80 20 240 260">
  <defs>
    <path id="badge" d="M150 44 H250 L281 75 V207 L200 252 L119 207 V75 Z"/>
    <clipPath id="badge-inside">
      <use href="#badge"/>
    </clipPath>
  </defs>
  <use href="#badge" fill="#20a6a8"/>
  <use href="#badge" fill="none" stroke="#244b7b" stroke-width="24"
    clip-path="url(#badge-inside)"/>
</svg>
Here the 24-unit stroke normally reaches 12 units to either side of the path. The clip removes its outer half, leaving a 12-unit visible band inside. Put the fill below the clipped stroke, as in the example, if you want the entire inner band to remain visible. For compound paths with holes, inspect the fill and clip rules before assuming which side is interior.
Make an outside outline with a mask
An outer band needs the reverse visibility region. The mask below is white over the document area and black inside the badge. It is applied only to the stroke copy, while an unmasked copy supplies the fill. The explicit mask region leaves room for the stroke beyond the original shape.
<svg xmlns="http://www.w3.org/2000/svg" viewBox="80 20 240 260">
  <defs>
    <path id="badge" d="M150 44 H250 L281 75 V207 L200 252 L119 207 V75 Z"/>
    <mask id="badge-outside" mask-type="luminance"
      maskUnits="userSpaceOnUse" maskContentUnits="userSpaceOnUse"
      x="80" y="20" width="240" height="260">
      <rect x="80" y="20" width="240" height="260" fill="white"/>
      <use href="#badge" fill="black"/>
    </mask>
  </defs>
  <use href="#badge" fill="#20a6a8"/>
  <use href="#badge" fill="none" stroke="#244b7b" stroke-width="24"
    mask="url(#badge-outside)"/>
</svg>
Again, only half of the centered 24-unit stroke survives, so the visible outside band is 12 units wide. Set the mask region deliberately: MDN documents how maskUnits, maskContentUnits, and the region dimensions affect a mask. The white rectangle must cover the full outer stroke. A mask that is too small can trim the very edge you meant to preserve.
There is a shorter visual trick for an opaque fill: paint a double-width stroke, then paint the fill over it with paint-order="stroke fill". That hides the inner half under the fill, but the stroke still exists there and can reappear if the fill becomes translucent or is removed. MDN explains paint order. Use the explicit mask when the outer band must remain a distinct visible construction.
Check the SVG after import
Clips and masks affect rendering, while a downstream application may require filled contours. Keep an editable master and test a delivery copy in the actual target:
- Open the SVG alone, then place it in the intended editor or production app. Compare the inner and outer edges at the same zoom.
- Check the
viewBoxor artboard around the outside version. Leave space for its 12-unit outward band and any joins at sharp corners. - Inspect the object list. The examples contain reusable paths, a clip or mask, and a live stroke. They do not create one solid outline contour.
- If the recipient needs filled geometry, convert the selected stroke on a delivery copy and inspect the resulting shapes. Keep the live-stroke source for later width changes.
If the line disappears during export, use the stroke visibility checklist to separate missing paint, clipping, and import support. If a stroke covers a fill unexpectedly, our SVG paint-order explanation shows which layer is drawing last.
Where PerfectVector fits
These steps start with an editable SVG path. If the logo exists only as a PNG or JPG, PerfectVector's logo vectorization workflow can create an SVG candidate before you add the clip or mask. Compare its silhouette, corners, and any openings with the original at the intended delivery size. Vectorization recovers candidate geometry; it does not assign inner or outer stroke alignment for you.
If the original SVG path is available, edit that path directly. Tracing its screenshot would add a needless reconstruction step and could change the boundary you are trying to align. Our logo vectorization guide helps choose between tracing, redrawing, and preserving an existing vector master.
FAQ
Does SVG support inside or outside stroke alignment? An SVG Strokes editor's draft describes those values, but it says SVG 2 remains the normative stroke definition. For portable delivery, use a tested clip or mask instead of depending on the draft property.
Why do I double the stroke width? An ordinary stroke sits halfway on either side of the path. A clip or mask discards one half. A 24-unit stroke therefore leaves a visible 12-unit inner or outer band in these examples.
Will an inner clip or outer mask create cut-ready outlines? No. They change the rendered appearance, while the underlying path and stroke remain. If a cutter or vendor needs filled contours, make a separate delivery copy, convert the stroke to paths in a suitable editor, and inspect the geometry after import.
Sources
- MDN — Fills and strokes — Defines centered stroke rendering and the paint-order behavior discussed here.
- W3C SVG Working Group — SVG Strokes editor's draft — Establishes the proposed alignment values and the draft's status relative to SVG 2.
- MDN — clipPath element — Defines how the inside construction restricts visibility.
- MDN — mask element — Defines mask region and coordinate attributes used for the outside construction.
- Alex Chan — Drawing inner/outer strokes in SVG — Demonstrates the double-width clip and mask approach used as a starting point for our original badge fixture.
If your logo is still a raster image, make an SVG candidate with PerfectVector, inspect its path boundary, then try the inner or outer construction in your editor and verify the delivered file in its destination.
More from the blog

SVG Miter Spikes: Fix Sharp Corners Without Clipping
An SVG miter join can make a narrow corner spike or clip at the page edge. Compare miter limits, bevels, round joins, and viewport space before editing paths.

SVG clipPath vs Mask: Choose Hard Edges or Soft Fades
Compare SVG clipPath with alpha and luminance masks on one image. Copy the working pattern, test light and dark backgrounds, and export the right geometry.