
SVG ClipPath Units: Fit a Custom Shape to Its Target
Choose SVG clipPath units, normalize a silhouette, and preserve its proportions. Test wide and tall targets while keeping holes and source geometry intact.
On this page
- Choose the coordinate system before resizing
- Compare a wide target with a tall one
- Normalize the source bounds, including their origin
- Preserve proportions with one scale factor
- Keep the opening in the clipping geometry
- Check bounds and the exported result
- Recover a raster silhouette when necessary
- FAQ
- Sources
Use clipPathUnits="objectBoundingBox" when a clipping shape should stretch with the target's bounds. Normalize the shape's coordinates first. Use userSpaceOnUse when you need explicit placement or uniform scaling that preserves the shape's proportions.
Changing the attribute alone does not convert a path drawn in hundreds of units into a shape between zero and one. It can move nearly the entire clip outside the target. This guide uses one original bookmark silhouette to show the coordinate change, the resulting distortion, and a centered fit that keeps the diamond opening square.
Clipping controls visibility. It does not trim the underlying paths into new editable geometry. If you already have a clean SVG silhouette, use it directly; tracing is relevant only when you need to recover that silhouette from a raster image.
Choose the coordinate system before resizing
The default is userSpaceOnUse. Its clip coordinates belong to the user coordinate system of the element referencing the clip. With objectBoundingBox, the target's top-left bound maps to (0, 0) and its bottom-right bound maps to (1, 1). See the clipPathUnits reference.
| Requirement | Coordinate choice | Work you must do |
|---|---|---|
| Keep a clip in known local coordinates | userSpaceOnUse | Position the path relative to the target |
| Stretch the silhouette to each target | objectBoundingBox | Normalize the source path and accept unequal axis scaling |
| Fit the silhouette without distortion | userSpaceOnUse | Calculate a uniform scale and centering translation |
The target's bounding box is not necessarily the outer SVG's viewBox. Clipping a group uses that group's bounds, which may differ from a rectangle inside it. For a predictable first test, apply the clip directly to a rectangle with known dimensions.
Compare a wide target with a tall one
Our bookmark's outer bounds are x=20, y=10, width=100, height=100. Its diamond is a second subpath within the same path. The test applies it to rectangles measuring 200 × 120 and 120 × 200 in local SVG units.
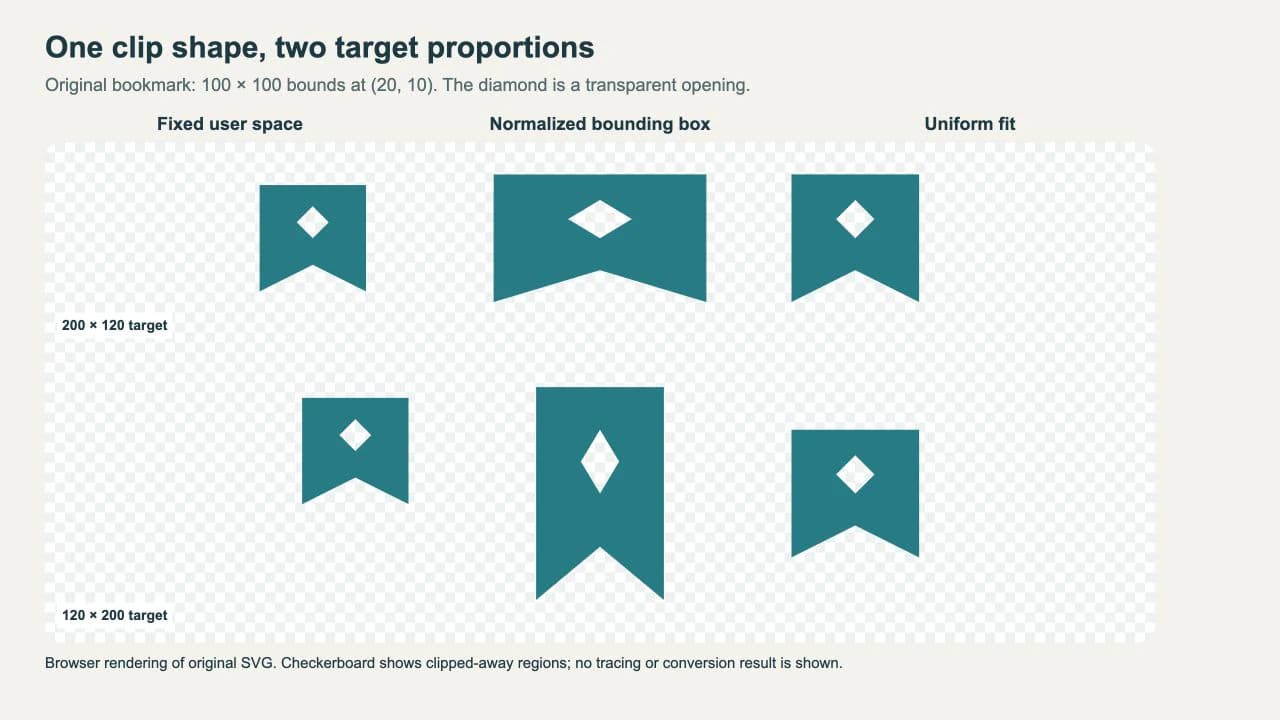
The middle column fills each target's bounds, but its diamond becomes wide or tall. The right column preserves the diamond and bottom notch, leaving space along the target's longer axis. All six openings remain transparent.
Save the complete example below as clippath-comparison.svg and open it in a browser. The columns follow the image order. The top row uses wide rectangles; the bottom row uses tall ones. The display translations arrange the samples and do not change their local target dimensions.
<svg xmlns="http://www.w3.org/2000/svg" viewBox="0 0 720 470">
  <defs>
    <path id="silhouette" d="M20 10H120V110L70 85L20 110Z M70 30L85 45L70 60L55 45Z"/>
    <clipPath id="fixed" clipPathUnits="userSpaceOnUse">
      <use href="#silhouette" clip-rule="evenodd"/>
    </clipPath>
    <clipPath id="box" clipPathUnits="objectBoundingBox">
      <use href="#silhouette" clip-rule="evenodd"
        transform="matrix(.01 0 0 .01 -.2 -.1)"/>
    </clipPath>
    <clipPath id="wide-fit" clipPathUnits="userSpaceOnUse">
      <use href="#silhouette" clip-rule="evenodd"
        transform="matrix(1.2 0 0 1.2 16 -12)"/>
    </clipPath>
    <clipPath id="tall-fit" clipPathUnits="userSpaceOnUse">
      <use href="#silhouette" clip-rule="evenodd"
        transform="matrix(1.2 0 0 1.2 -24 28)"/>
    </clipPath>
  </defs>
  <g fill="#107c86">
    <rect x="0" y="0" width="200" height="120"
      transform="translate(20 30)" clip-path="url(#fixed)"/>
    <rect x="0" y="0" width="200" height="120"
      transform="translate(260 30)" clip-path="url(#box)"/>
    <rect x="0" y="0" width="200" height="120"
      transform="translate(500 30)" clip-path="url(#wide-fit)"/>
    <rect x="0" y="0" width="120" height="200"
      transform="translate(60 230)" clip-path="url(#fixed)"/>
    <rect x="0" y="0" width="120" height="200"
      transform="translate(300 230)" clip-path="url(#box)"/>
    <rect x="0" y="0" width="120" height="200"
      transform="translate(540 230)" clip-path="url(#tall-fit)"/>
  </g>
</svg>
The teal paint belongs to the rectangles. The clipping path supplies their visible outline. The screenshot adds labels and a checkerboard around this same SVG; the standalone file itself has a transparent background.
Normalize the source bounds, including their origin
For a point (x, y) in a source whose bounds are (minX, minY, width, height), calculate:
normalizedX = (x - minX) / width
normalizedY = (y - minY) / height
Here that is (x - 20) / 100 and (y - 10) / 100. The matrix in the box definition performs both operations without rewriting the path data:
matrix(0.01 0 0 0.01 -0.2 -0.1)It maps (20, 10) to (0, 0) and (120, 110) to (1, 1). Dividing by 100 without subtracting the origin would leave the shape offset inside the target. The bounding-box mapping then scales the normalized result independently along the target's width and height.
Use the actual bounds of the geometry you want to normalize. A viewBox may include deliberate whitespace, so its dimensions need not equal the silhouette's bounds. If you want to retain that whitespace, use the viewBox rectangle deliberately rather than accidentally mixing the two measurements.
For imported artwork with nested transforms, measure and normalize in one consistent coordinate system. Resolve those transforms in an editor before copying raw path data if you cannot confidently account for them. The SVG editing workflow covers inspecting paths and groups before delivery.
Preserve proportions with one scale factor
For a target rectangle at local (0, 0) with width W and height H, use:
s  = min(W / width, H / height)
tx = (W - s * width) / 2 - s * minX
ty = (H - s * height) / 2 - s * minY
matrix(s 0 0 s tx ty)
The wide target gives s=1.2, tx=16, and ty=-12. Its clip occupies x=40..160 and y=0..120. The tall target gives s=1.2, tx=-24, and ty=28, placing the clip at x=0..120 and y=40..160.
These are explicit matrices in userSpaceOnUse, so recompute them when the target's local dimensions change. Merely displaying the whole SVG at a different CSS size scales the composition together. Changing a rectangle from wide to tall inside it is a different operation.
This calculation assumes nonzero source width and height and no unaccounted-for rotation or skew. It is a fit-inside operation: leaving space is expected. Stretching with bounding-box units is appropriate when filling the target matters more than preserving the motif's proportions.
Keep the opening in the clipping geometry
The example places clip-rule="evenodd" on each use inside its clipPath. The referenced path contains both the outer bookmark and the diamond subpath. The rule determines which regions of that compound shape are inside the clip.
Putting clip-rule on the teal rectangle does not set the clipping shape's rule. Likewise, a fill-rule used to paint the source is not a substitute for the clipping rule. MDN's clip-rule reference explains its scope within a clipPath.
Do not add a separate white diamond and expect it to subtract from the clip. Child silhouettes in a clipping path are combined into a visible region; their paint colors do not act as black-and-white mask values. For a hole like this one, use the compound path and its intended winding rule. The filled SVG holes guide explains the underlying path structure.
If your design needs partially transparent edges or luminance-based visibility, consider an SVG mask. A clip is useful for a geometric boundary; a mask offers a different visibility model.
Check bounds and the exported result
A horizontal or vertical line can have a zero-height or zero-width geometric bounding box even when its stroke is visible. Avoid objectBoundingBox for such targets, and do not divide by a zero source dimension when normalizing. The SVG coordinate specification excludes stroke width from this bounding-box calculation and warns against these degenerate cases.
Before delivery:
- Confirm that the referenced clip ID exists and is unique in the document.
- Compare wide and tall targets, including the smallest opening.
- Check both the source bounds and the target bounds in their intended coordinate systems.
- Save and reopen the exported SVG in the application that will consume it.
- Keep the original geometry when the clip must remain editable.
The CSS Masking specification states that clipping changes rendering, not the element's inherent geometry. A cutter or geometry-processing application may therefore need an actual path intersection or another editor operation. Confirm the resulting paths in that application; a correct browser preview alone does not establish a cut-ready file.
Recover a raster silhouette when necessary
PerfectVector fits when a custom motif survives only as a PNG or JPG and you need editable contours for the clip. Convert that image to SVG, then inspect the outer edge, inner openings, and any unwanted background shapes before extracting the silhouette. Choose which contours belong in the clip; the source's colors do not define separate clipping strengths.
Keep an existing vector master if you have one. A simple geometric bookmark can be drawn directly, as this example was. Vectorization does not choose clip units, normalize bounds, or perform a permanent Boolean trim. For broader source-selection advice, read the image vectorization overview.
FAQ
Does objectBoundingBox preserve the shape's proportions? No. It maps the normalized clip to the target's width and height independently. Use a uniform scale in userSpaceOnUse when the silhouette must keep its proportions.
Why does changing clipPathUnits hide my shape? The path coordinates may still be in the source's original units. Normalize them to the target-relative coordinate system, including the source origin, or retain userSpaceOnUse and position them explicitly.
Does clipping delete the hidden parts of my SVG? No. Clipping changes what is rendered while retaining the underlying geometry. Use an appropriate path-editing operation if the delivered file needs permanently trimmed contours.
Sources
- MDN — clipPathUnits — Coordinate choices and the default user-space interpretation.
- MDN — clip-rule — Winding-rule placement inside clipping paths.
- W3C — SVG coordinate systems — Bounding-box mapping, stroke exclusion, and zero-dimension limitations.
- W3C — CSS Masking — Clipping geometry, combined silhouettes, and unchanged underlying paths.
If your clip starts with a raster motif, prepare its SVG with PerfectVector, inspect the silhouette and openings, then test both target proportions before choosing stretching or a uniform fit.
More from the blog
Paper.js SVG Booleans: Cut and Join Imported Artwork
Import SVG paths into Paper.js, join overlapping shapes, subtract a real opening, and check the exported file with a small, reproducible browser example.

SVG Pointer Events: Match Click Areas to Your Artwork
Control SVG click areas with fills, strokes, holes, and separate hit targets. Test event routing and keep keyboard activation on a native button or link.