Convert Pixel Art to Vector Without Losing Sharp Edges
Convert pixel art to SVG with the square grid intact, or choose a smooth contour trace on purpose. Learn the right workflow, trade-offs, and checks.
On this page
You can convert pixel art to vector, but first decide whether the square pixels must remain visible. To preserve the original look, rebuild the image as a grid or object mosaic. To turn the sprite into a smooth illustration, use contour vectorization. Those are different outputs, and a generic trace cannot choose the right one for you.
If you are editing a game sprite in Scratch, its Convert to Vector button changes the editing mode without tracing the bitmap. Use the Scratch costume editability checks to decide whether to keep the pixels, redraw a part, or import traced SVG shapes, then compare the replacement costume's center with the original.
If the real goal is simply to show crisp pixel art on a website or in a game, you may not need an SVG at all. A correctly sized PNG with nearest-neighbor-style scaling is often smaller and truer to the source; on the web, the image-rendering property provides crisp-edges and pixelated behaviors intended to preserve hard edges.
Choose the result before the tool
- Keep a PNG when the artwork is already the right size and only needs crisp raster display.
- Build a grid SVG when every square and stair-step edge is part of the design.
- Use contour vectorization when you intentionally want smooth silhouettes and editable curves.
- Do not call a smoothed result “preserved pixel art.” It is a vector reinterpretation.
Three outputs that solve three different jobs
| Output | What happens to the pixels | Best for | Main trade-off |
|---|---|---|---|
| PNG with nearest-neighbor scaling | The raster grid stays untouched | Games, web icons, sprites, screen display | Still raster and tied to a pixel grid |
| Grid or object-mosaic SVG | Each cell becomes a vector tile or merged rectangular region | Large displays, plot layouts, editable color grids | Can create many objects and a larger file |
| Smooth contour SVG | Color regions become conventional curves and shapes | Logos, stickers, print graphics, simplified illustration | The blocky pixel character changes |
This is less about which format is “better” and more about what the blocks mean. In pixel art, stair-step edges are often deliberate. Smoothing them can be as destructive as adding blur to a line drawing.
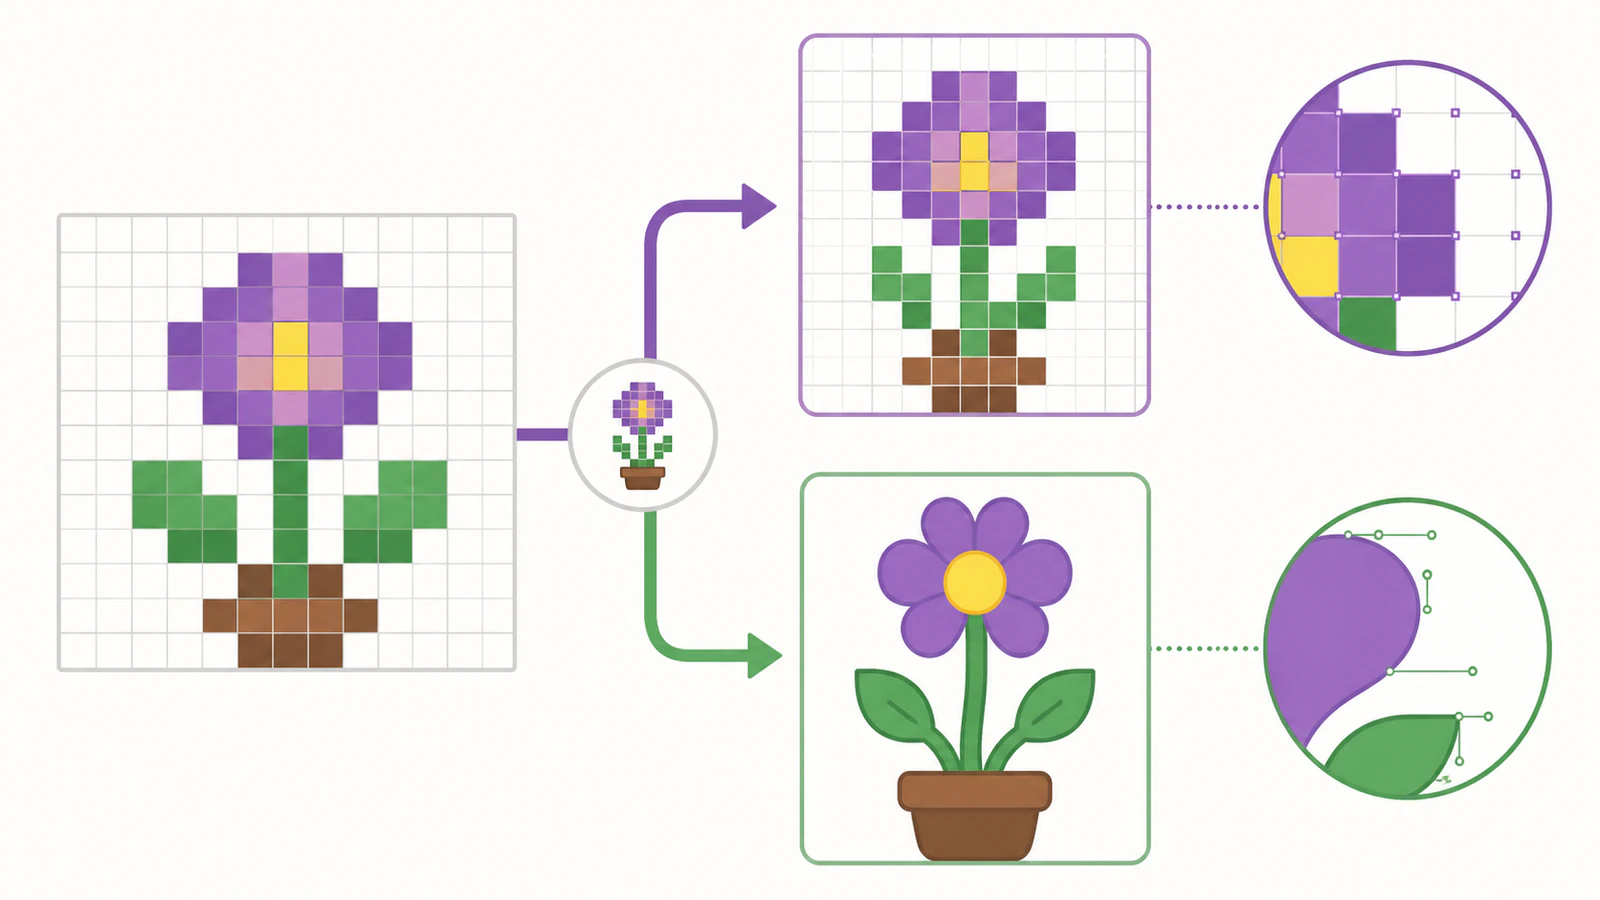
Route 1: preserve the pixel grid exactly
The most literal vector conversion turns the raster cells into vector rectangles. A red pixel becomes a red square. A run of adjacent red pixels can remain separate squares or be merged into a larger rectangular shape when that does not change the silhouette.
Before you begin, find the artwork's true grid dimensions. A sprite displayed at 800 by 800 pixels may have started as a 32 by 32 grid enlarged with nearest-neighbor scaling. The 32 by 32 structure is what you want to reproduce, not the enlarged display dimensions.
Illustrator Object Mosaic workflow
Adobe documents a built-in route for converting an embedded bitmap into a mosaic:
- Place the original pixel art in Illustrator and embed it.
- Select the image and choose Object > Create Object Mosaic.
- Set the tile count to match the original pixel grid when you know it.
- Use square tiles and color output.
- Keep the source raster until you have inspected the mosaic, then remove or hide it.
- Compare the outer silhouette, interior gaps, and palette against the original at high zoom.
Adobe's Create Object Mosaic documentation describes the command, square-tile option, color setting, and source-raster handling. The pixel-art workflow is a practical use of that documented mosaic behavior.
An object mosaic can be structurally faithful and still inefficient. A 64 by 64 sprite has 4,096 cells before any merging. Remove fully transparent cells, combine adjacent same-color rectangles where possible, and avoid carrying invisible objects into the final SVG.
Route 2: make a grid SVG without Illustrator
You can build the same kind of file with a pixel-aware script or purpose-built converter. The principle matters more than the app:
- Read the source at its native grid size.
- Map each non-transparent pixel to an exact vector rectangle.
- Preserve the palette values without anti-aliasing.
- Merge neighboring cells only when the merged shape produces the same visible grid.
- Export with an SVG
viewBoxthat matches the native grid dimensions. - Test the SVG at integer and non-integer display sizes.
The open-source vectorize-pixelart project is one example of a pixel-specific conversion utility. It also illustrates a general limit: large or complex grids can produce heavy SVG output. Treat an older utility as research material first. Review its code and maintenance state before adding it to a production workflow.
If you are comfortable with SVG markup, a tiny sprite can also be rebuilt manually with <rect> elements. That is reasonable for a 12 by 12 icon. It is not a sensible afternoon for a detailed scene.
Route 3: smooth the shapes on purpose
Sometimes the pixels are a draft rather than the identity. You may want the character, flower, or icon to become a clean sticker, print graphic, or logo with rounded contours.
If you deliberately want that smoothed interpretation, PerfectVector fits the contour route. Upload the largest nearest-neighbor version of the artwork you have, then judge the result as a new illustration:
- Remove anti-aliasing first. Soft fringe pixels create extra colors and tiny edge shapes.
- Keep the palette controlled. If the source uses eight colors, a trace should not invent dozens because of compression or blur.
- Inspect stepped diagonals. Decide which should become straight segments and which should become curves.
- Check holes and one-pixel gaps. Small openings may close when neighboring regions are simplified.
- Review the node count. The point of smoothing is not to replace every square corner with several tiny curves.
- Test at the destination size. A friendly smooth curve at poster size may erase a face or hand at icon size.
This route changes the art. Save the source PNG beside the SVG so nobody mistakes the vector interpretation for an exact archival version.
Prep problems that make every route worse
The source was resized with smoothing. Return to the native sprite or rescale it with nearest-neighbor interpolation. Once new blended edge colors have been baked in, the original grid is harder to recover.
The file is a JPG. Compression creates color blocks and ringing around every hard pixel edge. Use the original PNG whenever possible.
The transparent background became matte white. A white background can become thousands of unwanted cells or one large traced shape. Restore transparency before conversion, then check the result on a contrasting canvas. Our guide to transparent SVG backgrounds covers that audit.
The artwork contains semi-transparent effects. Glows, shadows, and partial opacity are not traditional pixel cells. Decide whether to preserve them as raster effects, quantize them into solid colors, or redesign them for the vector version.
Do you need vector for a website?
Not necessarily. If the artwork is a game sprite or interface icon, a PNG can remain the correct master. Use a native-size asset, scale it by whole-number multiples when possible, and configure the browser or rendering engine to use pixelated or nearest-neighbor interpolation.
An SVG grid helps when the palette must be edited as objects, the work needs to print at a large size, or the delivery system specifically requires vector. It does not automatically make a small screen asset lighter. A vector object for every cell can outweigh a compact PNG.
This is one of the cases where “SVG scales forever” is true but incomplete. The artwork may scale forever while becoming expensive to store, edit, or render. Our PNG versus SVG guide explains the broader format decision, and what image vectorization means covers why conventional traces favor shapes over pixel grids.
Final preflight
Before you deliver the file, compare it with the original at native size and at the intended output size.
- The grid dimensions match the source.
- No anti-aliased fringe colors were introduced.
- Transparent cells remain transparent.
- Stair-step silhouettes are intact in the preservation route.
- Smoothed edges are intentional in the contour route.
- One-pixel gaps, eyes, highlights, and interior holes still read correctly.
- Repeated same-color cells are simplified only where the picture remains identical.
- The SVG does not embed the original raster by accident. If it does, it may still look pixelated despite the file extension.
The cleanest workflow is the one that names its trade. Preserve the grid when the pixels are the art. Smooth the contours when you want a new vector interpretation. Keep the PNG when vector adds no useful control.
Sources
- Adobe Illustrator — Creating sketches and mosaics — the Object Mosaic command, square tiles, color output, and embedded-raster requirement.
- MDN — CSS
image-rendering— nearest-neighbor-style rendering for pixel art on the web. - W3C — PNG Specification, Third Edition — PNG's lossless raster model and alpha-channel behavior.
- W3C — SVG Basic Shapes — the rectangle geometry used for literal grid-cell SVGs.
- W3C — SVG Coordinate Systems and
viewBox— mapping a native grid coordinate system into an SVG viewport.
If you want smooth contours rather than a preserved grid, run the artwork through PerfectVector, then compare the silhouette, one-pixel gaps, and small details against the pixel master before you use it.
More from the blog

Why Your Logo Looks Pixelated (And How to Fix It for Good)
Your logo looks pixelated because it's a raster image being stretched. The permanent fix is a vector. Here's how to diagnose it and get a crisp logo at any size.

Clear Sticker Artwork: Plan White Ink and Transparent Areas
Plan clear-sticker artwork with separate color and white regions. Compare full and selective white, preserve clear areas, and check your supplier's proof.