Scratch Convert to Vector: Why It Still Looks Pixelated
Scratch's Convert to Vector button changes editing mode without tracing the bitmap. Check costume points, choose a fix, and inspect an imported SVG before use.
On this page
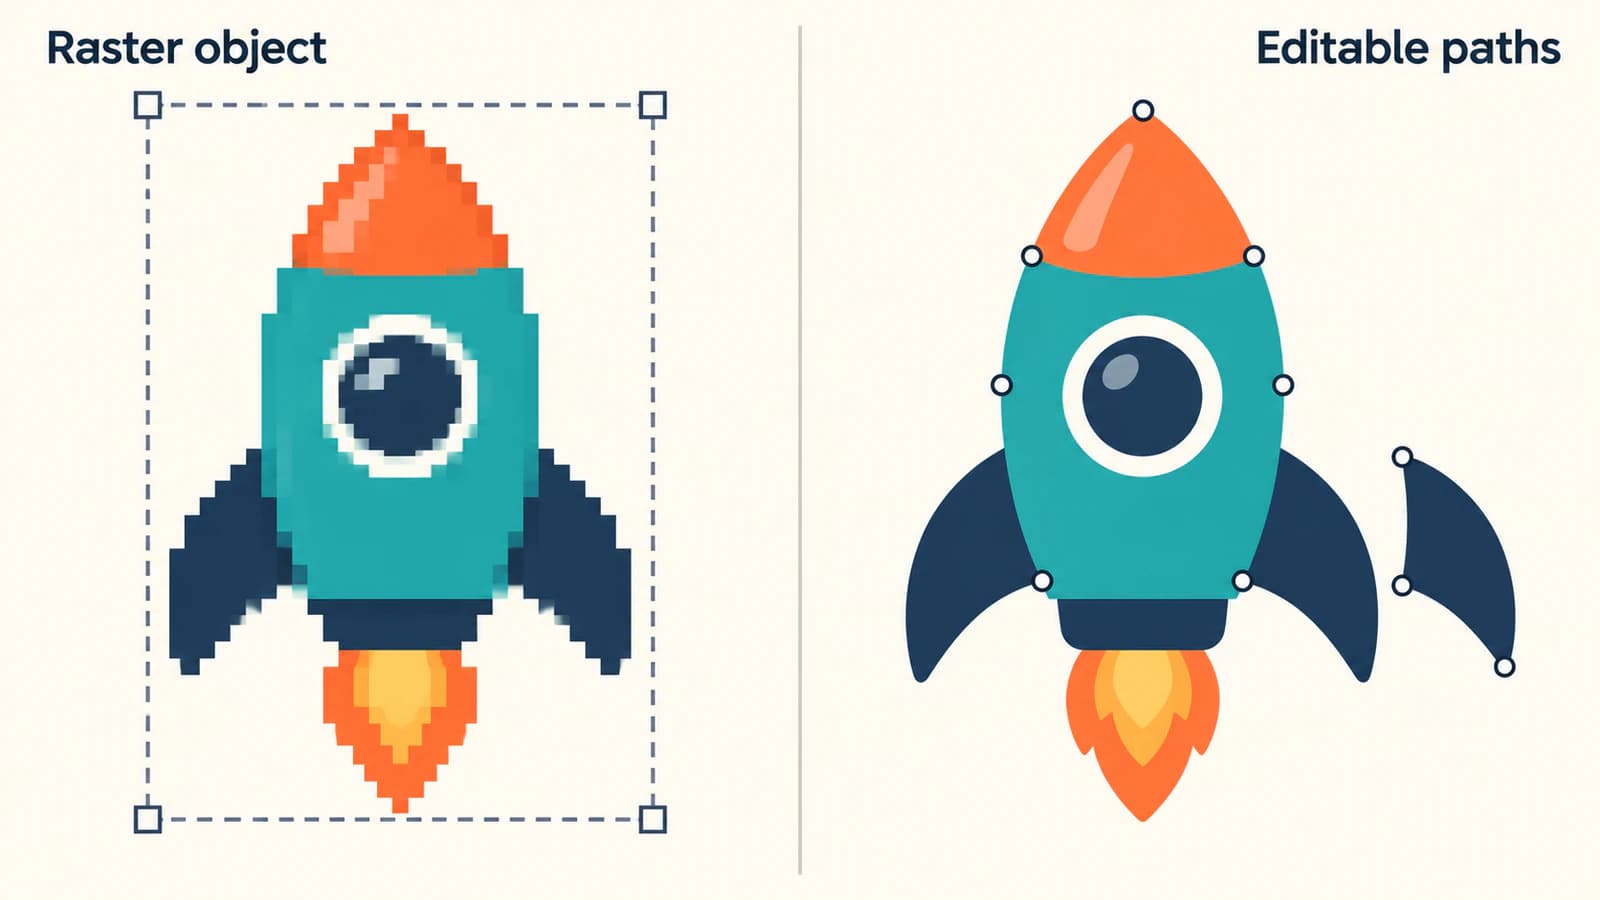
Scratch's Convert to Vector button does not trace the outlines of a bitmap costume. It brings the raster artwork into vector editing mode, where it can remain one image object. That is why a PNG costume can still look pixelated after you click it. The current Scratch paint editor source retains a raster object during this operation; it does not rebuild the colored regions as paths.
For a costume you want to reshape or recolor in pieces, you need newly drawn or traced vector shapes. For intentional pixel art, keeping the bitmap may be the right choice. Start by checking the selected costume, then choose the amount of rebuilding your project needs.
What the button changes
Open your sprite's Costumes tab and select the costume you want to inspect. The conversion button names the mode you can switch to: Convert to Vector appears in bitmap mode; Convert to Bitmap appears in vector mode.
Changing mode gives you a different set of editing tools. It does not mean every object on the canvas now has an editable outline. A vector costume can contain a raster image alongside shapes you draw yourself. The underlying distinction is the same one explained in our guide to SVGs that contain raster images.
Keep a copy of the original costume before experimenting. In particular, converting drawn vector artwork to bitmap flattens its geometry into pixels. Switching back afterward does not recreate the old points. Use Undo or your preserved original if you need those shapes back.
Check the costume in three ways
A bounding box alone proves very little: both a picture and a group of vector shapes can have one. Check the actual part you want to edit. The following diagnostic uses a rocket as an example, but an animal, badge, or classroom icon works just as well.
- Check the contour. In a duplicate costume, choose Reshape and click the edge of the rocket's fin. Look for points that follow that edge, rather than handles around a rectangle. If the artwork is grouped, select it and use Ungroup when available before checking a part. If you are unsure whether you are using Reshape correctly, draw a temporary circle beside the artwork and compare how the tool selects it.
- Check one color. Select the rocket's nose and try changing its Fill. Can you recolor that region without changing the body or other parts? Undo the trial edit. A whole-image selection does not give you an independently editable nose, even if the picture shows several colors.
- Check it where it will appear. Compare the costume in the editor with its appearance on the Stage at the size your project uses. Contour editability and on-screen sharpness are separate checks. A rough Stage preview alone is not enough reason to trace artwork that already has useful paths.
| What you find | What to check next | Useful next step |
|---|---|---|
| The costume came from PNG, and its colored edges have no points | Confirm you are inspecting the image rather than a new shape drawn over it | Keep the bitmap, redraw, or trace the source image |
| The artwork selects as a group | Ungroup when available and inspect a component | Edit the existing shapes before considering another conversion |
| Some parts have points and others remain pictures | Identify the particular region that needs editing | Rebuild only that raster region if the rest already works |
| The shape has points but looks rough only on the Stage | Check its intended display size and compare with the source SVG | Investigate the display before replacing the artwork |
For the last case, the broader SVG pixelation diagnostic helps separate file content from how an application displays it.
Choose the fix that matches the artwork
Keep bitmap when the pixels belong in the design
A small pixel character does not become a better costume just because its file is vector. If its stepped edges, tiny eyes, and limited palette are deliberate, judge it at the size you intend to use. Keep the original image and avoid repeated resizing while experimenting.
The same applies to a photo or painted backdrop whose texture matters more than editing individual outlines. Tracing those details into shapes changes the artwork. If you want square pixels preserved inside an SVG, that is a different task from smoothing a silhouette; our pixel art conversion guide explains the choice.
Redraw a simple costume with Scratch's vector tools
For a rocket made from a body, nose, window, and fins, drawing those parts separately gives you direct control over their structure. Start a new painted costume in vector mode. Use the circle, rectangle, line, and brush tools to build the major parts, then adjust contours with Reshape.
Work from the largest silhouette inward. Add the small window after the body reads clearly at its intended size. Keep a fin as a separate object if you will need to move it independently. This is a design choice: an automatic trace cannot decide which pieces your later edits will require.
You can also use an external vector editor to build the shapes. Pinnguaq's original vector art tutorial for Scratch demonstrates importing SVG artwork, selecting its components, changing fills, and arranging elements. That is the sort of editable structure to aim for.
Trace suitable clipart when the source is raster-only
Tracing is useful when you already have a flat illustration you want to keep, but drawing every contour again would be unnecessary work. Use the clearest source PNG or JPG you have. For this route, PerfectVector can reconstruct suitable clipart as SVG paths that you can inspect before importing into Scratch. The point is to recover editable shapes from the source picture; the costume still needs an editing check afterward.
A trace follows visible regions. It may divide a fin into several pieces or merge touching areas you wanted to move separately. Small eyes, narrow gaps, and lettering deserve particular attention. If your goal is to understand how that reconstruction works, start with image vectorization explained.
Import the SVG and check the costume center
Scratch's costume uploader accepts SVG as vector artwork. Import the downloaded SVG itself, rather than a screenshot or PNG preview of it.
- Select the existing sprite and open Costumes. Use Upload Costume from the costume chooser to add the SVG alongside your original. Use Upload Sprite instead when you want a separate sprite.
- Compare the imported artwork with the source. Check the outline, gaps between parts, eyes, and background. If the source already had vector shapes, repair or re-export that SVG rather than tracing a raster preview of it.
- Repeat the contour and single-color checks. Confirm that the parts you need are editable, then undo the trial edits. Remove any temporary comparison shapes from your working copy.
- Check placement against the costume editor's center crosshair. Keep the same visual reference point across related costumes: for a rocket, you might use the middle of the body. Adjust the artwork as needed and compare it with the original costume on the Stage.
- Switch between the original and the replacement without moving the sprite. Look for an unwanted jump, a change in apparent size, or a background rectangle. Keep the original until you are satisfied with the replacement.
Scratch stores a rotation center for each costume; its costume-loading code obtains one from the renderer when none is supplied. That is why matching the visible drawing is only part of the import check. Its placement relative to the costume center also needs to suit your project.
FAQ
Does Convert to Vector make a Scratch costume less pixelated? It does not trace or smooth the bitmap's contours. The costume changes editing mode while its raster artwork can remain an image object. To create editable outlines, redraw the artwork or import an SVG containing traced paths.
Why can I move a costume but not reshape its edges? Moving an image object does not require points on its visible outline. Check whether you have selected a group, then inspect a component with Reshape. A bitmap retained in vector mode does not gain contour points from the mode switch.
Will tracing a sprite create separate arms, legs, or other movable parts? Do not assume it will. Tracing reconstructs visible regions, which may differ from the parts you want to move. Inspect the imported shapes and separate or redraw components as needed.
Sources
- Scratch Foundation: bitmap conversion implementation — Shows the raster-preserving conversion to vector editing mode.
- Scratch Foundation: costume file uploader — Confirms that SVG costume uploads use the vector asset format.
- Scratch Foundation: vector costume loading — Shows how an imported costume receives a rotation center.
- Pinnguaq: Working With Vector Graphics Art in Scratch — Demonstrates SVG import and editing individual shapes, fills, and arrangement.
If your costume started as flat raster clipart and you need editable contours, convert your source image to SVG with PerfectVector. Import the result as a new costume, then check one outline, one color, and the costume center before replacing the original.
More from the blog
MapLibre SVG Icons: Check Pixels and Symbol Size
Decode custom SVG artwork for a MapLibre symbol layer, control image density and icon size, and keep an editable master. Verify the displayed shape and opening.

Satori SVG Logos: Keep Artwork in a Branded Card
Embed an SVG logo in a Satori card with explicit dimensions and self-contained image data. Inspect the nested artwork, then render a separate PNG delivery file.