How to Turn an ICO File Into an Editable SVG
An ICO can hide several bitmap sizes of the same icon. Learn how to recover the strongest source, trace real editable SVG paths, and know when to redraw.
On this page
- What is inside an ICO file?
- Extract, wrap, trace, or redraw?
- How PerfectVector chooses the ICO source
- Recover the icon step by step
- 1. Search for a better master
- 2. Preview the ICO at several sizes
- 3. Decide what the recovered SVG is for
- 4. Vectorize the strongest representation
- 5. Inspect the SVG as artwork
- 6. Test the icon at both large and small sizes
- What not to trace literally
- Stair-step pixels
- Anti-aliasing fringes
- Small-size optical edits
- Painted checkerboards
- When a manual redraw is better
- FAQ
- Sources
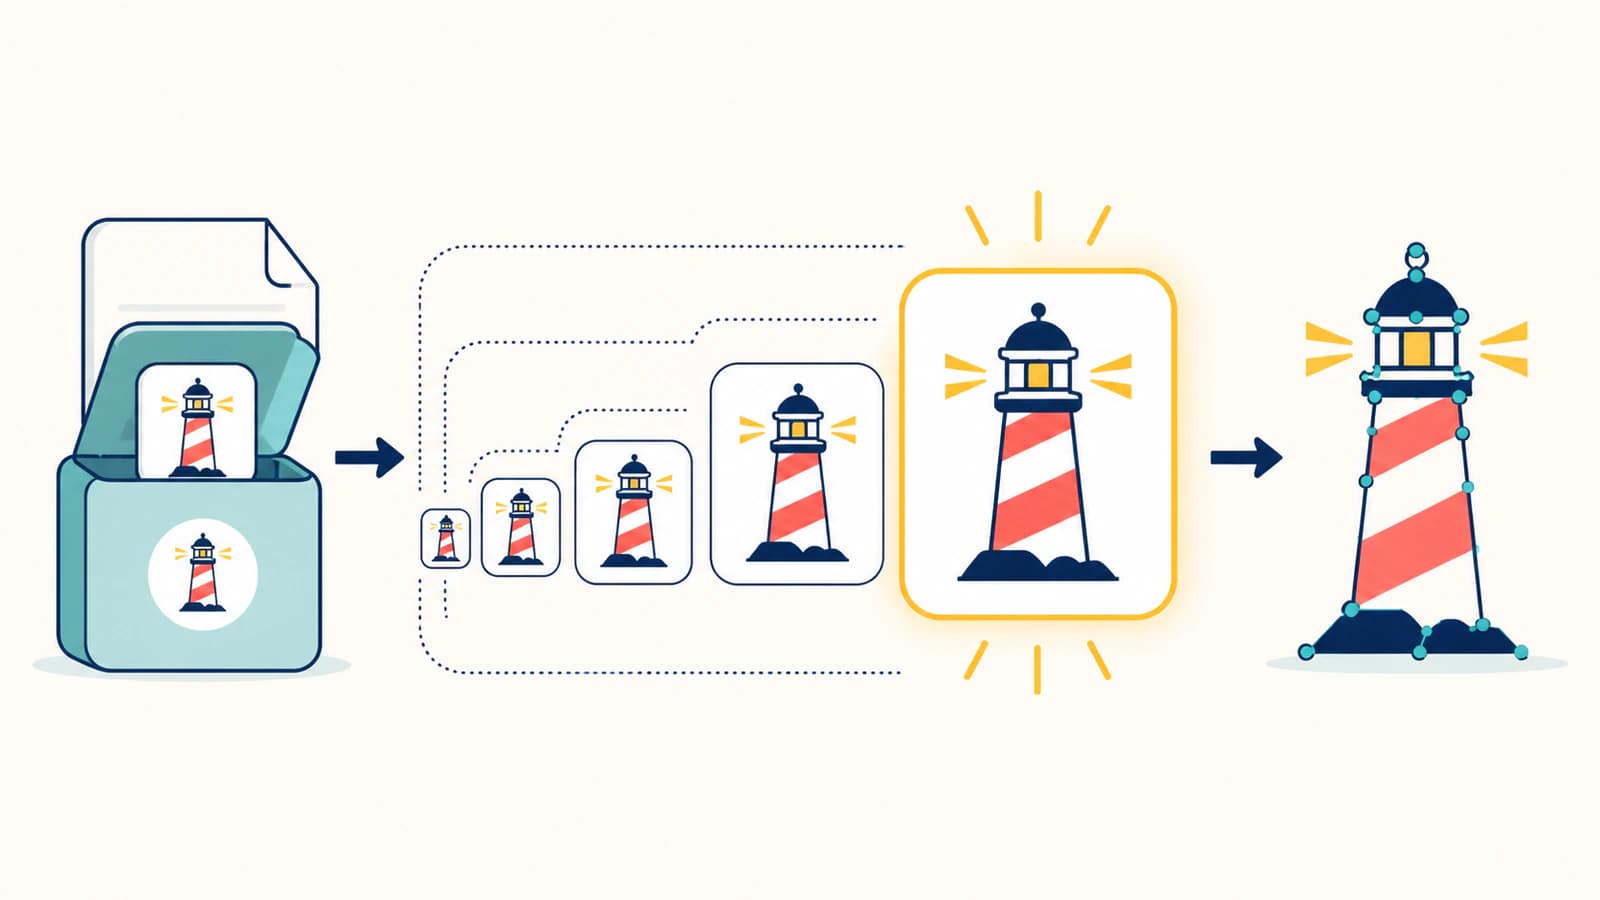
You can turn an ICO file into an editable SVG, but first understand what you are recovering. An ICO is usually a container of bitmap versions of the same icon at different sizes and color depths. It does not contain a dormant vector master waiting to be extracted. A real conversion chooses the strongest embedded image and traces its pixels into new paths.
That can recover a clean favicon, app mark, or legacy interface icon when the original design file is gone. It cannot restore curves or details that never existed in the largest bitmap. Find the original SVG, AI, or source file first if you can; trace the ICO when recovery is the only practical route.
If the lost source is a Mac .icns file rather than a Windows .ico, use the ICNS to SVG converter so the correct icon container is inspected before tracing.
The recovery rule
- An ICO may contain several raster representations, not vector objects.
- Start from the largest valid embedded image rather than the smallest favicon size.
- Trace it into real paths, then test editability and transparency.
- Treat subpixel anti-aliasing as screen rendering, not design detail.
- Redraw simple or brand-critical geometry when the bitmap is too small to define the original curves.
What is inside an ICO file?
ICO packages icon representations for different display sizes and capabilities. Microsoft’s icon documentation explains that an icon resource can contain images in multiple sizes and color depths. Those versions can differ slightly because a designer adjusted pixels by hand for small-size clarity.
That creates two recovery problems:
- Which representation should become the source? The largest image usually carries the most geometric information.
- Which differences are intentional? A tiny favicon may use thicker strokes, fewer details, or shifted pixels so it reads at small size. Those are optical adjustments, not necessarily the shape of the master icon.
A converter that silently traces an arbitrary small entry can give you a blocky SVG even when a stronger image exists in the same container. A converter that merely embeds the bitmap inside an SVG gives you no editable paths at all.
Think of source selection as a recovery step before tracing. Start with the representation that exposes the most edge information, then decide which small-size optical edits should survive in the recovered design.
Extract, wrap, trace, or redraw?
These operations are easy to confuse:
| Operation | What happens | Editable paths? | When it fits |
|---|---|---|---|
| Extract | Saves one embedded PNG/DIB representation | No | You only need the best raster copy |
| Wrap | Places the bitmap inside an SVG document | No | Rarely useful for recovery |
| Trace | Reconstructs the selected pixels as vector shapes | Yes | The icon is clear and the original vector is gone |
| Redraw | Rebuilds the geometry intentionally | Yes | The source is tiny, simple, or brand-critical |
Run a quick test after any online conversion: open the SVG, zoom in, and select the artwork. One image-sized selection or blocky zoomed edges means the pixels were wrapped. Individual shapes and control points mean you have a trace.
The broader image-vectorization guide explains why tracing is a reconstruction rather than a format rename.
How PerfectVector chooses the ICO source
PerfectVector inspects the ICO directory and its referenced payloads before decoding. It supports static PNG representations and common uncompressed Windows bitmap representations. From the valid supported entries, it chooses deterministically:
- largest pixel area;
- higher bit depth when area ties;
- PNG when area and depth tie;
- earlier source order as the final tie-breaker.
That rule is silent because ICO entries are expected to be resolution variants of one icon, not different pages or animation frames. The selected representation is decoded locally to a verified PNG, then sent through the normal vectorization path.
Animated PNG payloads inside ICO are not treated as static icons, and CUR cursor files are a separate format with hotspot coordinates in their directory entries, as documented in Microsoft’s resource file format reference. They are not part of this workflow.
This is where PerfectVector fits the recovery job: it starts with the strongest supported representation instead of asking you to guess an entry, then rebuilds that still as editable SVG paths. The choice is deterministic, but the quality ceiling still comes from the pixels stored in the ICO.
Recover the icon step by step
1. Search for a better master
Check the website repository, app resources, brand folders, old design exports, and the person who created the icon. An SVG, AI, EPS, PDF with real paths, or even a large transparent PNG is a better source than an ICO assembled for small screens.
2. Preview the ICO at several sizes
Use an icon viewer or file inspector if available. Look for the largest representation and compare it with the small ones. Note details that disappear, strokes that become heavier, and edges that change to fit the pixel grid.
3. Decide what the recovered SVG is for
- Editable master or large display: follow the largest representation, then correct its geometry.
- A new favicon: preserve the design, but plan fresh small-size exports and test them individually.
- Print or signage: only proceed if the largest bitmap clearly defines every important curve. Otherwise redraw.
- Archival extraction: save the largest embedded raster as well as the traced SVG.
4. Vectorize the strongest representation
Upload the file to the ICO to SVG converter. PerfectVector selects the largest supported entry, normalizes it, and traces the icon into paths.
5. Inspect the SVG as artwork
Check the silhouette, holes, straight edges, repeated corner radii, symmetry, and color regions. Delete any background rectangle that came from a non-transparent source. Open the file in a vector editor and confirm that the shapes can be selected and recolored.
6. Test the icon at both large and small sizes
Large zoom exposes wobbly curves and too many nodes. Small display exposes a different problem: a geometrically clean master can still look weak at 16 or 32 pixels. Export fresh raster sizes from the SVG and adjust those derivatives if necessary; do not distort the master to imitate every old pixel.
What not to trace literally
Stair-step pixels
Diagonal and curved edges in a small icon are built from square pixels. The recovered SVG should infer the intended curve, not draw a tiny square for every step unless the artwork is deliberately pixel art.
Anti-aliasing fringes
Soft edge colors help a bitmap look smooth against a particular background. If every fringe shade becomes a shape, the SVG gets bloated and may show a halo on a different background. Recover the solid contour and check transparency instead.
Small-size optical edits
A designer may thicken a stroke or open a gap for the 16-pixel version. Do not average every size into one confused master. Start with the largest representation, then use the small entries as references for future exports.
Painted checkerboards
A checkerboard inside the image is not transparency. If it was baked into the ICO, it will trace as squares. The transparent-background guide explains how to tell real alpha from painted background pixels.
When a manual redraw is better
Redraw when:
- the largest valid representation is still tiny;
- circles, rounded rectangles, or symmetry must be exact;
- text or lettering is present;
- the icon is a current trademark or brand asset;
- the trace produces many fragments for what should be a few simple shapes;
- you need a family of consistent icons, not one recovered artifact.
Simple icons are often faster to rebuild with rectangles, circles, and Bézier curves than to repair after a literal trace. Recovery is most valuable when the mark has enough irregular detail that tracing gives you a useful editable base.
For logos, apply the verification steps in how to vectorize a logo, especially the advice to keep the recovered SVG as a master and export each delivery format from it.
FAQ
Is an ICO file already a vector? No. An ICO normally contains one or more bitmap icon representations. It can package multiple sizes, but those images are still pixels. An editable SVG requires tracing or redrawing them into paths.
Which image inside an ICO should I vectorize? Start with the largest valid representation because it usually carries the most shape information. Use smaller entries as references for small-size optical adjustments, not as the master when a larger source exists.
Why does my ICO-to-SVG result still pixelate? The converter may have embedded the bitmap inside an SVG wrapper instead of tracing paths. Open the file in a vector editor. If the whole icon selects as one image, it is still raster.
Can converting an ICO recover the original SVG exactly? No. It can reconstruct shapes from the stored pixels, but it cannot recover original control points, layers, or details that were removed when the icon was rasterized. Brand-critical work should be verified or redrawn.
Does PerfectVector convert CUR files too? No. CUR resembles ICO but adds cursor hotspot meaning. The ICO recovery workflow does not accept CUR as if it were an ordinary icon.
Sources
- Microsoft Learn — About Icons — Explains multi-size and multi-color-depth icon resources.
- Microsoft Learn — Resource File Formats — Defines ICO image entries, PNG/DIB payloads, and cursor hotspot fields.
- Microsoft Learn — Cursor Resource — Documents cursor resources and hotspot coordinates.
- PerfectVector — ICO to SVG Converter — States the product’s current source-selection and tracing workflow.
If the original design file is truly gone, upload the ICO and recover its strongest representation as SVG paths. Then inspect the silhouette, transparency, repeated geometry, and small-size exports. Keep the result as a new editable master only after those checks pass.
More from the blog

Vectorize a BMP Without Tracing Every Pixel Defect
A BMP can preserve hard edges and every source defect. Learn how to clean it selectively, trace it into editable SVG paths, and inspect the result.

How to Convert PDF to SVG: Export or Trace It
How you convert a PDF to SVG depends on what's inside it. If it's vector, you export it; if it's a scan, you trace it. Here's how to tell, and how to do both.