Convert PNG Icons to SVG for a Consistent UI Kit
Turn a folder of PNG icons into a coherent SVG set. Learn how to standardize artboards, optical size, colors, paths, and delivery checks across a UI kit.
On this page
- Decide which PNG icons should become SVG
- Set the UI-kit rules before you trace
- Choose one coordinate space
- Choose a fill or stroke model
- Decide how color will be controlled
- Convert a representative sample first
- 1. Prepare the PNGs
- 2. Trace the sample icons
- 3. Inspect the paths, not only the preview
- Normalize the icons as one family
- What this looks like with PerfectVector
- Clean up without losing the source
- UI-kit delivery checklist
- FAQ
- Sources
Do not convert the whole folder in one pass. Start with a small group that includes your simplest icon, your busiest icon, a curved shape, and any icon with a cutout. Define the SVG rules with that sample, then apply them to the rest of the set. This catches bad tracing decisions before they spread across dozens of files.
The conversion itself is only one step. A usable UI kit also needs a shared coordinate system, consistent optical size, predictable color behavior, editable paths, and a delivery check in the product that will use the icons.
The short workflow
- Inventory the PNG set and find duplicates or missing sources.
- Choose representative icons and define the common grid, padding, fill or stroke model, and color rules.
- Convert the sample icons into real paths.
- Inspect silhouette, nodes, negative space, and color regions.
- Normalize the set in one vector editor, then convert and review the remaining icons.
- Test the exported SVGs in the actual UI and asset pipeline.
Decide which PNG icons should become SVG
Flat icons with clear boundaries are strong tracing candidates. Other images need a different route. Sort the folder before you open a converter.
If the remaining source is an icon container rather than a PNG, recover it through the matching ICO to SVG or ICNS to SVG workflow first. Then normalize the resulting artwork against the same UI-kit rules below.
| Source icon | Recommended route | Why |
|---|---|---|
| Flat monochrome or limited-color icon | Trace to SVG, then normalize | The visible design already consists of clean shapes |
| Pixel-art icon | Keep the raster grid or redraw deliberately | Automatic smoothing can erase the intended pixel structure |
| Gradient, glow, or textured icon | Keep it raster or simplify the art first | Tracing can split continuous detail into many small shapes |
| Icon with live text | Find the original design file or redraw the lettering | Tracing turns text into outlines and does not recover the font |
| PNG exported from an existing vector | Find and re-export the original SVG | Re-tracing throws away the cleaner source geometry |
An SVG filename does not prove that the pixels became vector paths. The format can legally contain an embedded raster image through an <image> element, as the SVG embedded-content specification explains. If an exported file still selects as one rectangular image or gets blocky at deep zoom, use the embedded-raster checks before adding it to the kit.
Set the UI-kit rules before you trace
A folder of individually clean icons can still look inconsistent together. Write down the set rules first, even if the original PNGs do not follow them yet.
Choose one coordinate space
Use one viewBox for icons that should share a component size. The numbers do not have to be 24 by 24 or 16 by 16; they need to match your system. SVG maps the viewBox rectangle into the displayed viewport, so identical outer dimensions only help when the artwork is positioned consistently inside them. The SVG 2 coordinate-system specification defines that mapping.
Record:
- the common
viewBox; - the intended visual center and baseline;
- minimum internal padding;
- which parts may intentionally extend beyond the usual optical bounds.
Choose a fill or stroke model
Decide whether the family is built from filled silhouettes, live strokes, or a documented mixture. A stroke-based outline set needs consistent cap, join, and apparent weight. A filled set needs consistent negative spaces and edge treatment. Tracing can turn a thin stroke into a closed outline, so inspect the geometry rather than relying on the preview.
Decide how color will be controlled
For a single-color system, use a repeatable color rule that the destination can map to its icon token. For multi-color icons, define the allowed palette and which regions may change. Do not keep tiny near-duplicate colors left by anti-aliasing unless they serve a visible purpose.
Convert a representative sample first
Pick four to six icons that expose the hard cases. Include a circle or arc, a diagonal, a small counter or hole, and the densest icon in the family. If the set uses multiple colors, include one of those too.
1. Prepare the PNGs
Use the cleanest export available. Remove accidental background rectangles, crop consistently, and avoid enlarging a small blurry source just to create more pixels. The source-preparation guide for converting PNG to SVG without losing quality covers the trace-specific details.
Keep an untouched copy of every original. Cleanup is easier to judge when you can compare the SVG with the source instead of relying on memory.
2. Trace the sample icons
Use an automated vectorizer or the tracing tool in your design software. Illustrator's current Image Trace workflow exposes controls for color, paths, corners, and noise. Figma's current Vectorize feature offers color modes after tracing and notes that complex or low-resolution images may not vectorize well (Adobe Image Trace; Figma Vectorize).
For a browser-based route, upload the sample to PerfectVector's PNG-to-SVG converter. Compare the preview with the original, inspect the shapes and color regions, then download the SVG you want to normalize in your vector editor. Run the representative group before committing the rest of the folder.
If Figma is your kit's master editor, the Figma Vectorize versus external SVG workflow helps you compare both routes on the same sample. Judge the shapes after import, including the holes and color regions you need to edit.
3. Inspect the paths, not only the preview
Open each result in a vector editor and select the shapes. SVG paths are built from commands and coordinates, including line and curve segments defined in the SVG 2 path specification. You want enough nodes to preserve the silhouette, with no universal target number.
Look for:
- dense chains of nodes around a simple curve;
- stray specks or background rectangles;
- overlapping copies of the same edge;
- tiny color fragments caused by anti-aliasing;
- holes or counters that closed during tracing;
- one raster rectangle instead of selectable paths.
If a simple shape is buried under points, use the too-many-nodes diagnosis before simplifying it. Aggressive cleanup can move corners and close small spaces, so compare the edited path with the PNG.
Normalize the icons as one family
Once the sample traces are structurally sound, place them on the shared grid and review them together. This is where a set becomes a system.
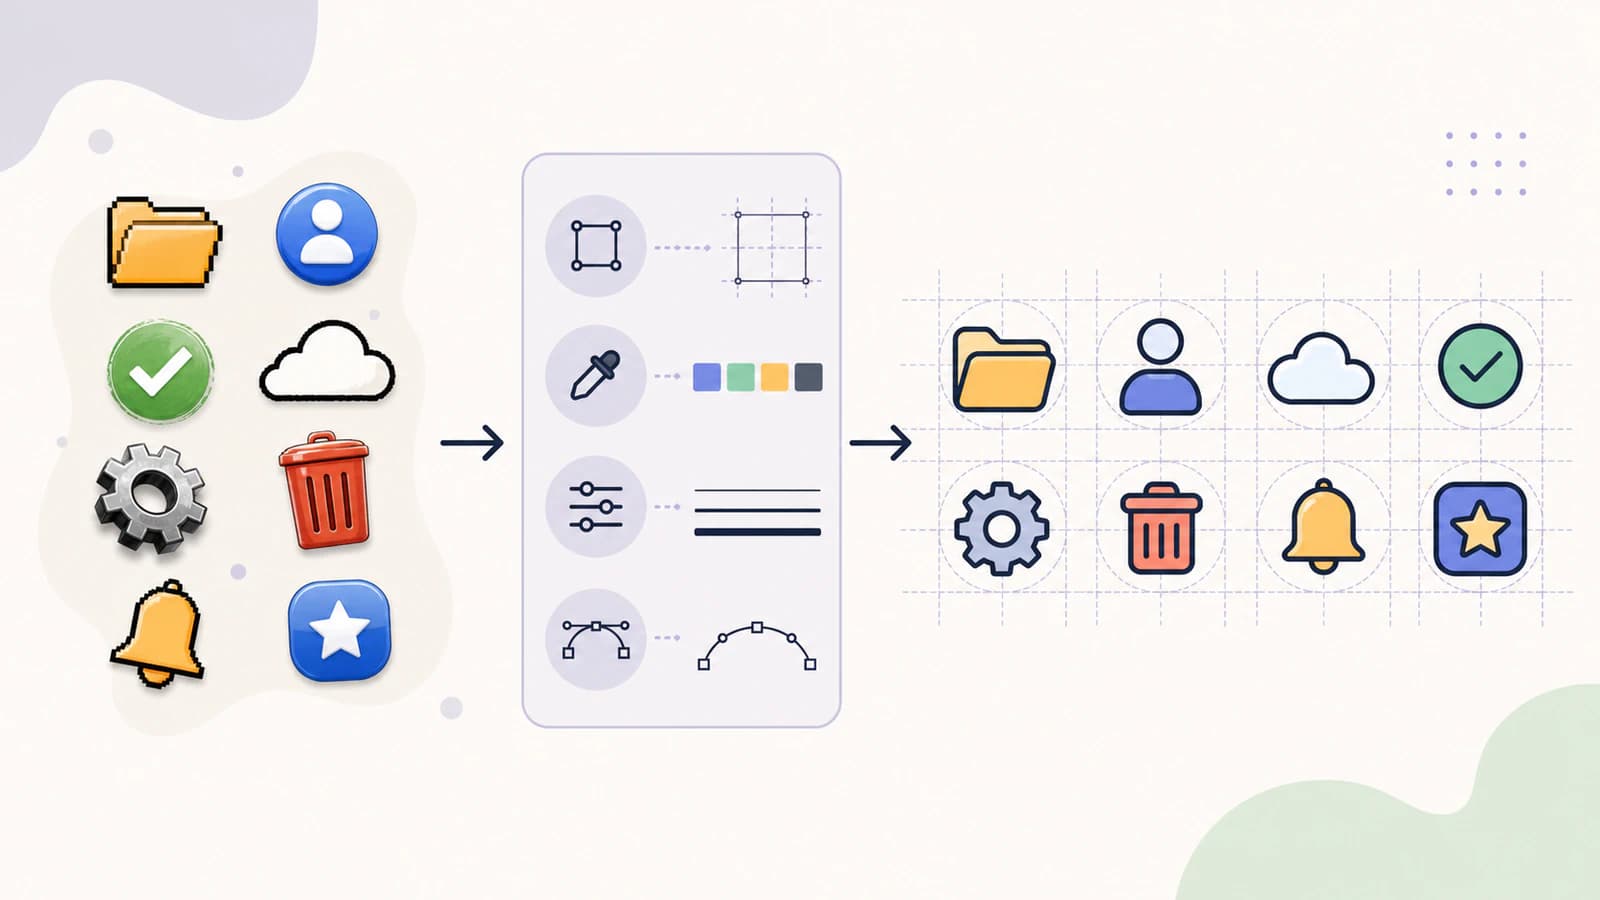
Check the set at its real interface size and at a larger editing zoom:
| Check | What to compare across the set | Common failure |
|---|---|---|
| Coordinate space | Same viewBox and intended placement | Icons jump or scale differently in one component |
| Optical size | Perceived mass, not only bounding-box width | A thin icon looks smaller than a dense icon |
| Alignment | Baseline, center, and intentional overshoot | Circles and pointed shapes appear low or off-center |
| Weight | Stroke width or filled-edge thickness | One icon feels darker than its neighbors |
| Corners and curves | Radius language and tangent quality | Some corners are crisp while others look swollen |
| Path structure | Selectable shapes and manageable nodes | One file is difficult to edit despite looking correct |
| Color behavior | Approved palette and token mapping | Near-duplicate fills make recoloring unpredictable |
| Naming | Stable component and file names | Duplicate or ambiguous assets reach the handoff |
Optical correction is allowed. A circle may need to extend slightly beyond the box that contains a square so both appear the same size. The rule is consistent perception, backed by a documented grid, rather than forcing every shape into identical geometric bounds. The printable visual schedule card workflow applies this distinction to picture boxes, separate labels, and a measured PDF page.
For a set of routine pictures that needs shape edits before card layout, use the visual-supports artwork converter on one representative drawing. Keep labels separate and check that the converted picture still carries the intended meaning.
What this looks like with PerfectVector
PerfectVector fits the tracing stage between source preparation and set normalization. Use it to rebuild a representative PNG sample as editable vector shapes, then judge the output on the criteria that matter to this kit:
- Does each icon preserve its silhouette and negative spaces?
- Can you select and recolor the intended regions?
- Do the curves use a manageable set of nodes?
- Is the result easier to normalize than a manual or app-native trace?
If the sample passes, convert the remaining suitable PNGs and bring them into the same master file for the set-level review. If it fails, change the source or tracing method before processing more icons. PerfectVector does not replace the optical-alignment and naming decisions that belong to the design system.
Clean up without losing the source
Keep two layers of files:
- Source archive: untouched PNGs, any original design files, and notes about provenance.
- Editable master: normalized vector icons on the shared grid.
- Delivery exports: the optimized SVGs consumed by the product.
Make shape edits in the master, then regenerate the delivery files. Avoid hand-editing separate exports because fixes will drift across copies. If an SVG needs recoloring, reshaping, or canvas correction, use the SVG editing workflow and return the corrected geometry to the master set.
When delivery uses reusable web icons, follow the SVG symbol sprite workflow after the artwork is approved. It checks symbol IDs, nested references, coordinate bounds, paint rules, and instance names before the set enters the application. If the interface draws icons on canvas, map SVG paths into canvas with Path2D and verify the coordinate transform, colors, openings, and backing resolution against the SVG master.
When Penpot is the design-library destination, insert a sample SVG into the canvas and test one color region and one contour before adding the rest of the kit. The Penpot SVG import guide separates project-file import from artwork insertion and explains how to check native shapes, raw SVG content, and editable labels. This catches an icon that looks correct but cannot support the edits the kit needs.
Before handoff, test a few icons in every environment that matters: the design library, the application component, and any build or optimization step. Check disabled and inverse-color states if the system uses them. A structurally clean file can still fail the kit if its color or sizing assumptions do not match the component. If Android is the destination, use the PNG-to-VectorDrawable import checklist to verify viewport sizing, fills, path complexity, and importer support before the asset enters the app. For Godot projects, use the Godot SVG import checklist to choose the texture import type and verify raster size, oversampling, and supported artwork. For Unity projects, use the Unity SVG import checklist to choose the editor-compatible importer and verify the UI Toolkit or sprite destination.
For SwiftUI projects, check the SVG asset-catalog and rendering workflow to confirm the named image resource, original or template color behavior, and final display size.
UI-kit delivery checklist
- Every traced icon came from the cleanest available source.
- Icons share the documented
viewBox, padding, and alignment rules. - Optical size and apparent weight are consistent at the real UI size.
- Filled and stroked icons follow the system's stated model.
- Color regions map predictably to the approved palette or token rule.
- Curves use enough nodes for fidelity without obvious path clutter.
- No SVG contains an accidental embedded raster, background box, or duplicate edge.
- File and component names are unique and stable.
- The exported set has been tested after the product's normal optimization step.
- The source archive, editable master, and delivery files are kept separate.
FAQ
Can I batch-convert all PNG icons before cleaning them up? You can, but a representative sample is safer. Convert a few icons that cover the set's hardest shapes, establish the grid and path rules, and only then process the rest. Otherwise, one bad tracing choice can create repetitive cleanup across the whole folder.
Should every SVG icon use the same viewBox?
Icons that share one UI component usually benefit from the same viewBox, but the artwork inside it may need optical adjustment. Keep the coordinate space consistent while allowing circles, pointed shapes, or unusually dense icons to use documented overshoot or padding changes.
How many nodes should a UI icon have? There is no universal number. Use the fewest nodes that preserve the intended silhouette, corners, and negative spaces. Compare icons of similar complexity and investigate any simple curve that contains a dense chain of points.
Should I keep PNG icons after the SVG set is finished? Yes. Keep the original PNGs and any earlier design sources in an archive. They provide provenance and a visual reference when a trace needs to be redone. Use the normalized vector master for edits and generate delivery SVGs from that master.
Sources
- W3C — SVG Coordinate Systems, Transformations and Units — Defines SVG viewports, coordinate systems,
viewBox, and how artwork maps into a displayed region. - W3C — SVG Paths — Defines the line and curve commands that make up editable SVG path geometry.
- W3C — SVG Embedded Content — Confirms that SVG can contain raster image content rather than vector paths.
- Adobe Illustrator — Vectorize images using Image Trace — Documents the current raster-tracing workflow and editable-path output.
- Figma Learn — Convert static images to vector layers — Documents Figma's current Vectorize workflow, color modes, and source-image limitations.
Start with the hardest few icons, not the entire folder. Convert the sample PNGs to SVG, inspect their paths and color regions, then normalize the winning result against your UI-kit rules before you scale the workflow.
More from the blog
Line Art to SVG: Get a Clean Trace Without Double Lines
Clean line art is the best image you can hand a vectorizer. Here's how to turn drawings and coloring pages into crisp SVGs, and dodge the double-line trap.
How to Check an SVG File Before You Cut It (or Buy It)
The five-minute preflight for cut files: spot fake vectors, doubled paths, node bloat, and stray boxes before you waste vinyl, plus what to check before buying.