Godot SVG Import: Texture2D, DPITexture, and Sharp Icons
Fix blurry Godot SVG imports by choosing Texture2D or DPITexture. Check raster size, oversampling, supported artwork and icons at the scales your project needs.
On this page
- Choose the SVG import type for the display behavior
- Check a default Texture2D import first
- Use DPITexture with the right oversampling settings
- Prepare artwork that Godot can reproduce
- Look for actual paths
- Convert decorative text to paths
- Test complex effects separately
- Diagnose the first visible mismatch
- Accept the icon in its actual interface
- What this looks like with PerfectVector
- FAQ
- Sources
Godot SVG import normally turns the SVG into pixels when the asset is imported. Enlarging that texture can therefore look blurry even when the source contains clean vector paths. For SVG icons that need to adapt to viewport scaling, the current importer also offers DPITexture, which can rasterize the source again for a different oversampling factor. Godot documents both routes in its image-import guide.
Start by checking the imported resource and the way your project scales it. Re-tracing an already valid SVG will not fix a low-resolution texture being stretched across a larger screen.
Choose the SVG import type for the display behavior
The two choices below describe the Import dock's resource types. DPITexture itself inherits from Texture2D, so they are not unrelated class families. The DPITexture reference also marks the class experimental; check the documentation matching your project's Godot version before adopting it.
| What the asset needs | Starting choice | What to verify |
|---|---|---|
| A sprite or icon with a known display size | Default Texture2D import | The generated raster has enough pixels for its largest intended use |
| An SVG UI icon that must adapt to viewport oversampling | DPITexture import | Re-rasterization works with the project's viewport and scaling settings |
| An icon whose Node2D or Control scale changes | DPITexture, with node-scale oversampling considered separately | The node's oversampling setting and the cost of repeated scale changes |
| A photo, painted texture, or deliberate pixel-art sprite | Keep an appropriate raster source | The intended appearance survives filtering and display scaling |
| Editable paths or collision geometry inside the scene | A separate geometry workflow | The scene contains the actual geometry you need |
Texture import gives you a texture resource. Treat path editing, collision shapes, and performance as separate requirements; an SVG filename does not prove that any of them are handled. For a browser scene, compare the PixiJS geometry and texture routes to see how the same SVG can take a different path into the renderer.
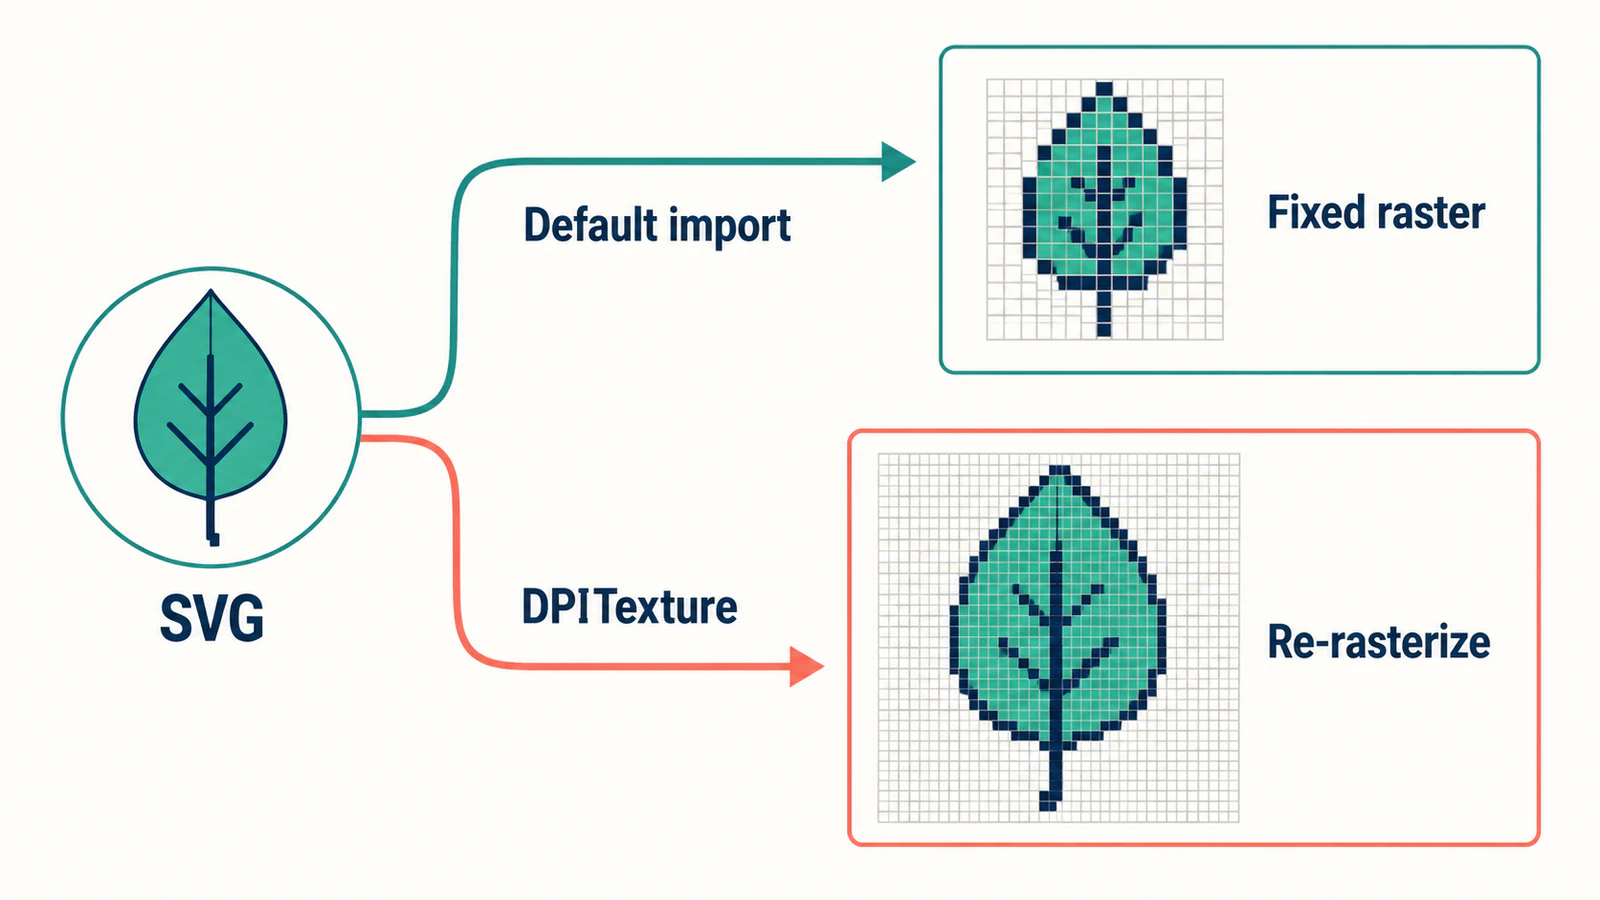
Check a default Texture2D import first
Use one representative asset before changing an entire icon folder. Pick a shape with a curved edge, a narrow gap, and any small detail that matters in the interface.
- Put the SVG in the project and select it in the FileSystem dock.
- Open the Import dock and confirm that the import type is Texture2D.
- Inspect SVG > Scale and Process > Size Limit, then reimport after changing an option.
- Place the texture in its intended sprite or UI component and check its displayed size.
SVG > Scale changes the rasterization size; a larger value creates a larger image. It also affects the texture's size in 2D, so review the node or layout dimensions after changing it. Process > Size Limit can cap the imported dimensions. Both controls are described in the texture importer reference.
For a simple sizing example, a 32-pixel-wide raster displayed across 128 screen pixels is being enlarged. The source's vector curves do not add pixels to that already imported raster. Either generate a texture suited to that use or test DPITexture where oversampling fits the interface.
Avoid increasing every SVG's scale by an arbitrary large multiplier. First establish the largest actual use, then inspect the smallest use too. A resource that looks good in a large inventory preview may lose a narrow gap when shown on a tiny button.
Use DPITexture with the right oversampling settings
To test the adaptive route, select the SVG in the FileSystem dock, change its import type to DPITexture, and reimport. Reuse the same UI placement so the comparison answers one question: does changing the rasterization route resolve the mismatch at the intended scales?
DPITexture keeps SVG source data and can produce a raster matched to oversampling. Its base_scale controls the source texture scale; it does not make the resource into editable scene paths. See the DPITexture class documentation.
There are two scaling cases to check:
- Viewport scaling: Godot's image oversampling can re-render the vector source when the viewport scale factor changes. Enable it for an SVG by importing that image as DPITexture.
- Node scaling: Oversampling based on a Node2D or Control's Scale is disabled by default. Enable Oversampling with Scale on the relevant node when that is the behavior you need.
Godot's oversampling guide explains this distinction. It also notes that frequent scale changes can demand CPU work because the texture is rendered again. Test animated scaling in the scene that will ship before applying the option widely.
The 2D editor can automatically resample while you zoom, which makes it a useful preview. Also run the project and test its actual viewport behavior. With Viewport stretch mode, the scene is first drawn at the base viewport size and then scaled to the window; that final scaling can still determine how the interface looks. The stretch-mode documentation describes the difference from Canvas Items mode.
Prepare artwork that Godot can reproduce
An importer change solves a rendering-size problem. Missing objects or a changed silhouette need a source-art check.
Look for actual paths
Open the SVG in a vector editor and select its visible artwork. If the whole icon is a single placed bitmap, investigate before adjusting Godot. SVG's <image> element can contain raster content, as the MDN element reference explains. Re-rasterizing that wrapper cannot reconstruct the clean curves that a small embedded PNG never contained.
Use the embedded-raster checklist to distinguish placed pixels from editable shapes. If a vector master exists, export from it. If you are preparing a set, keep a consistent canvas and padding using the UI-kit SVG guide.
Convert decorative text to paths
Godot's SVG importer does not render live SVG text. Convert decorative lettering to paths in the delivery copy, while preserving an editable text master. In Inkscape, the relevant command is Path > Object to Path. Godot includes the procedure in Importing SVG images with text.
For a button label that needs localization or frequent editing, keep the label as interface text and import the icon separately. Outlining an entire interface would make those later changes harder.
Test complex effects separately
Godot uses ThorVG for SVG rendering. ThorVG's SVG interpreter has a defined support boundary; its SVG overview lists animation, interactivity, and multimedia among its unsupported features. General ThorVG engine capabilities are not a guarantee that a particular SVG feature works through Godot's importer.
If a badge loses a detail, compare the exported SVG with a copy made from simple filled shapes. Add the required effects back one at a time. Keep a raster export when it preserves complex artwork more reliably and the project does not need scalable source shapes.
Do not simplify away a narrow opening merely to reduce the file's complexity. The acceptance test is the intended silhouette, including its negative space.
Diagnose the first visible mismatch
Record the source file, import type, SVG scale, node scale, viewport settings, and expected display size. Then change the setting related to the symptom.
| Symptom | First check | Next useful test |
|---|---|---|
| Sharp SVG in the editor, blurry icon in the game | Default import dimensions and actual displayed size | Generate sufficient raster dimensions or test DPITexture |
| DPITexture improves viewport resizing but not an enlarged node | Node-scale oversampling | Check Oversampling with Scale on that node |
| The whole interface looks soft | Viewport rendering and final window scaling | Compare the project's stretch behavior before editing individual icons |
| Lettering disappears | Live text in the SVG | Import an outlined delivery copy |
| A glow, animation, or complex detail changes | SVG feature compatibility | Compare a simple shape-only export or a raster alternative |
| Only part of the image remains pixelated | Embedded raster content | Inspect the source objects and locate the placed image |
| Edges change with filtering | CanvasItem texture filtering | Compare the filter appropriate to the artwork at its actual size |
In Godot 4, 2D texture filtering is configured through CanvasItem properties, with a project default. An older tutorial may direct you to an import setting that no longer belongs there. The image-import manual documents the change. Filtering can change the appearance of existing pixels; it does not repair missing source detail.
For blur that also appears outside Godot, follow the broader pixelated-SVG diagnosis. That helps you identify whether the bad edge already exists before the engine sees the file.
Accept the icon in its actual interface
Test the smallest and largest intended icon placements against both light and dark backgrounds. Check the curve, the narrowest gap, and transparency around the edge. Resize the running window, exercise any user-facing UI scale control, and test node-scale animation if the interface uses it.
Repeat the check in a target build. Keep the chosen import settings with the source asset so another contributor can reproduce the result. For a set of icons, test more than the easiest silhouette: include the densest icon and the one with the thinnest important detail.
A small SVG source file is not evidence of lower GPU memory use. Both routes discussed here produce raster textures for display. Profile the imported resources and the actual scene when memory or frame time drives the choice.
What this looks like with PerfectVector
PerfectVector fits before Godot import when your only source is a flat PNG or JPG and you need editable SVG shapes. Upload one representative icon to PerfectVector's image-to-vector converter, compare its traced contour and internal gaps with the original, then inspect the downloaded SVG before choosing the Godot import type.
Accept the trace only when the shape is right. Remove an unwanted background shape, check that intended regions remain editable, and confirm that small openings survive cleanup. Then run the same Godot size and oversampling checks used for an existing SVG.
Keep photographs, soft painted effects, and intentional pixel art raster when that is the desired result. A simple geometric icon may be easier to draw directly. Tracing is useful for rebuilding source shapes; it does not configure Godot's importer or validate the final game.
FAQ
Can Godot import SVG files? Yes. The default Texture2D import rasterizes an SVG at import time. The current importer also offers DPITexture for SVG images that need re-rasterization with oversampling. Check the documentation for your project's version; DPITexture is marked experimental.
Why is my SVG blurry in Godot? Check whether a fixed imported raster is displayed larger than its pixel dimensions. Also inspect viewport stretching, filtering, node-scale oversampling, and embedded raster content. Fix the cause before tracing or replacing the source.
Does DPITexture preserve editable SVG paths in the scene? It retains SVG source for re-rasterization, but it is a texture resource. Importing it does not provide a scene path-editing workflow or automatically create the collision geometry your game needs.
Sources
- Godot — Importing images — Defines SVG import types, text preparation, renderer limitations, and texture-filter settings.
- Godot — DPITexture — Documents inheritance, retained SVG source, scaling, and experimental status.
- Godot — Multiple resolutions — Explains viewport stretching, image oversampling, node-scale settings, and repeated rasterization costs.
- Godot — ResourceImporterTexture — Describes raster scale and size-limit controls for the default texture importer.
- ThorVG — About ThorVG — Defines the SVG interpreter's support boundary.
- MDN — SVG image element — Explains how an SVG can contain raster artwork.
If your Godot icon starts as a flat PNG or JPG and needs editable shapes, convert your image with PerfectVector. Check the silhouette, small gaps, and unwanted background paths, then test the SVG at the display sizes and scaling settings your project uses.
More from the blog
p5.js SVG Images: Load, Scale, and Keep Your Source
Load an SVG in p5.js 2.3.4 with async setup, check its transparent opening at three Canvas sizes, and keep editable paths separate from the displayed image.
Canvas Path2D SVG: Reuse Paths at the Right Size
Reuse SVG path data on canvas with the right viewBox transform, colors, holes, and pixel density. Follow an original example and keep the editable SVG master.