
PixiJS SVG Import: Choose Graphics or a Texture
Import an SVG into PixiJS as geometry or a texture. Test an icon at two sizes, check texture resolution, and catch missing group transforms before shipping it.
On this page
PixiJS can use an SVG in two different ways: Graphics.svg() parses supported drawing geometry, while loading the SVG as a texture gives a Sprite pixels to display. Choose geometry when the artwork needs substantial scaling, and a texture when a raster matched to the intended display size suits the asset. PixiJS describes both routes in its SVG guide.
Test the same file through both routes before choosing. Our small emblem kept its opening and colors in both, but the geometry route missed its group translation. The texture matched the browser's placement and became softer when enlarged. Those are separate problems with different fixes.
Decide what the scene needs
| Requirement | Starting route | Acceptance check |
|---|---|---|
| A simple icon that changes scale | Graphics.svg(svgText) | Curves, holes, transforms, and paint match the source |
| A fixed-size decorative image | SVG texture and Sprite | Enough texture pixels for the largest display size |
| Several instances of the same geometry | A shared GraphicsContext | Instances use the intended shared drawing data |
| Node editing or SVG export | Keep an SVG editor and source file | The editable master survives outside the Pixi scene |
A Graphics object is Pixi drawing content, not an SVG DOM tree with the original element IDs. Its context can be shared between instances, as the Graphics guide explains. Keep the original SVG when you need to edit individual source paths or export another SVG later. Both routes ultimately draw pixels on the screen.
Test a curve, a hole, and a transform
This example uses PixiJS 8.21.0, a 96 × 96 SVG, renderer resolution 1, and an SVG texture loaded at resolution 1. The small version is drawn at its native size; the large version uses scale 3. The original emblem has two colored paths and a group translated by eight SVG units in each direction. Its inner contour winds opposite to the outer contour to form the opening.
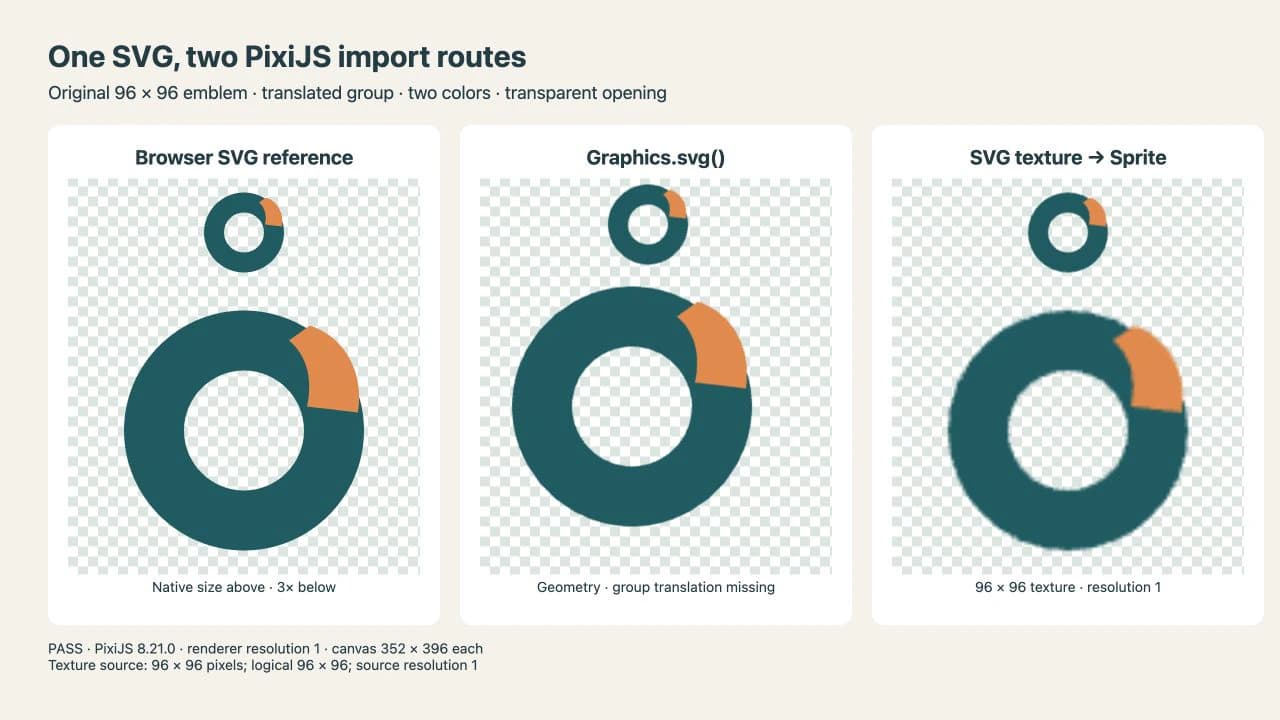
The checkerboard shows through the opening in all three columns. It is a background behind the artwork, not a white shape painted into the hole. The center column's displacement is visible at both sizes: eight units at native scale becomes 24 display pixels at scale 3.
These observations apply to this source and version. They do not establish that every hole, transform, gradient, or exported SVG will work the same way.
Save the SVG source
Save this as emblem.svg beside your page. It is original artwork drawn for the comparison, not a vectorization result.
<svg xmlns="http://www.w3.org/2000/svg"
     width="96" height="96" viewBox="0 0 96 96">
  <g transform="translate(8 8)">
    <path fill="#145c61" d="M40 0
      C62 0 80 18 80 40 C80 62 62 80 40 80
      C18 80 0 62 0 40 C0 18 18 0 40 0 Z
      M40 20 C29 20 20 29 20 40 C20 51 29 60 40 60
      C51 60 60 51 60 40 C60 29 51 20 40 20 Z"/>
    <path fill="#e68546"
      d="M62 5 C74 9 80 21 78 34 L61 32
         C63 23 61 15 55 10 Z"/>
  </g>
</svg>
Run both routes
Put this script in an HTML page served over HTTP alongside emblem.svg. It imports the pinned Pixi build, fetches your trusted SVG, and draws native and enlarged versions in two columns. The left column uses geometry; the right uses a texture.
<script type="module">
import { Application, Assets, Graphics, Sprite }
  from 'https://cdn.jsdelivr.net/npm/pixi.js@8.21.0/dist/pixi.mjs';

const app = new Application();
await app.init({
  width: 640, height: 420, resolution: 1,
  antialias: true, background: '#e7eeea', preference: 'webgl'
});
document.body.append(app.canvas);

const response = await fetch('emblem.svg');
if (!response.ok) throw new Error('SVG request failed');
const svgText = await response.text();
const texture = await Assets.load({
  src: 'emblem.svg', data: { resolution: 1 }
});

for (const [scale, y] of [[1, 12], [3, 120]]) {
  const geometry = new Graphics().svg(svgText);
  geometry.scale.set(scale);
  geometry.position.set(16, y);
  const sprite = new Sprite(texture);
  sprite.scale.set(scale);
  sprite.position.set(336, y);
  app.stage.addChild(geometry, sprite);
}
</script>
Open the original SVG in the browser too. Compare the outer contour, opening, accent shape, and placement, not just whether the file loaded without an error.
Fix the mismatch you actually see
Geometry has moved
In this test, Graphics.svg() did not apply the enclosing translate(8 8). The pinned SVG parser implementation is useful when checking the behavior of the version in your project.
For this specific file, replacing the geometry position line with the following compensates for that one known translation:
geometry.position.set(16 + 8 * scale, y + 8 * scale);The correction includes scale because the missing translation belongs to the source's coordinate system. At scale 3, the correction is 24 pixels in each direction. This is not a general transform flattener. A file with nested rotations, skews, or different transforms on separate paths needs a properly prepared delivery SVG or another rendering route. Compare the exported delivery file against the editable master.
The enlarged texture is soft
The SVG texture in the figure contains 96 × 96 pixels. Scaling its sprite to 288 × 288 does not re-read the source curves. To prepare more pixels, load a separate texture with a higher resolution:
const largeTexture = await Assets.load({
  src: 'emblem.svg?resolution=3',
  data: { resolution: 3 }
});
In the tested build this produced a 288 × 288 pixel source with a logical texture size of 96 × 96 and source resolution 3. Use largeTexture when creating the sprite. The query string gives this experiment a distinct cache key; the server must serve the same SVG for that URL. Pixi's Assets guide explains its URL-based caching, and its texture guide distinguishes a texture from its source.
Select resolution for the largest required on-screen use, including the renderer resolution you actually ship. Increasing the renderer's resolution alone does not add detail to an already loaded low-resolution texture. Also check the smallest icon size: a larger source cannot make a tiny opening readable if the final display is too small.
A detail is missing
Check the original source in a browser, then test a simpler copy in Pixi. Reduce the SVG to the affected shapes and add its groups, paint, and effects back one at a time. Pixi's Graphics documentation describes SVG support as a subset; loading successfully is not a complete compatibility check.
Keep a raster delivery copy when that reliably preserves the artwork at known sizes. For a simple geometric symbol, drawing the shapes directly in Pixi may be easier to maintain. Do not choose a route using an unmeasured claim that it will always be faster or use less memory. Test your scene and target devices.
Prepare the source before importing
If an SVG contains a placed PNG, changing its filename or importing it as geometry does not reconstruct the missing vector contours. Use the embedded-raster checklist to inspect the source first. The broader image vectorization guide explains when tracing is useful.
PerfectVector fits when only a flat PNG or JPG remains and you need editable source shapes for the icon. Convert your image to SVG, then inspect the contour, separate colors, and small openings in an SVG editor before repeating the Pixi test. Use an existing clean vector master directly. Tracing does not fix Pixi's transform handling or configure texture resolution.
Other engines make their own import choices. The Godot SVG import guide explains texture and oversampling behavior there; the Unity SVG guide covers that separate workflow. Do not transfer one engine's settings to another based on the SVG extension alone.
Check the delivered icon
Before accepting the asset, compare it with the browser-rendered source at its smallest and largest intended sizes. Check the opening over contrasting backgrounds, the group placement, and any required effects. Record the Pixi version, renderer resolution, texture source pixel dimensions, and scene scale. Keep the SVG master with the project so a later change in layout or importer can be tested against the same source.
Only have raster artwork? Prepare an editable SVG with PerfectVector, inspect its contour and negative space, then test the actual Pixi import route at the sizes your interface uses.
FAQ
Does importing an SVG into PixiJS keep it as vector geometry? It depends on the route. Graphics.svg parses supported drawing geometry. Loading an SVG as a texture gives a Sprite a raster source. Keep the original SVG separately for source editing and future exports.
Why can a PixiJS SVG sprite look blurry? A sprite can display its texture larger than the texture's pixel dimensions. Check the source resolution and the largest intended display size. Load a suitably sized texture or test the geometry route for supported artwork.
Will Graphics.svg preserve every SVG feature? No. It supports a subset of SVG. In this PixiJS 8.21.0 example, the hole and two colors survived, but the group's translation did not. Test your own exported file against a browser reference.
Sources
- PixiJS SVG guide — Describes texture and geometry import routes and texture resolution.
- PixiJS Graphics guide — Explains GraphicsContext sharing and the SVG support boundary.
- PixiJS Assets guide — Documents asset loading and URL-based caching.
- PixiJS texture guide — Describes the relationship between textures and their sources.
- PixiJS 8.21.0 SVG parser — Provides the version-pinned implementation for investigating import differences.
More from the blog

Why Your SVG Looks Pixelated and How to Fix It
A real SVG can still show pixels: an embedded image inside the file, a viewer that rasterizes, or icon-size softness. Here's the quick diagnosis and each fix.
jsPDF SVG: Keep Logo Paths in a Browser-Made PDF
Use svg2pdf.js with jsPDF to place an SVG logo, preserve supported paths, set its PDF size, and check the saved file against a rasterized export of that artwork.