Penpot SVG Import: Get Editable Shapes Into Your Design
Import SVGs into the Penpot canvas, check individual fills and paths, and diagnose missing artwork or uneditable text before adding icons to your design kit.
On this page
To import an SVG into Penpot, open a design file and drag the .svg onto its canvas, or choose the toolbar's image tool to select the file. The dashboard's Import files command is for Penpot project files. If you are trying to place an icon, start inside the design. Penpot's layer insertion guidance and project import documentation describe these separate routes.
Once the artwork appears, check whether you can change one color region and edit one contour. An icon can look correct while still being awkward to modify. If the source is already vector, repair or re-export it when necessary. Trace a PNG or JPG only when you need to recover shapes from pixels.
Check the import before you reuse it
Keep the original SVG, import one representative icon, and work on a duplicate. Test appearance, one fill, one curve, and any editable text. Export a separate SVG and compare it with the original before repeating the workflow across a kit.
Start in the canvas, then inspect the layers
Open the Penpot file where the artwork belongs. Insert the saved SVG into an empty area so you can examine it away from the rest of the design. If dragging fails, use the image tool's file chooser to remove drag-and-drop behavior from the diagnosis.
Select the imported artwork and expand its entry in the Layers panel. A group is useful organization, not evidence that the SVG became a bitmap. You can select a child from the panel or double-click into a group; Penpot also supports deep selection with Ctrl-click or Command-click. These controls are covered in the layer selection guide.
Different SVG content can become different kinds of objects. In Penpot's released importer, common shapes such as paths, rectangles and ellipses have native shape handlers; other elements can be retained as raw SVG. The importer also handles image elements separately. This is why the filename alone cannot establish how every part will edit. See the SVG shape importer.
Avoid ungrouping or flattening everything at the start. First identify the part you want to change. Preserve the group if its children already give you the control you need.
Test one fill and one curve
Use a small icon with visibly separate parts. A plant in a pot makes a useful example: the pot should accept a different color without changing the leaves, and one leaf should be editable without distorting the whole plant.
On a duplicate of the imported icon:
- Select the pot's layer and change its fill to a contrasting color. Check that only the intended region changes.
- Select one leaf path. Press Enter to edit its nodes, move one point slightly, then undo. Penpot documents this in its node-editing instructions.
- Compare the duplicate with the untouched import. Confirm that the original silhouette, small gaps and stroke weight remain intact after you undo the test.
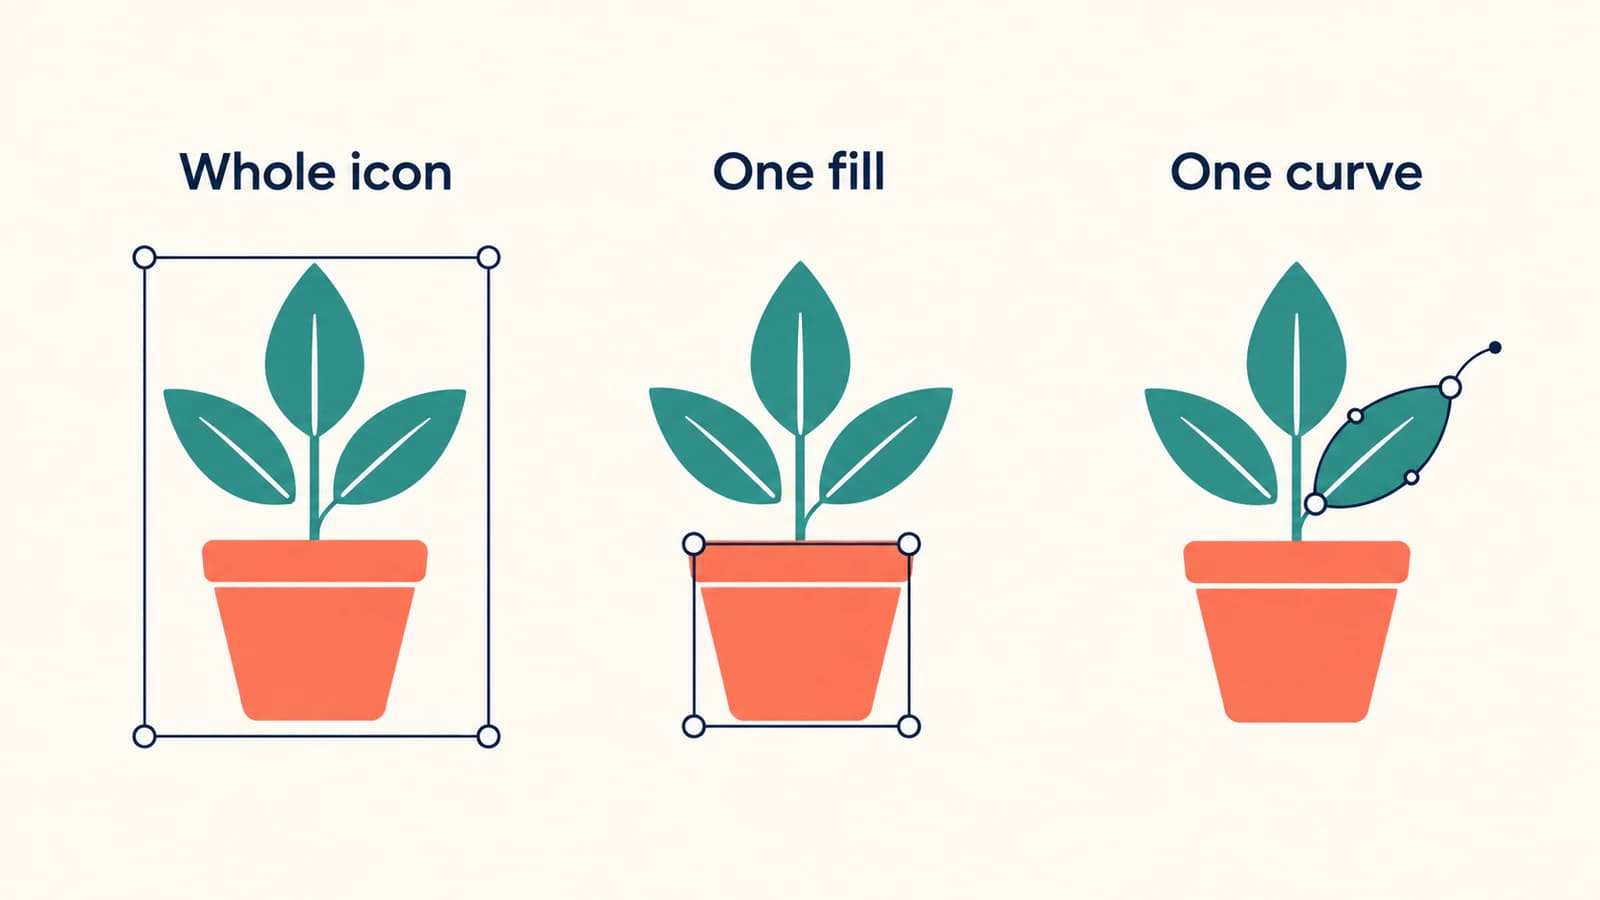
If the pot and leaves change together, inspect the selection and source structure. You may have selected the outer group, or the source may combine several regions into one path. A successful color change does not prove that every contour is a separate native path.
Raw SVG content is another possibility. Penpot has a separate options panel for it, including appearance controls for supported elements. The presence of fill or stroke controls therefore does not guarantee ordinary node editing. If the part cannot be edited as needed, simplify or redraw that part in the source editor and import a new copy. The distinction is visible in Penpot's raw SVG options implementation.
Diagnose the symptom before changing the file
Use the unchanged SVG as your reference. Open it in a browser and compare that rendering with the Penpot import. If it already looks wrong in the browser, return to the source export before trying to repair the Penpot copy.
| What you see | First check | Next action |
|---|---|---|
| The importer asks for a Penpot project | Whether you are on the dashboard | Open a design and insert the SVG into its canvas |
| The icon selects as one unit | The expanded Layers entry | Select a child before changing the grouping |
| Artwork is present in Layers but invisible | Visibility, opacity, paint and board clipping | Check the affected layer against the original on a contrasting background |
| A line or small dot disappears | The selected path's stroke, width and end caps | Restore the intended appearance on a duplicate, then compare |
| A color edit affects too much | Group selection or combined source geometry | Select the intended child or separate the source artwork |
| The picture has no editable contours | An image fill or embedded raster | Find the original vector, redraw, or trace suitable raster artwork |
| A label looks right but cannot be typed into | Whether it is a native text layer | Recreate copy as text if the wording must remain editable |
Missing strokes and invisible artwork
Check the selected layer's fill and stroke settings before deleting it. Penpot exposes stroke color, opacity, width, style and visibility, plus end-cap controls for open paths. A short stroked mark can look quite different with another cap, so compare the shape rather than assuming the line is absent. The available controls are described in Color and Strokes.
For an invisible object, also inspect hidden layers and clipping. If the browser renders the source correctly but Penpot does not, isolate the failing element in a copy of the source. Re-export the simpler sample and compare again. This gives you a specific file and symptom to investigate instead of changing several settings at once.
Do not remove every style, mask or definition merely because an older workaround suggests it. Those elements can carry appearance information. If the source's stroke construction is the issue, follow the deeper missing SVG strokes diagnosis and preserve an editable master before expanding strokes into outlines.
Text that looks right but will not edit
For a button label, try changing one word. For a logo, decide whether preserving the letter shapes is enough. These are different requirements.
Imported lettering may already be outlines, or may remain SVG content instead of a native text layer. Do not assume that every imported SVG text element becomes editable Penpot text. If the wording needs regular changes, recreate it with Penpot's text tool, choose the intended font, and compare spacing and line breaks. Penpot's text guide explains creating text layers and editing their content.
When letters change shape or wrap differently, use the SVG font troubleshooting guide. Keep a copy with editable text even if a delivery version needs outlined lettering.
When PerfectVector belongs in the workflow
PerfectVector is useful when you have a raster icon or illustration and need editable contours in Penpot. Convert the PNG or JPG into SVG paths, inspect the silhouette and color regions, then import the result and run the one-fill, one-curve test. The trace still needs to be judged against the artwork you intend to use.
A raster picture placed inside an SVG does not acquire editable leaf or pot contours just because its container changed. Penpot's importer has a separate image handler; it does not turn that image into the native path objects handled elsewhere in the importer code.
Use the original vector export when you have it. For a simple interface symbol, drawing it with Penpot's native shapes may give you more deliberate geometry than tracing. Keep photographs and texture-heavy artwork as images when their pixels are part of the design. The image vectorization explainer covers what tracing can recover and what it changes.
Export one sample before building the kit
Keep the working design in Penpot and export a separate delivery SVG. Select the icon or its board, add an export preset with the plus button in the Design panel's Export section, and choose SVG. Penpot documents this under Exporting layers.
Open the exported file in a browser. Compare its colors, strokes, text appearance, crop and whitespace with the reference. If the file must return to a design editor, import that export into a separate area and repeat the editing test. Correct appearance and useful editing structure each need a check.
Before adding the sample to a larger kit, confirm:
- The regions that need separate colors can be selected independently.
- The contours you expect to reshape expose usable editing controls.
- Editable labels remain text in the working design.
- The exported icon has the intended bounds and padding.
- The icon still reads clearly at its actual interface size.
Then apply the same checks across the set. The PNG icon to SVG UI-kit workflow adds shared grids, optical sizing and naming rules once the individual imports are sound.
FAQ
Why does Penpot's Import files dialog reject my SVG? That dialog imports Penpot project files. To place an SVG graphic, open a design file and use the image tool or drag the SVG onto the canvas.
Does importing an SVG make every part editable? Common vector shapes can become native Penpot objects, but other content may remain raw SVG or images. Test the particular fill, curve or text change you need before reusing the artwork.
Do I need to ungroup an imported SVG? Only if changing the group structure helps your task. Try selecting a child in the Layers panel first. Keeping a useful group does not prevent editing its selectable children.
Should I vectorize an SVG that imports incorrectly? Start by repairing or re-exporting existing vector artwork. Vectorization is useful when the available artwork is raster and you need paths; it is not a general repair step for an existing SVG.
Sources
- Penpot: Layers — Inserting artwork, selecting children, and editing path nodes.
- Penpot: Export and import Penpot files — The native project import route, separate from canvas artwork insertion.
- Penpot: SVG shape importer — Separate handling of native shapes, images and raw SVG content in a released version.
- Penpot: Raw SVG options — Appearance controls do not by themselves establish native path editability.
- Penpot: Color and Strokes — Fill, stroke and end-cap controls used in the diagnostic checks.
- Penpot: Text and Typography — Creating native text layers and editing their content.
- Penpot: Exporting layers — Adding an SVG export preset for a layer or board.
If your source is a PNG or JPG and you need editable shapes, prepare an SVG with PerfectVector. Import it into Penpot, change one fill, and test one curve before committing the artwork to your design kit.
More from the blog

SVG in WPF: Choose a Renderer or a XAML Drawing
Use SVG artwork in WPF with a renderer, a native DrawingImage, or a PNG export. Follow an original icon example and check bounds, colors, and dependencies.

Matplotlib SVG: Keep Plot and Logo Artwork as Paths
Export your Matplotlib plot as SVG, compose separate logo paths with svgutils, and check the delivered file for embedded pixels, placement, and font changes.