Make Visual Schedule Cards from Your Own Pictures
Make visual schedule cards with your own photos or drawings. Keep labels editable, fit complete pictures, and check card sizes in a PDF before you print.
On this page
To make visual schedule cards, choose the pictures and wording, build one card with a separate image and text label, then duplicate it on a page. Export a PDF and check its page size before printing. The part that causes trouble is often the layout: one picture looks tiny, a longer label gets squeezed, or the printer scales every card down.
You can use your own photos, drawings, or existing vector artwork. This guide builds a six-card example and shows what to check between choosing a picture and cutting out the finished page.
A practical starting point
- Choose pictures and wording with the person who will use the cards.
- Keep useful photographs as photos; vectorize drawings only when editable shapes help.
- Keep the artwork, label, and cutting boundary as separate objects.
- Make one card work before filling a whole page.
- Export, reopen, and print a single test sheet at the intended scale.
Choose the pictures before designing the sheet
Write down the activities you need to represent. Then pair each activity with an image and the wording you actually use: for example, “Wash hands,” “Snack time,” or “Pack bag.” Those are example labels, not a required vocabulary or sequence.
A photograph of the person's own bag may be more useful for your particular task than a generic illustration. A familiar drawing may already be the right choice. Do not replace a useful picture just to make every card match a graphic style. ASHA's guidance on communication symbols emphasizes individual relevance, access, and recognition; it also treats symbol size and arrangement as individual decisions. The dimensions below are a document example, not a recommended size for every person.
If an existing resource already fits, you may not need to make new artwork. The National Center for Pyramid Model Innovations has instructions and resources for visual schedules, routine cards, and first/then boards. For custom cards, gather images you own or have permission to use, and keep their originals in a separate folder.
| Starting picture | Preparation for the card |
|---|---|
| Personal photograph | Keep the photo; crop distracting surroundings only if the intended subject remains clear |
| Drawing saved as PNG or JPEG | Use it directly if it looks suitable at the intended size; trace it if you need to edit its shapes or colors |
| Existing SVG artwork | Use the vector original and check its canvas margins |
| Picture with a word already baked into it | Keep that version if appropriate, or obtain artwork without the word and add a separate text label |
For a flat drawing that needs shape or color edits, PerfectVector's visual-supports workflow can turn the raster artwork into SVG paths. Compare the result with the original before using it: keep the objects that carry meaning, such as the tap and water in a handwashing picture. Conversion prepares the artwork; you still build the card page in your layout editor.
Build one card with three separate parts
Use a drawing or page-layout editor that lets you enter physical dimensions, place images, and add text. Set the paper size first. A Letter page and an A4 page are different shapes; changing paper after laying out the cards can change the available margins.
Create these parts separately:
- Card boundary: a rectangle with the finished card dimensions. Use a light dashed outline if it will double as a hand-cutting guide.
- Picture area: a consistent box inside the card. Fit the entire picture proportionally, then check whether it looks balanced beside the others.
- Label: a text object below the picture, with its own font size and spacing.
Keep the boundary and picture from moving while editing the label. Group a completed card for duplication, but retain access to its text and artwork inside the group. Our SVG editing guide covers entering groups and changing artwork without flattening everything into one image.
Try the longest label before duplicating the card. If it does not fit, give the label more room, use a deliberate second line, or revise the wording with the person using it. Automatically shrinking only that label can leave one card much harder to read than its neighbors.
Fit the artwork, not its empty canvas
Two files with identical dimensions can show very different amounts of picture. One may contain a large empty border. Placing both files at the same width also scales that border, making one subject appear smaller.
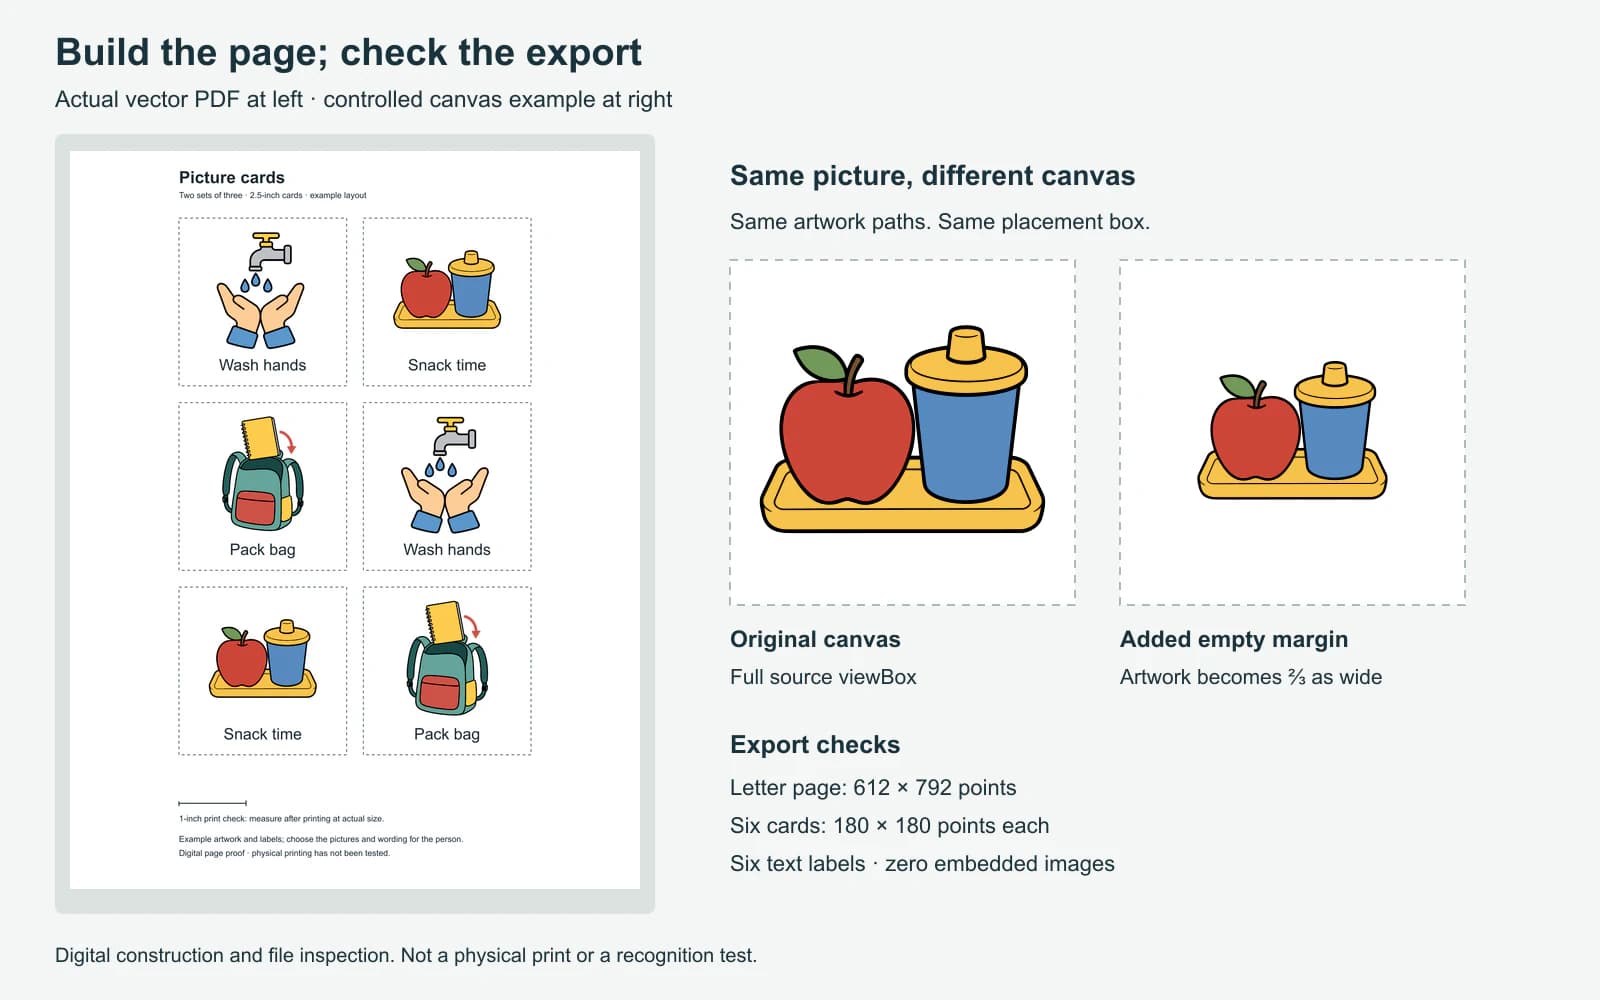
The figure below includes a controlled example: the snack picture's paths stay unchanged, but its canvas grows from 1,254 to 1,881 units square. Inside an identical placement box, the picture becomes two-thirds as wide. This follows the SVG viewBox mapping rules; it is a canvas change, not a loss of image detail.
For your cards, inspect the full picture before removing unused margins. Preserve an arrow, fingertip, handle, or other feature near the edge. Fit the whole artwork rather than filling the box by cropping, and avoid stretching width and height independently. A wide snack scene and a tall backpack do not have to fill exactly the same rectangle to belong on the same sheet.
The PNG icon normalization guide explains the related difference between equal geometric bounds and equal apparent size. On a card sheet, use that comparison to spot awkward scale differences, then check the pictures themselves with the intended user.
Lay out a page you can measure
The example uses three existing SVG pictures twice, creating two sets of three cards on one Letter page. The labels are separate text objects. These are the document settings:
| Item | Example setting |
|---|---|
| Page | US Letter, 8.5 × 11 inches, portrait |
| Card size | 2.5 × 2.5 inches |
| Grid | Two columns and three rows |
| Gap between cards | 0.25 inch horizontally and vertically |
| Grid placement | 1.625 inches from the left; 1 inch from the top |
| Picture box inside each card | 2 inches wide × 1⅚ inches high, fitted proportionally |
| Label | Separate 17-point text, centered below the picture |
| Print check | A one-inch line outside the card grid |
You can choose another size. Keep the card dimensions, spacing, and paper size explicit so you can reproduce the page later. Leave room around the grid for the printer's printable area and for handling the sheet. For hand cutting, gaps make it easier to cut a boundary without running into the neighboring picture or label.
In the exported sample PDF, the page measures 612 × 792 points, matching Letter. The SVG master contains six separate card labels, and all six labels can also be extracted as text from the PDF. The PDF contains no embedded image objects; its pictures remain vector artwork. Those checks describe this particular export. A sheet made with photographs should contain raster images, and that is fine. The PNG versus SVG guide explains why a photo and a drawing can reasonably take different routes.
Keep an editable master alongside the print PDF. If you later change “Pack bag” to “Pack backpack,” edit the text in that master and recheck the line length. Do not start from a screenshot of the completed sheet.
Reopen the PDF before printing
Check the exported file, rather than trusting only the editor canvas:
- Page: Does the PDF report the intended paper size and orientation?
- Pictures: Are the entire subjects visible, including small features near the edges?
- Labels: Are the words correct, fully visible, and spaced consistently? If the font changed on export, fix the export or font choice before printing.
- Boundaries: Are cutting guides visible and clear of the pictures and text?
- Duplicates: Did every copied card receive the right picture and label?
Then print one sheet. In Acrobat, Actual size prints without scaling, while Fit can reduce or enlarge the page to its printable area. Adobe's page-sizing instructions also note that content which does not fit may be cropped at Actual size. Match the paper to the PDF and inspect the print preview.
Measure the one-inch check line on the paper. If it is shorter or longer, resolve the scaling before cutting out a whole set. Then measure a card and check the actual pictures and labels on paper; an enlarged on-screen view cannot establish their printed legibility. Once that sample is suitable for your use, cut and finish the cards using your chosen mounting method.
Fix the common layout problems
| Problem | What to check first |
|---|---|
| One picture looks much smaller | Extra canvas margins, followed by the picture's natural proportions |
| A hand, handle, or arrow is missing | A crop or fill-to-frame setting that cut off meaningful artwork |
| A label cannot be edited | Text baked into the source image, outlined text, or a flattened page |
| The PDF looks different from the master | Font substitution, changed line breaks, or unsupported artwork effects |
| All cards print too small | Fit-to-page or another print scaling setting |
| The sheet is crisp but the picture is wrong for the person | Return to picture and wording choices; vector sharpness does not establish recognition |
FAQ
Can I make visual schedule cards with my own photos? Yes. Place the photos in a card layout and add separate text labels if useful. Keep the original photos, crop carefully, and check them at the intended print size. They do not need to become SVGs.
What size should visual schedule cards be? Choose a size for the person, viewing distance, handling needs, and available space. This guide's 2.5-inch square is a measured layout example, not a universal recommendation. Check a printed sample before making the full set.
How do I keep the labels editable? Create each label as a text object separate from the picture, and save an editable master. A word traced from an image becomes artwork rather than ordinary text you can retype.
Why are my visual schedule cards smaller after printing? Check whether the print dialog used Fit or another scaling option, and confirm the paper matches the PDF. Print at the intended scale and measure a known-length check line before cutting.
Sources
- ASHA — Augmentative and Alternative Communication — Explains individual relevance, access, recognition, and display considerations for communication symbols.
- NCPMI — Visual Supports for Routines, Schedules, and Transitions — Provides an existing route to instructions and resources for schedules, routine cards, and first/then boards.
- W3C — SVG coordinate systems and viewBox — Defines the canvas-to-viewport mapping behind the controlled whitespace example.
- Adobe — Adjust page size for printing — Distinguishes Actual size, Fit, and other PDF print-scaling options.
If a drawing needs editable shapes before it goes onto your cards, try it in PerfectVector's visual-supports converter. Compare the full picture with the original, then place the SVG in one card with a separate label and check the exported page before making the set.
More from the blog
Seam Allowance: Offset the Pattern, Don't Scale It
See why enlarging a sewing pattern does not add equal seam allowance. Measure original SVG examples, distinguish corner joins, and keep the seam line unchanged.
Board Game Art: Vector or Raster for Print?
Choose vector or raster for board game art, test symbols across components, preserve painted detail, and prepare the files your game manufacturer needs.