
QGIS SVG Markers: Prepare Symbols With Editable Colors
Prepare a custom QGIS SVG marker with fill and outline parameters, a real cutout, and a fixed accent. Keep a plain SVG master and inspect the destination copy.
On this page
To prepare a custom QGIS SVG marker with editable colors, add QGIS's param() placeholders to the paint attributes you want the application to control. Keep explicit colors on regions that should stay fixed. The QGIS 3.44 Symbol Selector manual documents placeholders for fill, outline, their opacity, and outline width.
Start with a small, clean symbol. An icon that looks convincing at illustration size can lose its hole, accent, or outline when used as a map marker.
Scope of this guide: we rendered the ordinary SVG master in a browser and audited the parameterized copy's XML. We did not import the copy into QGIS. The parameter syntax below follows the 3.44 documentation; the destination checks are for you or the GIS recipient to complete in the application.
Keep a plain master and a QGIS copy
Use two files with the same geometry:
| File | Purpose |
|---|---|
marker-master.svg | Ordinary SVG paints for editing and browser inspection. |
marker-qgis.svg | A destination copy with QGIS parameter placeholders on selected attributes. |
This separation keeps the original artwork easy to inspect. A browser preview of the plain master proves how that source renders in the browser. It does not prove that the QGIS copy has imported correctly or that its controls behave as intended.
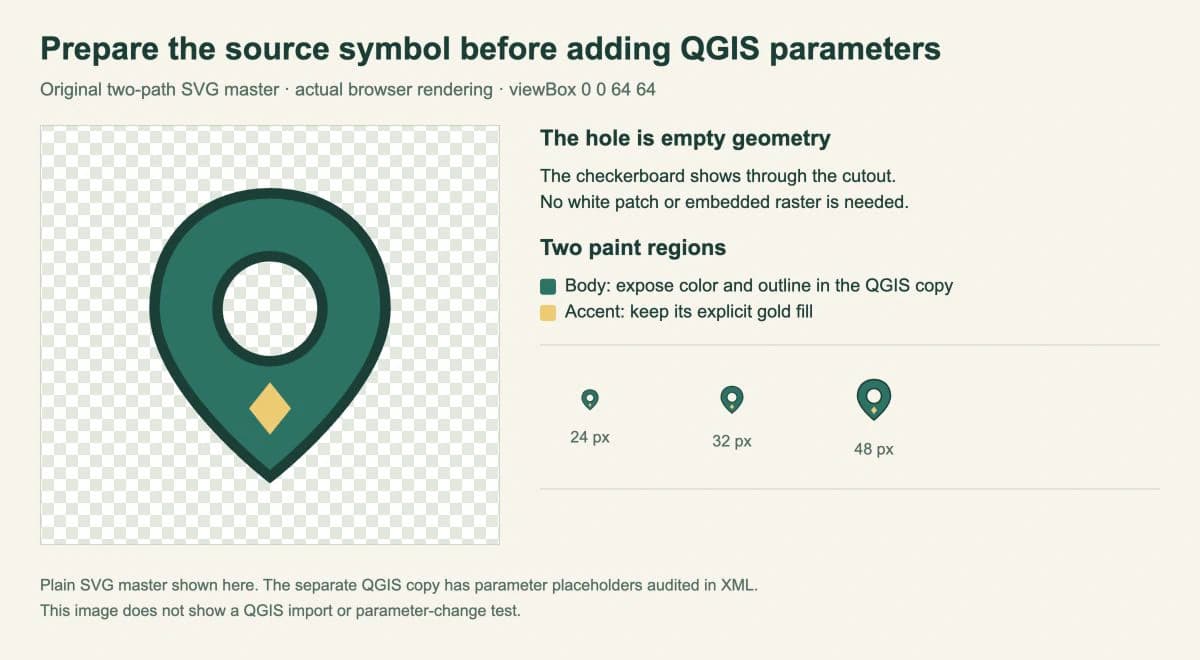
Our original marker has a green body, a transparent circular hole, and a gold diamond accent. It contains two paths and no embedded raster image.
Build a real hole into the source
Save this as marker-master.svg:
<svg xmlns="http://www.w3.org/2000/svg"
     width="64" height="64" viewBox="0 0 64 64">
  <path id="body" fill="#237466" fill-opacity="1"
        stroke="#173f37" stroke-opacity="1" stroke-width="2"
        fill-rule="evenodd"
        d="M32 5C19 5 10 14 10 27C10 42 32 59 32 59S54 42 54 27C54 14 45 5 32 5Z M32 17A10 10 0 1 0 32 37A10 10 0 1 0 32 17Z"/>
  <path id="accent" fill="#f2c96c" stroke="none"
        d="M32 41L36 46L32 51L28 46Z"/>
</svg>
The body path includes an outer contour and an inner circular contour. fill-rule="evenodd" makes the inner region a cutout in this construction. It shows the background through the marker instead of painting a white disk over it. MDN's fill-rule reference explains how the rule determines which regions are filled.
The viewBox defines the source coordinate rectangle. Here it is 64 units square, with space around the outline. Keep that frame consistent between the two copies. If the symbol appears unexpectedly small inside its frame, inspect the geometry and empty margins before increasing its displayed size.
The gold accent is a separate path, which makes its paint choice explicit. For a more elaborate icon, decide which regions belong to the shared body color before adding parameters. Our SVG color guide explains where fills and strokes can be stored.
Parameterize the body and leave the accent fixed
Make a copy named marker-qgis.svg. On the path with id="body", replace its five paint attributes with this attribute block:
fill="param(fill) #237466"
fill-opacity="param(fill-opacity) 1"
stroke="param(outline) #173f37"
stroke-opacity="param(outline-opacity) 1"
stroke-width="param(outline-width) 2"
Keep the path data and fill-rule unchanged. Leave the accent path's fill="#f2c96c" and stroke="none" as they are.
| SVG attribute | QGIS placeholder | Intended control |
|---|---|---|
fill | param(fill) | Body fill color |
fill-opacity | param(fill-opacity) | Body fill opacity |
stroke | param(outline) | Body outline color |
stroke-opacity | param(outline-opacity) | Body outline opacity |
stroke-width | param(outline-width) | Body outline width |
The values after the placeholders are optional defaults in the QGIS syntax. They are not a promise that an ordinary SVG viewer will understand the parameterized paint value. Use the plain master for general SVG editing and previewing.
Do not replace every color with param(fill) automatically. In this design, that would discard the decision to keep the gold accent separate. Apply the shared placeholder only to regions that should respond to the same control.
Audit the destination copy before handing it over
Our XML check confirmed that both files have the same viewBox and identical path data. The QGIS copy contains the five intended placeholders on body; accent retains its fixed gold fill. There are no <image> elements, external files, or fonts in this example.
For your own marker, check:
- The source contains the vector shapes you expect. Changing a paint attribute cannot recolor pixels inside an embedded image as separate regions.
- Only the intended paths receive parameters. Keep decorative accents explicit.
- A style declaration is not retaining a conflicting fixed paint value elsewhere in the file.
- The cutout remains a genuine opening when viewed over a contrasting background.
- The marker has enough space for its outline without a large empty frame.
A successful XML parse checks syntax. It does not certify that the destination renderer supports every SVG feature. Keep the source simple and complete the application checks next.
Check the marker in the recipient's QGIS project
In the point symbol's selector, choose an SVG marker symbol layer and load the destination copy. The version-scoped QGIS manual linked above describes this symbol type and its available controls.
Before using the symbol across the map, ask the recipient to verify the body fill, outline, and opacity separately; confirm that the gold accent stays fixed; inspect the hole at the intended marker size; and reopen the shared project with its symbol file available. Also inspect the exported map or layout, since that is the file the audience will receive.
These checks complete the handoff. Our browser image and source audit cover the input artwork, while the actual QGIS project determines the final result.
When the icon starts as raster clipart
If your custom pictogram exists only as a PNG or JPG, PerfectVector's clipart-to-SVG tool can recover vector artwork for editing. Inspect the paths, simplify details that disappear at marker size, and separate the body from any fixed accent before adding QGIS parameters. The small-icon preparation guide covers source clarity and cleanup at small sizes.
This prepares a symbol's appearance. It does not georeference an image, recover coordinates, or turn a drawn map into accurate geographic data. Our hand-drawn map guide explains that distinction. If the input already has the required vector paths, use it directly; the SVG file guide can help you inspect its contents.
FAQ
Why does an imported SVG marker not expose the colors I want? Check whether the relevant paint attributes contain the QGIS parameter placeholders. In this example, only the body is parameterized; the gold accent is deliberately fixed. Then verify the controls in the destination QGIS version.
Can I keep one accent color fixed? Leave that region's fill as an explicit color and apply the shared parameters only to the regions you want to control. Keep the accent in a separate path so the source is easy to audit.
Does vectorizing an icon make it geographic data? No. It creates artwork for the symbol. The map's locations, coordinates, and accuracy still depend on the geographic data and the GIS workflow.
Sources
- QGIS 3.44 — The Symbol Selector — SVG marker parameters and optional defaults.
- MDN — fill-rule — Filled regions and the even-odd rule used for the hole.
- MDN — viewBox — The SVG coordinate rectangle used by both source copies.
For a raster pictogram, convert the clipart to SVG, inspect the hole and small details, and prepare a separate QGIS copy. Keep the ordinary master, then have the recipient test the marker's colors and appearance in the actual project before delivery.
More from the blog

SVG Gradient Units: Share One Blend Across Logo Paths
Make a gradient flow across separate SVG logo paths. Compare gradientUnits, set shared endpoints, and fix a translated group's unexpected color shift.

Inline SVG vs img: Choose How Your Artwork Behaves
Compare the same SVG as an image and inline markup. Test CSS color control, sizing, accessible names, and reuse before choosing how to embed your artwork.