SignLab Vectorize Image: Trace or Import Clean SVG?
Compare SignLab's native vectorization with an imported SVG. Learn how to prepare the bitmap, inspect paths, preserve holes, and test a production-ready file.
On this page
- What SignLab vectorization actually creates
- Prepare the bitmap before you trace it
- Run the native SignLab trace first
- Compare the native trace with an imported SVG
- Audit both candidates as production paths
- Keep vectorization separate from contour-cut setup
- When each route is the better choice
- Final production checklist
- FAQ
- Sources
SignLab can vectorize a bitmap with its Prepare to Vectorize Wizard and Accuscan controls. That is usually the fastest first test for a clean black-and-white mark. Import a separately prepared SVG when the native trace keeps damaging small counters, rounding corners, splitting colors, or following compression noise. Whichever route you choose, judge the result as production paths at the final size, not as a filled preview on screen.
Choose the route in two passes
- Run SignLab's native vectorization on the cleanest source you have.
- If the geometry needs heavy repair, make one external SVG from the same source.
- Compare both at the same physical size and with the same intended output.
- Keep the version with clearer contours, open counters, fewer accidental pieces, and less manual cleanup.
- Treat contour-cut setup, registration, and machine settings as a separate production check.
What SignLab vectorization actually creates
SignLab's Prepare to Vectorize Wizard prepares a selected image before tracing. The official help describes image-quality adjustments, optional background removal, posterization for color selection, and the final Vectorization command. The output is a group of vector shapes.
Those shapes are new geometry. SignLab is not making the original pixels infinitely sharp. It is interpreting visible regions as curves and boundaries. A clean silhouette may need little work. A small JPEG with halos, shadows, or fuzzy type can turn those defects into paths.
This distinction matters because sign production follows geometry. A smooth fill can hide a rough contour, a closed letter hole, or two stacked paths. Switch to wireframe or node editing and inspect what the cutter, engraver, or routing workflow will receive.
Prepare the bitmap before you trace it
Start with the original artwork whenever possible. A screenshot copied from a website is a weak substitute for the designer's PNG, TIFF, PDF, or vector master.
For a bitmap source:
- Crop away unrelated page content and empty borders.
- Straighten the artwork and remove camera perspective.
- Make the background clearly different from the subject.
- Remove isolated dust and JPEG blocks that are not part of the design.
- Preserve small counters and intentional gaps instead of closing them with aggressive contrast.
- Set the intended production size before approving fine detail.
Color reduction can help a flat logo, but it is not automatically an improvement. Combining two intentional brand colors changes the art. Keeping every anti-aliased edge shade creates unnecessary regions. Choose the smallest palette that still represents the design correctly.
The wizard's preprocessing controls should solve a visible source problem. Denoising is useful when specks would become small shapes. Smoothing is useful when pixel stair-steps distort a curve. Edge sharpening can help a soft boundary, but too much can exaggerate halos. Preview one adjustment at a time so you know which change helped.
Run the native SignLab trace first
The exact interface can vary by SignLab edition and version. In the current official help, the core sequence is:
- Import or place the bitmap.
- Select the image.
- Open Image > Prepare to Vectorize Wizard.
- Choose the relevant image-quality and background options.
- Review sharpening, smoothing, and denoising in the preview.
- Posterize and select the colors you want to retain.
- Continue to the Vectorize Wizard.
- Open the Accuscan SmartBar, run Vectorization, and close the tool.
- Ungroup or enter node editing so you can inspect the new shapes.
Fiery's current SignLab Quick Guide also describes a v11 vectorization previewer for black-and-white images and selection-area control. Use the documentation that matches your installed build; the output audit below stays useful even when labels move.
Do not start by tracing the most detailed possible version. For sign and cut work, additional detail has a cost. It creates more objects to select, more nodes to edit, and more places for a machine path to hesitate or change direction.
Compare the native trace with an imported SVG
If the native result needs extensive repair, keep it as a comparison and make one external vector candidate from the same source. For a suitable flat logo, vectorize the logo with PerfectVector, then inspect the SVG before you bring it into SignLab.
PerfectVector fits this branch when the source contains filled shapes with clear boundaries. It is not a centerline tracer, and it does not decide cutter operations. Photos, gradient-heavy artwork, and single-stroke drawings may need a different method or a manual redraw.
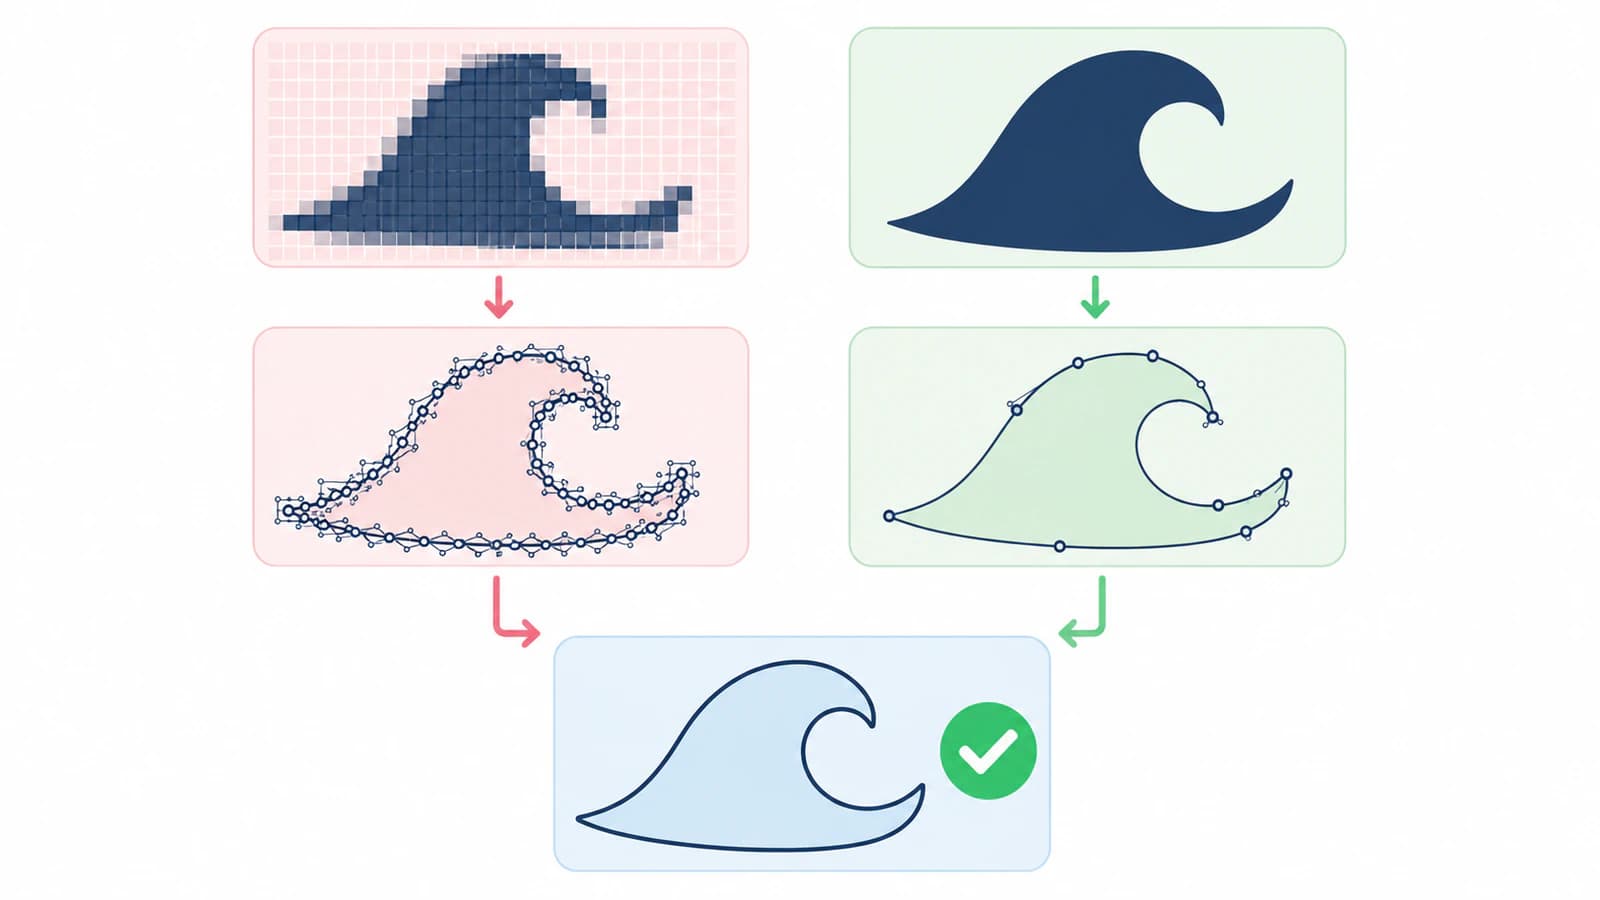
When you import SVG or PDF, keep the file as vectors if you want editable paths. CADlink's rasterize-or-not guidance explains that rasterizing converts shapes, text, and effects into pixels and removes node editing. It also warns that transparency may not always survive a non-rasterized import as expected, so inspect both appearance and structure after import.
Use a fresh SignLab document for the comparison. Put the native trace and imported SVG side by side, set both to the same final dimensions, and hide the original bitmap. If one candidate was scaled differently, you are comparing rendering size instead of geometry quality.
Audit both candidates as production paths
SVG path data describes lines, curves, and subpaths, which is why a visual match alone is not enough. The W3C SVG path specification is the underlying model; SignLab presents that geometry through its own editing and output tools.
Use this audit in order:
| Check | What to look for | Why it matters |
|---|---|---|
| Silhouette | No dents, clipped corners, or false bumps | The outer contour defines the visible edge or cut boundary |
| Counters | Holes in letters and symbols remain open | Closed counters can change the mark and produce wrong cuts |
| Duplicate paths | Only one intended path occupies each boundary | Stacked copies can cause repeat passes |
| Thick strokes | Decide whether you need two edges or one centerline | Filled-outline tracing follows both sides of a stroke |
| Color regions | Each production color is deliberate and selectable | Tiny edge colors create extra objects and cleanup |
| Nodes | Curves use enough points without tracing pixel noise | Excess points make editing harder and can create rough motion |
| Scale | Physical dimensions match the job | A clean path at the wrong size is still unusable |
| Output assignment | Only intended objects receive cut, print, engrave, or route operations | Correct geometry can still be sent to the wrong process |
If one line becomes two closed contours, read the double-line tracing diagnosis. If the design is technically correct but cumbersome to edit, the too-many-nodes guide shows how to separate useful shape detail from raster noise.
Count repairs, not just nodes. One SVG may have fewer nodes but a missing counter that takes longer to rebuild. Another may have more points yet preserve every important corner. Choose the candidate that needs the least risky work while keeping the design faithful.
Keep vectorization separate from contour-cut setup
Vectorizing the image produces shapes. A print-and-cut job still needs a deliberate contour, offset or margin where appropriate, registration workflow, output device, material settings, and a representative test.
Do not assign every traced boundary to cutting. A full-color print may contain dozens of internal color edges that should print but never become blade paths. Create or select the one contour the job calls for, then inspect it without the artwork fill.
Likewise, an imported SVG can be structurally clean and still fail at the machine because of scale, blade condition, pressure, speed, registration, or media movement. Geometry and device setup are different troubleshooting lanes. Fix the one you can observe instead of retracing the artwork after every bad test.
The sign-shop vector handoff checklist is useful when another operator will receive the file. Keep an editable master, outline or package fonts according to the shop's request, note the intended size and colors, and send a visual proof with the production file.
When each route is the better choice
Use SignLab's native trace when:
- the source is a clean, high-contrast silhouette;
- the current preview preserves the important holes and corners;
- color posterization produces the regions you need;
- cleanup is short and predictable;
- keeping the whole job in SignLab reduces handoff risk.
Try an imported SVG when:
- JPEG noise keeps becoming small shapes;
- curves remain lumpy after reasonable smoothing;
- a flat logo's counters or lettering break repeatedly;
- you need a reusable vector master outside SignLab;
- an external vector candidate needs fewer or safer repairs.
Choose manual redraw when precise lettering, symmetric geometry, legal brand reproduction, or single-line toolpaths matter more than the speed of automatic tracing. Keep photographic work raster when the final job is printed imagery rather than simplified vector art.
Final production checklist
- The best available source was used.
- Native and imported candidates were compared at the same size.
- The silhouette, corners, counters, and gaps match the reference.
- Accidental color islands and background shapes are gone.
- No boundary has a hidden duplicate.
- Single-stroke work uses an appropriate centerline method.
- The chosen file remains editable where future changes are expected.
- Only intended paths are assigned to production operations.
- The final dimensions and orientation are correct.
- A representative material or device test passed.
The pre-cut SVG audit adds file-level checks before you commit material. Save the working SignLab file and a separate interchange copy so production settings do not become your only editable master.
FAQ
How do I vectorize an image in SignLab? Select the bitmap, open Image > Prepare to Vectorize Wizard, choose the needed quality, background, and posterization options, then continue to the Vectorize Wizard. Open the Accuscan SmartBar and run Vectorization. Afterward, inspect the grouped shapes in wireframe or node editing.
Should I trace in SignLab or import an SVG? Run the native trace first for a clean, simple image. Compare an external SVG when small counters, curves, colors, or raster noise require heavy repair. Use the same source, final size, and audit for both, then keep the geometry that needs less risky cleanup.
Why does my SignLab trace have too many nodes? The trace may be following JPEG blocks, paper texture, shadows, anti-aliased color edges, or detail that is too small for the final job. Clean the source, reduce unnecessary colors, and use smoothing carefully. Simplify only after confirming that important corners and gaps remain.
Why did my imported SVG become pixels? The import may have been rasterized. CADlink's help says rasterizing an SVG converts vector shapes, text, and effects into a bitmap and removes node editing. Reimport the file, choose the vector-preserving option, and inspect transparency and appearance afterward.
Does a clean SVG guarantee a clean cut? No. Clean paths reduce geometry problems, but the job still depends on the intended contour, scale, output assignment, registration, material, blade, pressure, speed, and machine condition. Verify the preview and run a representative test.
Sources
- CADlink — Prepare to Vectorize Wizard — The official preprocessing, posterization, Accuscan, and vectorization sequence.
- Fiery — SignLab Quick Guide — Current SignLab v11 vectorization-preview and production-workflow context.
- CADlink — To Rasterize or Not to Rasterize — Official behavior for SVG/PDF rasterization, node editing, and transparency cautions.
- W3C — SVG Paths — The path and subpath model behind editable SVG geometry.
If SignLab's native trace keeps rebuilding pixel damage, make one clean SVG candidate from the logo, compare it at the final size, and keep it only when the counters, curves, and color regions survive with less repair.
More from the blog

Roland CutStudio Image Trace: Get Cleaner Cut Lines
Use Roland CutStudio Image Outline, diagnose jagged or doubled contours, and decide when a cleaner imported vector gives your cutter better geometry.

Graphtec Studio 2 Image Trace: Fix Incomplete Paths
Fix partial traces, missing cut paths, small counters, and noisy contours in Graphtec Studio 2. Compare native tracing with a cleaner vector-first workflow.