Photo to Laser Cut File: Your First Cut-Out Project
Turn a pet photo, kid's drawing or handwritten note into a laser cut file: prep the photo first, export SVG or DXF, then check pieces and size before cutting.
On this page
- Engrave the photo or cut it out?
- What a raw phone photo turns into
- Step 1: prep the photo before you convert
- Pet or person: make a silhouette
- Kid's drawing or handwritten note: crop to the paper
- Step 2: convert, then choose SVG or DXF
- What the files look like in LightBurn
- Step 3: check pieces, tiny bits and size before the first cut
- A worked example: a kid's drawing ornament
- What this looks like with PerfectVector
- When the built-in trace is enough
- FAQ
- Sources
To turn a photo into a laser cut file, you need vector outlines, not the photo itself, so first decide what you are making. If you want the photo burned onto wood with its shading, keep it as a bitmap and use your laser software's photo-engraving workflow. If you want to cut a shape out (a pet silhouette ornament, a kid's drawing on a plaque, a handwritten gift tag), the photo has to become closed outlines in an SVG or DXF file.
This guide is about the cut version. The short story from our own test: a phone photo converted as-is gives you the wall, the floor and hundreds of tiny pieces. The fix comes before you convert.
The short version
- Engrave or cut? Shaded photo engraving stays a bitmap. A cut-out needs vector outlines (SVG or DXF).
- Prep first. Lift the subject off its background, crop a drawing to the paper, or fill the subject solid black to make a silhouette.
- Then convert, and export SVG for xTool or LightBurn, or DXF when you want the size recorded in millimeters.
- Check before cutting: how many pieces, any tiny bits, and the final width in mm.
- In LightBurn: hide the background layer and set engrave layers to Fill.
Engrave the photo or cut it out?
Many "photo to laser" guides are really about engraving. For a first cut-out project, decide which one you are making before you open any converter.
| You want | File type | What the laser does | Typical first project |
|---|---|---|---|
| The photo itself, with shading, burned onto wood | Bitmap (JPG or PNG) | Engraves line by line | Photo on a wood slice |
| A shape cut out of the material | Vector outlines (SVG or DXF) | Follows the outline with the cut operation | Pet silhouette ornament |
| Lines on the surface plus an outline cut | Vector, with engrave and cut parts | Engraves the lines, then cuts around them | Kid's drawing ornament |
Laser apps draw the same line. Glowforge's upload guide, for example, describes SVG or PDF files "for cutting and engraving" and JPG or PNG "for engraving only" (Glowforge Support). If your project sits in the first row, you don't need this workflow; follow your machine software's photo engraving guide instead. Everything below is about the second and third rows.
What a raw phone photo turns into
We ran the same dog through PerfectVector's image to DXF converter three times, prepping it a little more each round. The photos are illustrative samples, not a customer's image. In the figure, the left column is the photo as a phone would take it and the right column is the final silhouette.
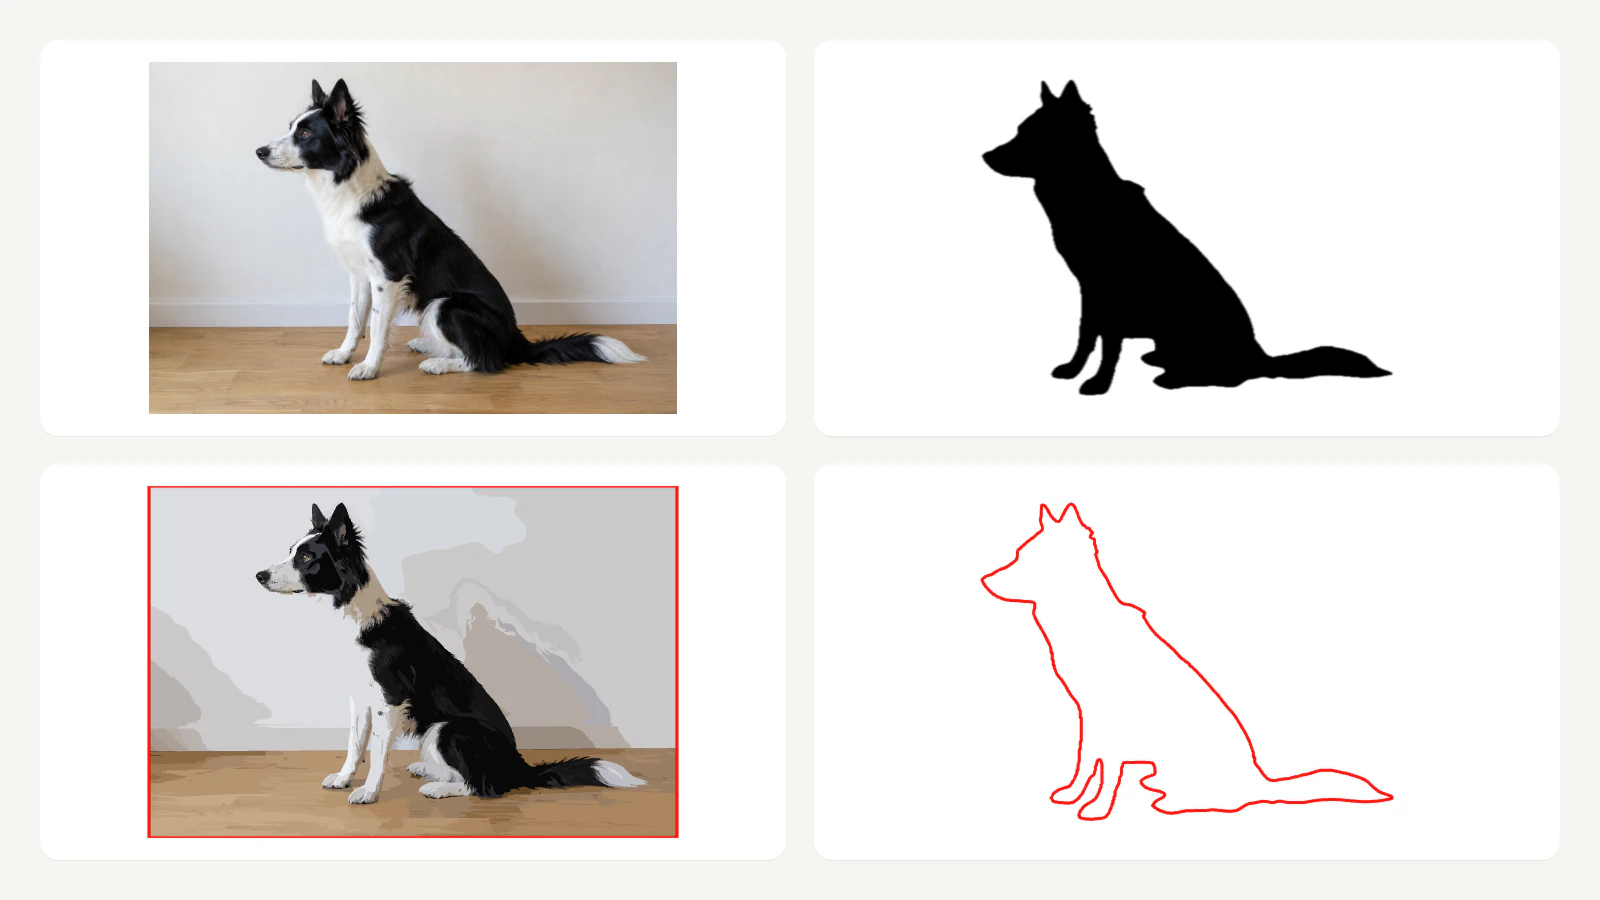
Here is what each input produced:
- Raw photo: 38 colors and 907 paths. The wall and floor came back as shapes too. In the DXF export, 503 of the 905 outlines were smaller than 1 mm. The Laser SVG panel offered only a cut around the whole canvas, with the warning "The cut follows the whole canvas. Remove the background or set its color to Skip."
- Subject lifted, background transparent: 676 paths. Better, but still 23 pieces at 90 mm wide, with the warnings "22 pieces are smaller than 6 mm and may fall through the bed." and "22 details are thinner than 1 mm and may burn away." Furry edges and white fur turned into specks and grey patches.
- Subject filled solid black: 2 paths (the dog and the white background). The Laser SVG panel reported 1 piece, 0 holes and 297.05 mm of cut, with no warnings.
Another sample, a handwritten "Love, Grandma" card photographed on a granite counter, went further: 5,534 paths, most of them speckles from the stone, and the Laser SVG panel declined it with "This artwork is too detailed for Laser SVG. Download SVG instead."
The converter traced what was in the pixels each time. What changed the result was the photo we gave it. These counts are what the export panel reported for our sample files; we did not cut them on a machine.
Step 1: prep the photo before you convert
Pick the prep that matches your project. Both take a few minutes with a phone or a basic photo editor.
Pet or person: make a silhouette
- Lift the subject from the background. Many phones and photo apps can do this. On a supported iPhone, touch and hold the subject in Photos to lift it from the background. Any background remover works.
- Fill the subject solid black on white. In a photo editor, put the lifted subject on a white layer and set its brightness all the way down, or use a "fill" or "silhouette" effect if your app has one.
- Check the outline, not the details. Ears, paws and tail should read clearly as a shape. Fur texture, eyes and collar tags will disappear; a cut-out only needs the edge.
A silhouette works because the converter only has one edge to follow. If you want facial detail on the finished piece, engrave it separately from the photo and keep the cut as the silhouette outline.
Kid's drawing or handwritten note: crop to the paper
- Photograph it flat in even daylight, with no shadow from your phone across the page.
- Crop to the paper. Anything outside the sheet, such as the table edge, a granite counter or a placemat, will be traced as shapes.
- Keep the paper itself. The plain paper becomes one background color you can skip later; the ink becomes the shape you engrave or cut around.
Thick marker lines convert more predictably than pencil. For more on getting the scan right, the child's drawing to SVG guide and the handwriting and signature guide cover the photo stage in more depth.
Step 2: convert, then choose SVG or DXF
Upload the prepped image and look at the preview before anything else. You should see the subject and very little else. If background shapes are still there, go back to Step 1 rather than trying to fix them later.
Both formats work for a first cut-out. The choice depends on where the file is going next.
| SVG | DXF | |
|---|---|---|
| Opens in | xTool Studio and XCS, LightBurn, Glowforge, Inkscape | xTool Studio and XCS, LightBurn, CAD and CNC software, fabrication shops |
| Size | Depends on the importing app's SVG DPI setting | Unit is written into the file (mm by default in PerfectVector) |
| Background | PerfectVector's Laser SVG removes it by default | Kept as its own color layer, which you delete or skip |
| Best when | You stay in one laser app and want cut or engrave groups ready | You want the size recorded in mm or need a format most CAD tools read |
xTool Studio, XCS and LightBurn all import both SVG and DXF (xTool Studio's supported formats; xTool's XCS import FAQ; LightBurn's import formats). Glowforge's app takes SVG, with DXF listed for Premium members (Glowforge's upload guide). So you don't need DXF to use an xTool machine.
The difference is size. An SVG's size on the canvas depends on a DPI setting in the importing app. LightBurn's SVG options list 96 DPI as Inkscape's default and 72 DPI as Illustrator's (LightBurn settings). A DXF can carry its unit instead: xTool Studio and LightBurn both have an auto-detect units option that reads it when the file contains unit data (xTool's vector import guide; LightBurn settings). That makes DXF useful when you want the final size locked in millimeters, or when the same file has to work in LightBurn, a CAD program and a shop's cutting software.
In PerfectVector, a DXF exports as closed R12 outlines with the unit recorded in the file, millimeters by default. Each source color goes on its own layer, so the white background or paper arrives as a layer of its own: our silhouette DXF held exactly two closed outlines, the white background rectangle and the dog. Hide or delete that background layer in your laser software before you assign the cut. The Laser SVG export takes the other route and removes the background by default, leaving only the red cut line.
What the files look like in LightBurn
We opened four of our exported files in LightBurn to see what arrives. In our test in LightBurn 2.2 (the Pro trial on macOS) on 29 October 2026, with no laser connected, this is what we saw:
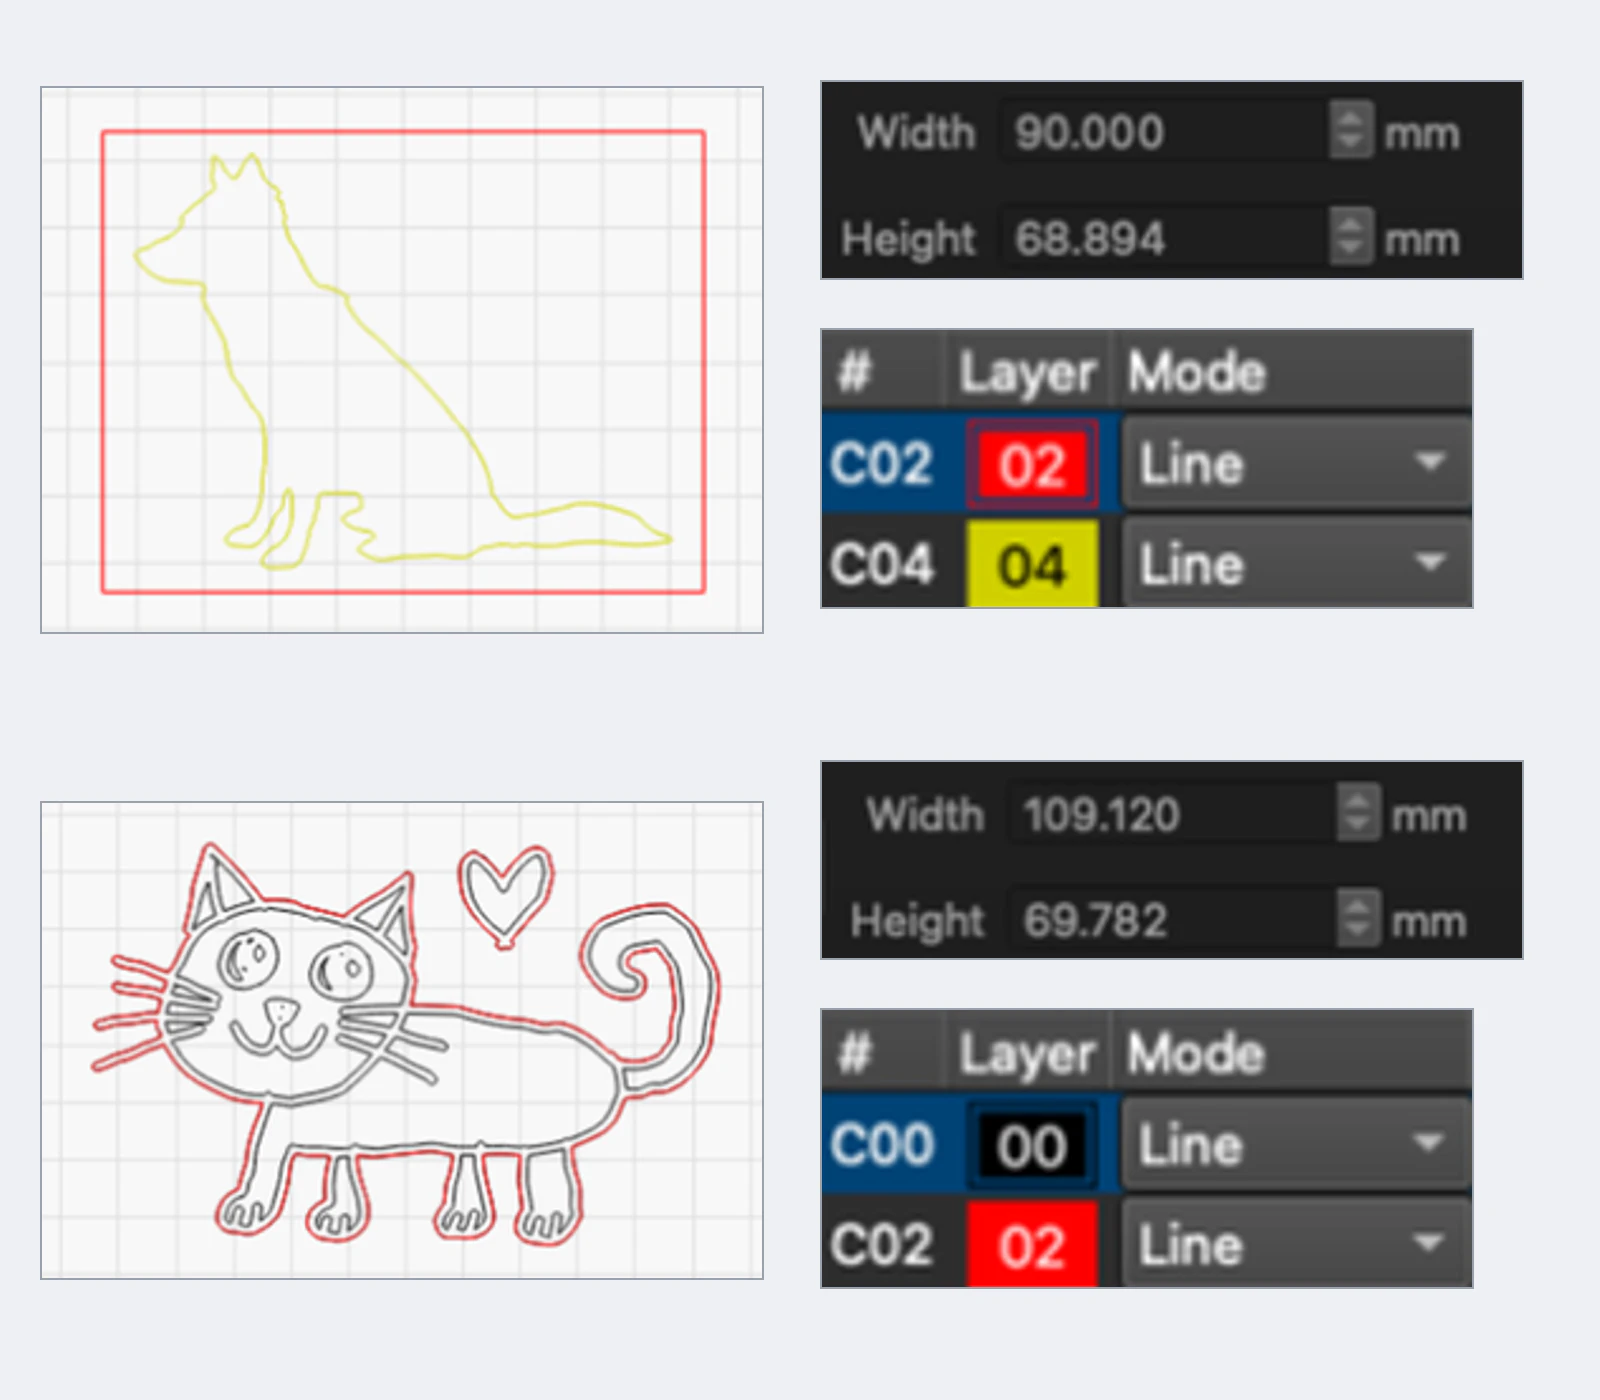
- Silhouette DXF: it opened at exactly 90.000 × 68.894 mm, the size we set in PerfectVector, with no rescaling. It arrived as two layers, the white background rectangle and the dog outline, and both outlines were closed. Delete or hide the background layer before cutting, or the laser cuts a rectangle around the dog.
- Laser SVG: the dog Cut out file arrived as a single cut layer holding only the dog outline. The cat Engrave + cut file arrived as two layers, one for the engrave lines and one for the cut. LightBurn set every imported layer to Line, so switch the engrave layer to Fill.
- DXF of a drawing: in the cat DXF, the ink arrived as the outlines of filled regions, with a line along both sides of every marker stroke. Set that layer to Fill to engrave the drawing. Left on Line, the laser would score each stroke twice.
One size detail is easy to miss. The width you set in PerfectVector is the width of the whole image, including the margin around the subject. Our dog image was 90 mm wide, but in the Laser SVG the dog shape itself measured 80.306 × 61.684 mm. Crop tight to the subject before converting, or check the shape's own size after import and scale it there.
We did not cut these files on a machine, and we did not test importing them into xTool Studio or XCS. For those apps, the format support above comes from xTool's documentation.
Step 3: check pieces, tiny bits and size before the first cut
Before you send the file to the laser, run these checks. PerfectVector's Laser SVG panel shows most of them as numbers; in another tool, zoom in and count.
- Piece count. A silhouette ornament should be 1 piece. If the count is in the dozens, the background or fur texture is still in the file.
- Tiny pieces. Small loose bits can fall through the bed or get lost. PerfectVector warns when pieces are smaller than 6 mm.
- Thin details. Whiskers, hair strands and thin pen lines may burn away when they are cut. The panel flags details thinner than 1 mm.
- Final width in mm. Set the size you will actually cut, then confirm it again after import, on the shape itself rather than the whole image. A small ornament can hold far less detail than a large plaque.
- Background layer. In a DXF, make sure the background or paper layer is hidden or deleted so you don't cut a rectangle around everything.
- Test on scrap. Power, speed, passes and kerf depend on your machine and material. Set them in your laser software and run a small test cut first.
A worked example: a kid's drawing ornament
The second project is the classic grandparent gift: a child's marker drawing, engraved, with the outline cut around it. We used a sample photo of a cat drawing on white paper, cropped to the sheet.
What we did and what the panel reported:
- Converted the cropped photo. It came back with 8 colors, even though the drawing is black marker on white paper.
- Used Simplify Colors to bring it down to 2, ink and paper. This is an editor step, available after the result is unlocked.
- Chose Laser SVG → Engrave + cut at 120 mm wide. The ink defaulted to Engrave and the paper to Plain.
- Read the result: 2 pieces (the cat and the heart), 0 holes, 635.39 mm of cut, no warnings.
- Opened the Laser SVG in LightBurn. It arrived as the two layers in the bottom panel of the figure above, engrave lines on C00 and the cut on C02, both set to Line. Switch C00 to Fill before engraving. The cat and heart measured 109.120 mm across, not 120 mm, because the paper margin counts toward the image width.
One thing worth zooming for: at high magnification we found tiny paper-colored pinholes inside the black eye and nose. They would engrave as unburned dots. That is the kind of detail the piece count can't tell you, so look at the preview up close before you cut.
What this looks like with PerfectVector
PerfectVector covers the step between the prepped photo and your laser software. Upload the image to the image to DXF converter, check the preview, then export either a DXF (closed outlines, size in mm, one layer per color) or a Laser SVG with Cut out or Engrave + cut, which shows piece count, mm of cut and the small-piece warnings before you download. It does not choose laser power or speed, and it does not replace the test cut.
When the built-in trace is enough
xTool's software and LightBurn both have their own trace tools, and for simple, high-contrast art they are often all you need. If your input is already a clean black silhouette, a built-in trace will usually give you a usable outline without leaving the app. LightBurn's Trace Image separates dark from light with a cutoff and threshold, and xTool Studio's Trace follows the edges of color blocks in Auto-trace mode, so a black-on-white silhouette is an easy input for both. LightBurn's own documentation notes that fine details such as sharp corners and small text may not convert well.
The prep step matters either way. A raw phone photo with a wall, a floor and fur gives any tracer the same problem, because the background and texture are really in the pixels. Lift the subject or crop to the paper first, then choose whichever converter gives you the outline you can check most easily.
For more on the trace-or-import decision in XCS, see image to SVG for xTool. For LightBurn, can LightBurn vectorize an image walks through its trace settings.
FAQ
Can I laser cut a photo directly? No. A laser cuts along vector outlines, so a JPG or PNG photo can only be engraved as a bitmap. To cut a shape out, convert the subject into closed outlines in an SVG or DXF file, ideally after removing the background.
Should I use SVG or DXF for an xTool laser? Either works for a first project, because xTool's software imports SVG. Use DXF when you want the size recorded in millimeters or the same file needs to open in LightBurn, CAD or a shop's software. Delete the background layer in a DXF before assigning the cut.
Why did my photo turn into hundreds of tiny pieces? The background and texture were traced along with the subject. In our test, a raw dog photo produced 907 paths, while the same dog as a filled silhouette produced 1 piece. Lift the subject or crop to the paper before converting.
What size should my first cut-out be? Pick the real size first, then check the details at that size. Our sample silhouette was 90 mm wide and the drawing ornament 120 mm. At small sizes, thin lines and small pieces are the first to cause trouble.
Will the file import at the right size in LightBurn? In our test in LightBurn 2.2 on 29 October 2026, our DXF opened at exactly the size set at export, 90.000 × 68.894 mm, with no rescaling. That size covers the whole image, margin included: the dog outline inside the file spans about 80.3 × 61.6 mm. Crop tight to the subject or check the shape's size after import.
What does it cost to try this on my own photo? The preview is free, so you can check the outline and how many colors it found first. The piece count and mm of cut appear in the Laser SVG panel once the result is unlocked. One credit unlocks a result, and downloading that same result as SVG, DXF or Laser SVG costs nothing extra.
Does the converter set laser power and speed? No. The file supplies geometry only. Set cut and engrave operations, power, speed and kerf in your laser software, and run a test on scrap material first.
Sources
- xTool Support — File import failures in Studio — The file formats xTool Studio imports, including DXF and SVG.
- xTool Support — FAQs on Importing Images — The file formats XCS imports, including SVG and DXF.
- xTool Support — Import and Parse Vectors — DXF auto-detect units and the SVG DPI setting in xTool Studio.
- LightBurn Documentation — File Management — SVG and DXF in LightBurn's list of import formats.
- LightBurn Documentation — Settings — SVG import DPI options and DXF unit auto-detection.
- LightBurn Documentation — Trace Image — How LightBurn's built-in trace works and its note on fine details.
- Glowforge Support — Upload your own design file — SVG or PDF for cutting and engraving, JPG or PNG for engraving only.
- Apple Support — Lift a subject from the photo background — The phone-based subject-lifting step used in prep.
Have a photo you want to cut out? Upload it to the image to DXF converter, check that the preview shows only the subject, then take the file to your laser software for a test cut.
More from the blog
Best Image to SVG Converter for Laser Cutting: 8 Picks
Our pick for laser cut files from logos and line art is PerfectVector's Laser SVG. See when LightBurn, Inkscape, Vector Magic or a built-in trace fits better.
Convert an Image to SVG for Clean Laser Cutting
Laser cutters follow paths, not pixels. Here's how to turn a PNG or JPG into a clean, closed-path SVG your machine can cut, and when to engrave instead.