Can LightBurn Vectorize an Image? Yes, With Trace Image
LightBurn can turn a bitmap into vectors with Trace Image. Learn its key controls, when to keep raster engraving, and what to check before a test cut.
On this page
- How to vectorize an image in LightBurn
- What each Trace Image control does
- Cutoff and Threshold: choose which brightness values count
- Ignore Less Than: remove small specks
- Optimize: reduce node count
- Smoothness: lines or curves
- Trace or engrave the raster? Decide first
- The thin-line trap: an outline is not a centerline
- Check the trace before running the laser
- LightBurn Trace Image vs importing an SVG
- FAQ
- Sources
Yes. LightBurn can vectorize an imported bitmap with Tools → Trace Image, the right-click menu, or Alt/Option + T. The result is a group of editable vector shapes you can ungroup, inspect, and assign to laser operations. Use it for logos, silhouettes, handwriting, and other artwork with clear edges. Keep photographs as raster images when the goal is tonal engraving rather than a cut line.
The quick version
- LightBurn can vectorize images with its built-in Trace Image tool.
- Cutoff and Threshold choose the brightness range; Ignore Less Than drops tiny regions; Optimize reduces nodes; Smoothness changes lines into curves.
- Trace Image creates an approximation of the bitmap. Clear, high-contrast edges produce a better starting point than blurry or textured art.
- Do not trace every image. LightBurn can engrave raster images directly, and that is usually the better route for photographs and shaded artwork.
- For cutting or scoring, inspect the resulting contours, assign the correct Line layer, preview the job, and test on scrap.
How to vectorize an image in LightBurn
The basic workflow is straightforward:
- Import and select the bitmap in the LightBurn workspace.
- Choose Tools → Trace Image, right-click and choose Trace Image, or press
Alt/Option+T. - Adjust the preview until the purple vector outlines follow the intended shapes.
- Click OK. LightBurn adds the vectors as a group.
- Move or delete the original image, ungroup the trace when individual editing is needed, and assign the vectors to the right operation layer.
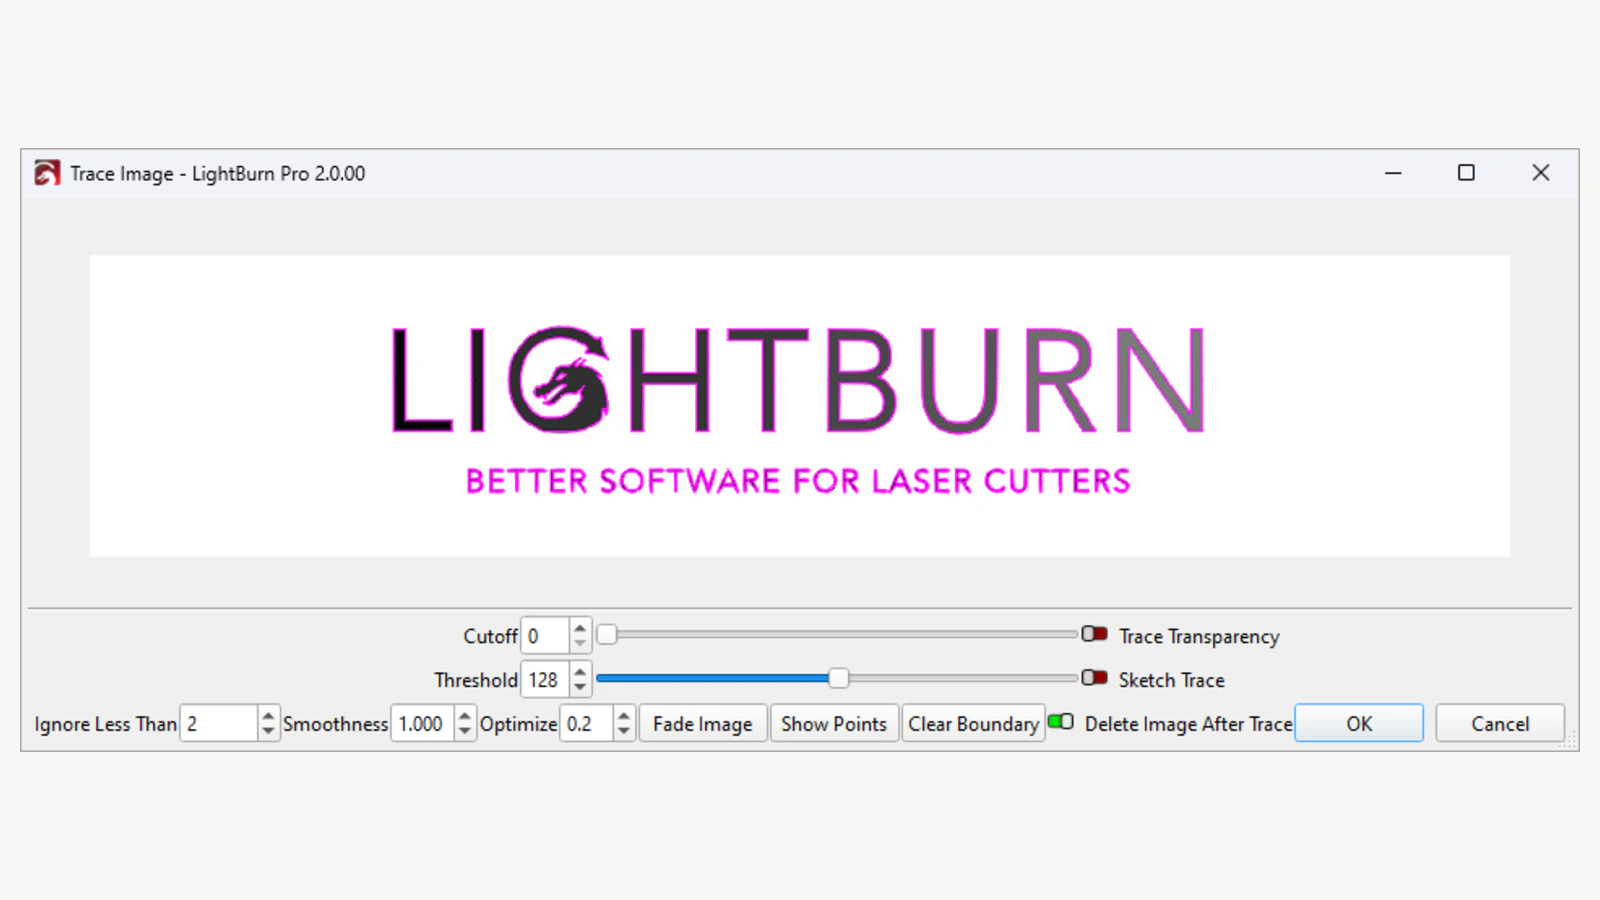
If the new vectors seem to vanish, the original bitmap may simply be covering them. Move the image aside or send it behind the trace. Turning on Delete Image After trace avoids that overlap, but keeping the source temporarily makes comparison easier.
What each Trace Image control does
The controls are related, so tune them in an order that makes the preview easier to read.
Cutoff and Threshold: choose which brightness values count
LightBurn outlines pixels inside a brightness range. Its documented default is 0 to 128: dark values from 0 through 128 are included, while lighter values from 129 through 255 are excluded. Increase Threshold to include lighter pixels. Increase Cutoff to remove darker pixels from the selected range.
This is not a color-layer reconstruction. The trace is driven by brightness and boundaries. If different colors need different cut, score, or engrave operations, isolate or edit the required shapes and assign them deliberately after tracing.
Ignore Less Than: remove small specks
Increase Ignore Less Than to skip regions smaller than the specified pixel area. It is useful for dust, JPEG noise, and isolated dots. Raise it carefully: a value that removes dirt can also erase punctuation, narrow bridges, or small internal details.
Optimize: reduce node count
Optimize merges similar lines and curves to reduce nodes. LightBurn documents 0.2 as a useful default balance; 0 performs no optimization, while a high value can move the contour away from the source. Turn on Show Points and judge the curve, not just the number. A trace with fewer nodes is only better if it still preserves the intended corners, holes, and silhouette.
Smoothness: lines or curves
Smoothness converts more traced segments into curves as the value rises. At 0.0, the result uses lines; near 1.33, it uses curves heavily. Too little can preserve pixel stair-steps. Too much can round sharp corners and soften lettering. The middle is a starting point, not a universal answer.
Two specialized options help with particular sources. Trace Transparency follows the alpha boundary of a transparent image. Sketch Trace uses local contrast, which LightBurn recommends for photographed pages with uneven lighting, such as handwriting, sketches, and documents.
Trace or engrave the raster? Decide first
This choice matters more than any slider. LightBurn's own images-versus-vectors guide separates the jobs clearly:
| Intended result | Keep the bitmap | Use Trace Image |
|---|---|---|
| Photograph with shading | Yes; use an appropriate Image Mode | Usually no; tracing posterizes tonal detail into contours |
| Logo or silhouette to cut | No bitmap cut path exists | Yes; trace, clean, and use Line Mode |
| Flat shape to engrave | Either, depending on the desired texture | Trace when a clean closed Fill shape is useful |
| Handwriting to score or engrave as paths | Not when paths are required | Try Sketch Trace, then inspect doubled outlines |
| Small image that must scale larger | Pixels will become visible | Trace can provide scalable contours if the source edge is clear enough |
Raster images in LightBurn use Image Mode and are scanned across the surface. Vector paths in Line Mode can cut, score, or mark a perimeter. Closed vector shapes in Fill or Offset Fill can engrave an area. Vectorizing does not decide the operation for you; the layer mode, speed, power, material, and machine settings still do that.
The thin-line trap: an outline is not a centerline
Trace Image follows the boundaries of visible regions. A thick black line therefore tends to produce a contour on each side. If you put those paths in Line Mode, the laser follows both edges, which looks like one line being cut twice.
For an outline logo, both boundaries may be exactly what you want. For a pen sketch, score line, or single-stroke engraving, they may be wrong. LightBurn's Sketch Trace can handle uneven lighting, but it does not promise a single geometric centerline for every mark. Use a genuine centerline trace or redraw one path when the beam should make one pass. The broader double-line diagnosis shows how to tell paired contours from duplicated objects.
Check the trace before running the laser
After clicking OK, ungroup the vectors and inspect the job at high zoom. Then use LightBurn's Preview before touching material.
- Silhouette: did the outside boundary move, lose a corner, or swallow a narrow gap?
- Nodes: turn on node editing and look for dense clusters along simple curves. If necessary, retrace with a modest Optimize change or use Optimize Selected Shapes.
- Closed shapes: Fill and Offset Fill need closed contours. A gap can also stop a cut piece from releasing.
- Double contours: thin raster strokes commonly produce two outlines.
- Stray regions: delete background boxes, dust, and fragments that survived Ignore Less Than.
- Scale and operation: confirm the physical dimensions and make sure cut paths are on Line layers while filled engraving shapes use an appropriate Fill mode.
- Cut order and safety: preview the toolpath, follow your machine manufacturer's safety guidance, and test on scrap of the same material.
Tracing is upstream geometry work. It does not choose safe speed, power, focus, ventilation, or material settings. Those are machine- and material-specific decisions.
If the trace looks right but the outside contour runs before its holes, follow the LightBurn inner-shapes cut-order checks to inspect closure, groups, layers and the active plan before retracing.
LightBurn Trace Image vs importing an SVG
Trace inside LightBurn when the source is simple, the brightness controls isolate it cleanly, and you want to stay in the laser workspace. This keeps the route short and gives you immediate access to layer assignment, node editing, and the job preview.
Prepare the vector elsewhere when you need multicolor region separation, want to compare a different tracing approach, or have many shapes to simplify before assigning laser operations. The image-to-SVG workflow for laser cutting covers source preparation, path cleanup, import, and the test cut. LightBurn exports SVG as well as importing it, so an external SVG is not a one-way handoff; you can still edit and export the project geometry.
If the destination is LaserGRBL, follow its Vectorization Tool guide for the threshold, noise, and contour checks in that workspace. Keep the same distinction between a filled area and the two outlines of a thick stroke when reviewing the result.
PerfectVector's laser workflow is one alternative for the conversion step. It turns a supported raster into vector shapes, lets you inspect the preview and consolidate color regions, and exports an SVG that you can bring into LightBurn. It does not infer a reliable centerline from every thick raster stroke or configure your laser. Compare its result with LightBurn's trace on the same source, then keep the geometry with fewer unwanted fragments, cleaner curves, and less repair work.
FAQ
Can LightBurn convert a PNG or JPG to vector? Yes. Import and select the bitmap, then choose Tools → Trace Image. Tune the preview and click OK to create a grouped set of vector shapes. Ungroup the result to edit individual paths.
Can LightBurn export the traced result as SVG? Yes. LightBurn's Export command supports SVG, AI, and DXF for vector or mixed graphics. Select the trace if you only want that artwork exported; otherwise the project contents are exported according to LightBurn's documented selection behavior.
Should I vectorize a photo before laser engraving? Usually not. LightBurn can engrave a photograph directly as a raster image with Image Mode processing. Trace a photo only when you deliberately want a simplified, posterized vector interpretation rather than tonal engraving.
Why does LightBurn trace both sides of a line? Trace Image outlines the visible region, so a thick raster stroke has two boundaries. Use both for an outlined shape, or create one centerline when the intended laser operation should make a single pass.
How do I get fewer nodes in a LightBurn trace? Increase Optimize modestly while Show Points is enabled, and balance it against visible accuracy. You can also ungroup the trace and run Optimize Selected Shapes, but excessive smoothing can round corners and remove small details.
Sources
- LightBurn — Trace Image — current workflow, controls, grouped output, editing, and tracing limitations.
- LightBurn — Images vs. Vectors — when raster engraving and vector paths fit different laser operations.
- LightBurn — Layer Modes — Line, Fill, Offset Fill, and Image operation behavior.
- LightBurn — Optimize Selected Shapes — post-trace node reduction, smoothing, and tolerance tradeoffs.
- LightBurn — File Management — SVG, AI, and DXF export behavior.
- PerfectVector — SVG for Laser Cutting — first-party description of the alternative conversion workflow used in the comparison.
Need a second trace to compare before you burn material? Create a laser-ready SVG and inspect its paths, then import the cleaner result into LightBurn and test it on scrap.
More from the blog
Dashed SVG Lines for Laser Cutting: Check the Paths
Diagnose dashed SVG lines that become solid in a laser preview. Compare stroke paint, separate centerlines, and outlined dashes before preparing your own file.
Image to SVG for WeCreat MakeIt: Import Clean Paths
Prepare and import a clean SVG into WeCreat MakeIt. Fix scale, layers, colors, holes, and duplicate paths before assigning cut or engraving operations.