Image to SVG for WeCreat MakeIt: Import Clean Paths
Prepare and import a clean SVG into WeCreat MakeIt. Fix scale, layers, colors, holes, and duplicate paths before assigning cut or engraving operations.
On this page
- Choose SVG for geometry, not for every image
- Prepare paths around the operation plan
- Convert text and effects into portable geometry
- Preserve holes with compound paths
- Set a known physical size before import
- A dependable WeCreat MakeIt SVG workflow
- 1. Start with suitable source art
- 2. Reconstruct the visible shapes
- 3. Organize by operation
- 4. Export a delivery SVG
- 5. Upload and verify
- 6. Assign processing modes
- 7. Frame and test
- Troubleshoot the import by symptom
- FAQ
- Sources
WeCreat MakeIt can import SVG files. WeCreat's official import guide lists SVG and DXF alongside PNG, JPG, JPEG, GIF, WebP, and BMP, and directs users to upload from the left toolbar. The useful distinction is what happens after import: SVG and DXF can carry paths, while the raster formats carry pixels. (WeCreat: Importing Images)
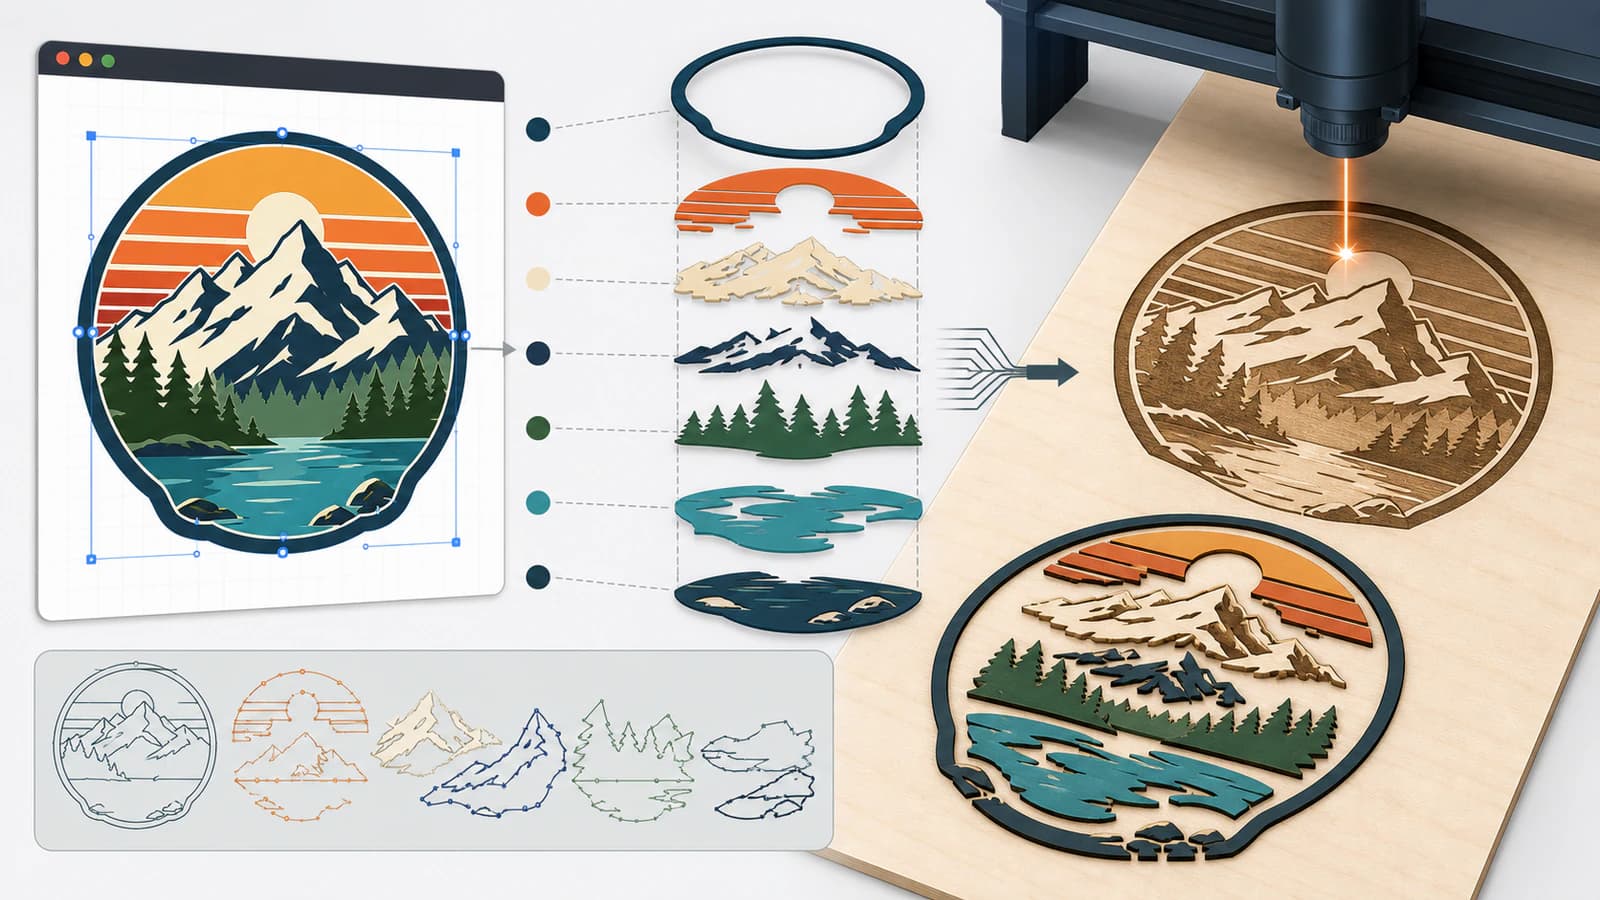
For a reliable laser job, prepare the SVG as simple, visible geometry at the intended size. Separate the shapes that need different operations, remove duplicate paths, outline important text, and inspect holes before assigning Engrave, Fill Engrave, or Cut in MakeIt.
The clean import checklist
- Export real paths, not a PNG embedded inside an SVG wrapper.
- Keep cut contours, line engraving, and fill engraving in separate groups.
- Convert important text to outlines if the receiving system may not have the font.
- Crop empty canvas space and record one known physical dimension.
- Treat colors as organization, then explicitly assign the operation in MakeIt.
- Frame and test the job on suitable scrap before production.
Choose SVG for geometry, not for every image
WeCreat's current help center describes bitmaps as pixels and vectors as mathematical paths. Its examples put photos in the bitmap category and logos, icons, and illustrations in the vector category. It also notes that vectors stay sharp when scaled, while bitmaps can pixelate. (WeCreat: Differences Between Bitmap Mode and Vector Mode)
That makes SVG a good starting point for:
- a logo or badge with flat colors;
- a sign outline or ornament silhouette;
- line art intended for scoring;
- separate shapes that need cut and engraving operations;
- artwork that must be resized without soft pixel edges.
A photograph, wood-grain texture, or soft shaded portrait is usually better treated as a bitmap engraving. Converting every tone into vector shapes can create a heavy file without improving the physical result. Decide the laser operation first, then choose the file structure.
Prepare paths around the operation plan
Before import, write a short operation list. A typical layered sign might need an outer contour cut, interior line engraving, and one filled engraved region. Those are three pieces of job logic, even if the original artwork uses six decorative colors.
WeCreat documents layers by processing mode and says separate layers can carry separate speed, power, and other parameters. It also lists Engrave, Fill Engrave, and Cut as distinct modes. (WeCreat: Layer Management; Processing Mode)
Use source colors to make the geometry easy to identify, but do not assume red always means cut or blue always means fill in every application. In MakeIt, inspect the selected objects and assign the processing mode intentionally.
Convert text and effects into portable geometry
An SVG may rely on a font, clipping mask, filter, blend mode, pattern, or linked image that another application interprets differently. Make a delivery copy instead of flattening your editable master.
For the delivery copy:
- Convert essential text to outlines when exact letter shapes matter.
- Expand strokes if their visible thickness must become a filled shape.
- Simplify clipping masks and appearance effects into ordinary paths where practical.
- Remove hidden objects outside the artboard.
- Keep only the groups needed for the laser job.
Outlined text is no longer editable as text, so retain the original design file. Expansion also changes a single centerline stroke into a closed region with two boundaries. That can be correct for a filled engraving and wrong for single-line scoring. The single-line SVG guide explains the difference.
Preserve holes with compound paths
Letters such as A, B, D, O, P, and R contain counters. Donut shapes, frames, and many badges also depend on interior holes. If an exporter sends the outer and inner contours as unrelated filled objects, the hole may appear filled or behave unpredictably after import.
Use a compound path or the appropriate Boolean subtraction in your vector editor, then reopen the exported SVG. The visual test is simple: the background should remain visible through every intended hole. The structural test is selecting the object and confirming that its contours behave as one shape.
Be careful with overlapping copies. A duplicate cut contour may look identical on screen while instructing the laser to repeat the same path. Use outline view in the source editor, click suspicious edges, and delete accidental duplicates before export. The double-lines troubleshooting guide covers the most common causes.
Set a known physical size before import
WeCreat's import guide says MakeIt can prompt to scale content when an uploaded image is larger than the canvas. A fit-to-canvas action changes size by design. It may be convenient for a decorative engraving, but it is not a substitute for measured dimensions on a part that must fit something else.
Prepare the SVG with:
- a tightly cropped artboard or
viewBox; - explicit width and height where your export workflow supports them;
- one recorded reference dimension, such as a 100 mm outside diameter;
- no distant hidden object that enlarges the bounds.
After import, measure the known feature in MakeIt. If the scale is wrong, correct it before you duplicate, align, or assign final settings. The broader laser-cutting SVG workflow includes a preflight for scale and operation mapping.
A dependable WeCreat MakeIt SVG workflow
1. Start with suitable source art
Use a high-contrast image for conversion. Remove paper texture, shadows, and compression artifacts that you do not want traced. If the source already exists as clean vector artwork, skip raster conversion.
2. Reconstruct the visible shapes
Convert the raster into paths, then compare silhouette, negative spaces, and lettering with the source. PerfectVector's SVG tool for laser cutting can reconstruct a raster source before import. Inspect the result rather than treating conversion as automatic job setup.
3. Organize by operation
Create separate groups for line engraving, fill engraving, and cutting. Merge decorative colors when they perform the same operation. Split objects only when they genuinely need different handling.
4. Export a delivery SVG
Outline required text, resolve important holes, remove hidden rasters and duplicates, and retain the editable master separately.
5. Upload and verify
Use MakeIt's upload control, respond deliberately to any scale-to-fit prompt, and check the physical dimensions. Confirm each group remained separate and selectable.
6. Assign processing modes
Map objects to Engrave, Fill Engrave, or Cut according to the job. Set machine values from WeCreat guidance and material tests for your exact device and material.
7. Frame and test
Use the application's positioning and framing workflow, observe all machine safety requirements, and run a small test on appropriate scrap.
Troubleshoot the import by symptom
| Symptom | Likely cause | What to check |
|---|---|---|
| SVG looks like one flat image | Embedded raster or unsupported appearance effect | Inspect for image elements and export ordinary paths |
| A hole is filled | Inner and outer contours are not behaving as one shape | Rebuild the compound path or Boolean subtraction |
| Parts move independently | Groups or compound structure were lost | Regroup by intended operation in the source or MakeIt |
| Design is too large or small | Canvas-fit scaling, loose bounds, or unit interpretation | Crop bounds and verify a known measurement |
| Laser repeats an edge | Duplicate path or overlapping shapes | Use outline view and remove repeated geometry |
| Thin line becomes two cuts | An outlined stroke was expanded or traced by its borders | Use a true centerline for one travel path |
| Colors do not match the job | Appearance colors were mistaken for operation assignments | Select each group and assign the MakeIt mode explicitly |
FAQ
Can WeCreat MakeIt import SVG files? Yes. WeCreat's official import documentation lists SVG among MakeIt's supported formats and says to upload it from the toolbar.
Should I use SVG or PNG in WeCreat MakeIt? Use SVG for path-based logos, icons, line art, and cut geometry. Use PNG or another bitmap format for photographs and tone-based engraving when editable paths are not the goal.
Why does my WeCreat SVG import at the wrong size? The file may have loose bounds, missing physical dimensions, or may have been scaled to fit the canvas. Crop the artboard, keep a known reference measurement, and verify it immediately after import.
Why are the colors separate after SVG import? SVG colors often belong to separate objects. That separation can be useful when assigning different operations. Group or merge only the shapes that should move and process together.
Do SVG colors automatically set cut and engraving modes? Do not rely on color alone. WeCreat documents layers and processing modes as controls for Engrave, Fill Engrave, and Cut. Select the intended geometry and verify the assigned mode and parameters.
Sources
- WeCreat: Importing Images — Official supported formats, upload location, and canvas-fit prompt.
- WeCreat: Differences Between Bitmap Mode and Vector Mode — Current official distinction between pixels and path-based artwork.
- WeCreat: Layer Management — Official relationship between layers, processing modes, and separate parameters.
- WeCreat: Processing Mode — Official definitions of Engrave, Fill Engrave, and Cut.
Starting from a raster logo or drawing? Build a clean SVG for laser cutting, then verify paths, scale, grouping, and processing modes in WeCreat MakeIt.
More from the blog
Dashed SVG Lines for Laser Cutting: Check the Paths
Diagnose dashed SVG lines that become solid in a laser preview. Compare stroke paint, separate centerlines, and outlined dashes before preparing your own file.
LightBurn Cuts Outside First: Check Groups and Layers
Diagnose outside-first LightBurn cuts with a simple SVG, closed-path checks, group and layer review, and Preview verification before choosing the job order.